User Guides

Vispoint.Cloud is a cloud-based platform for the signage players and content management.

Quick Start Guide

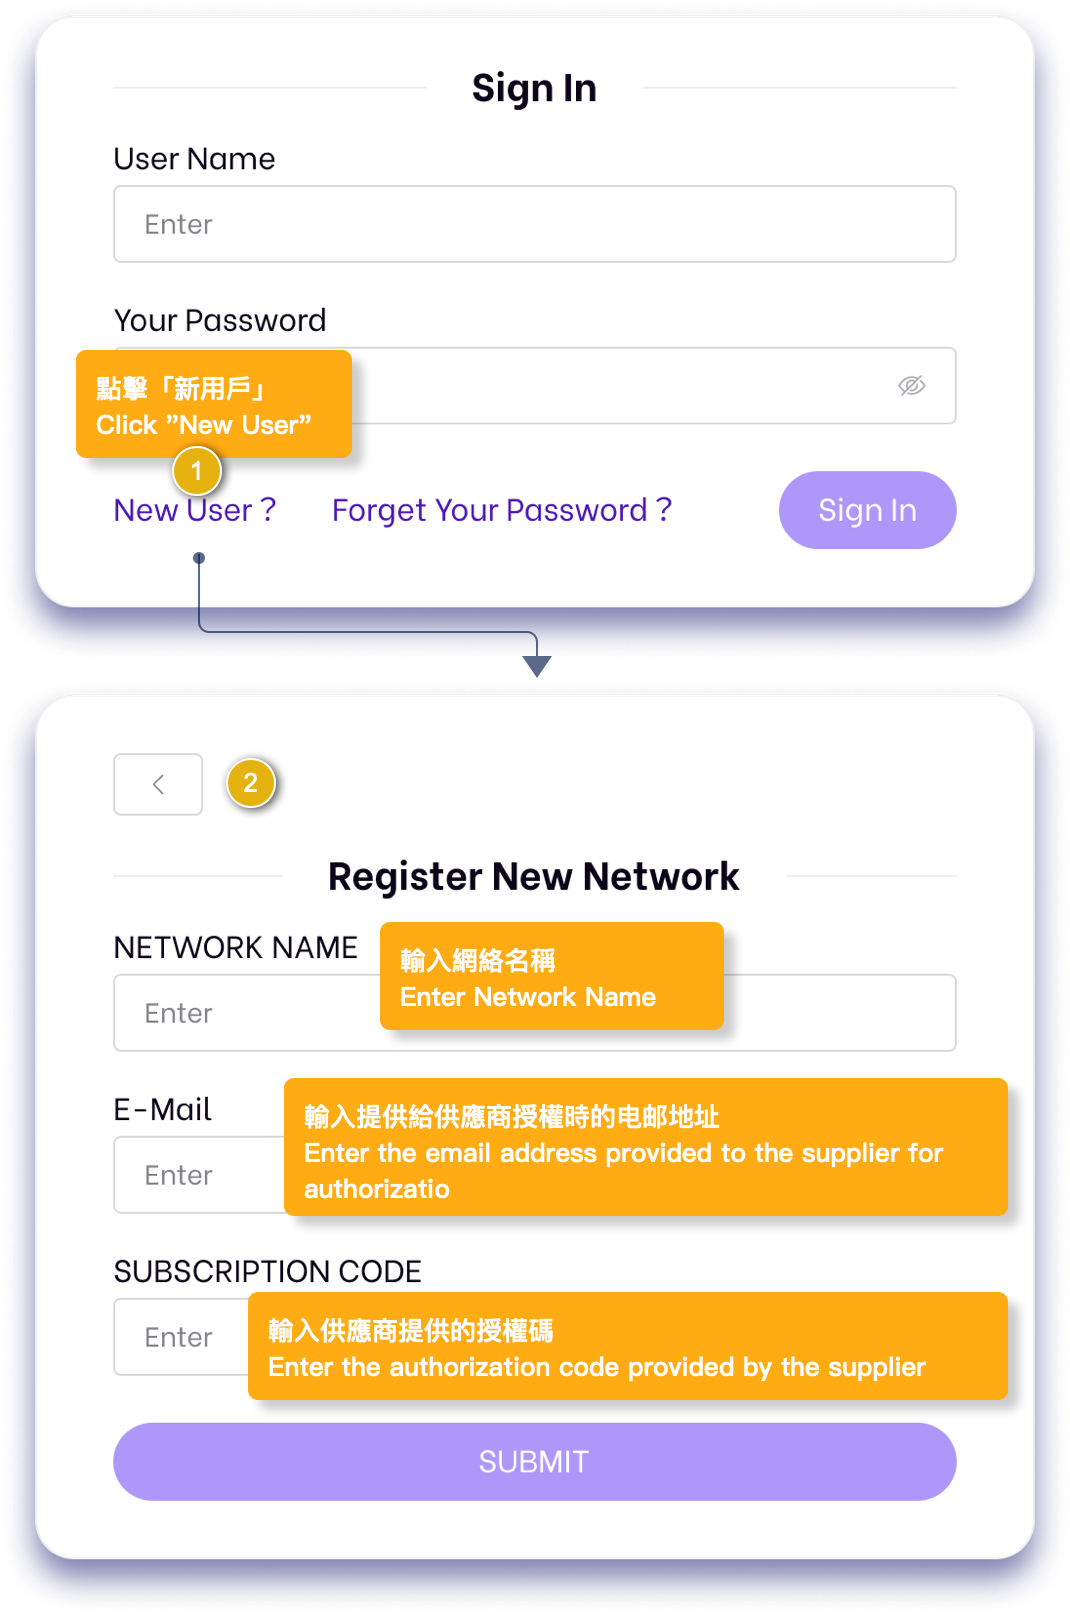
  • New users must obtain an official authorisation code to complete “New User Registration”.

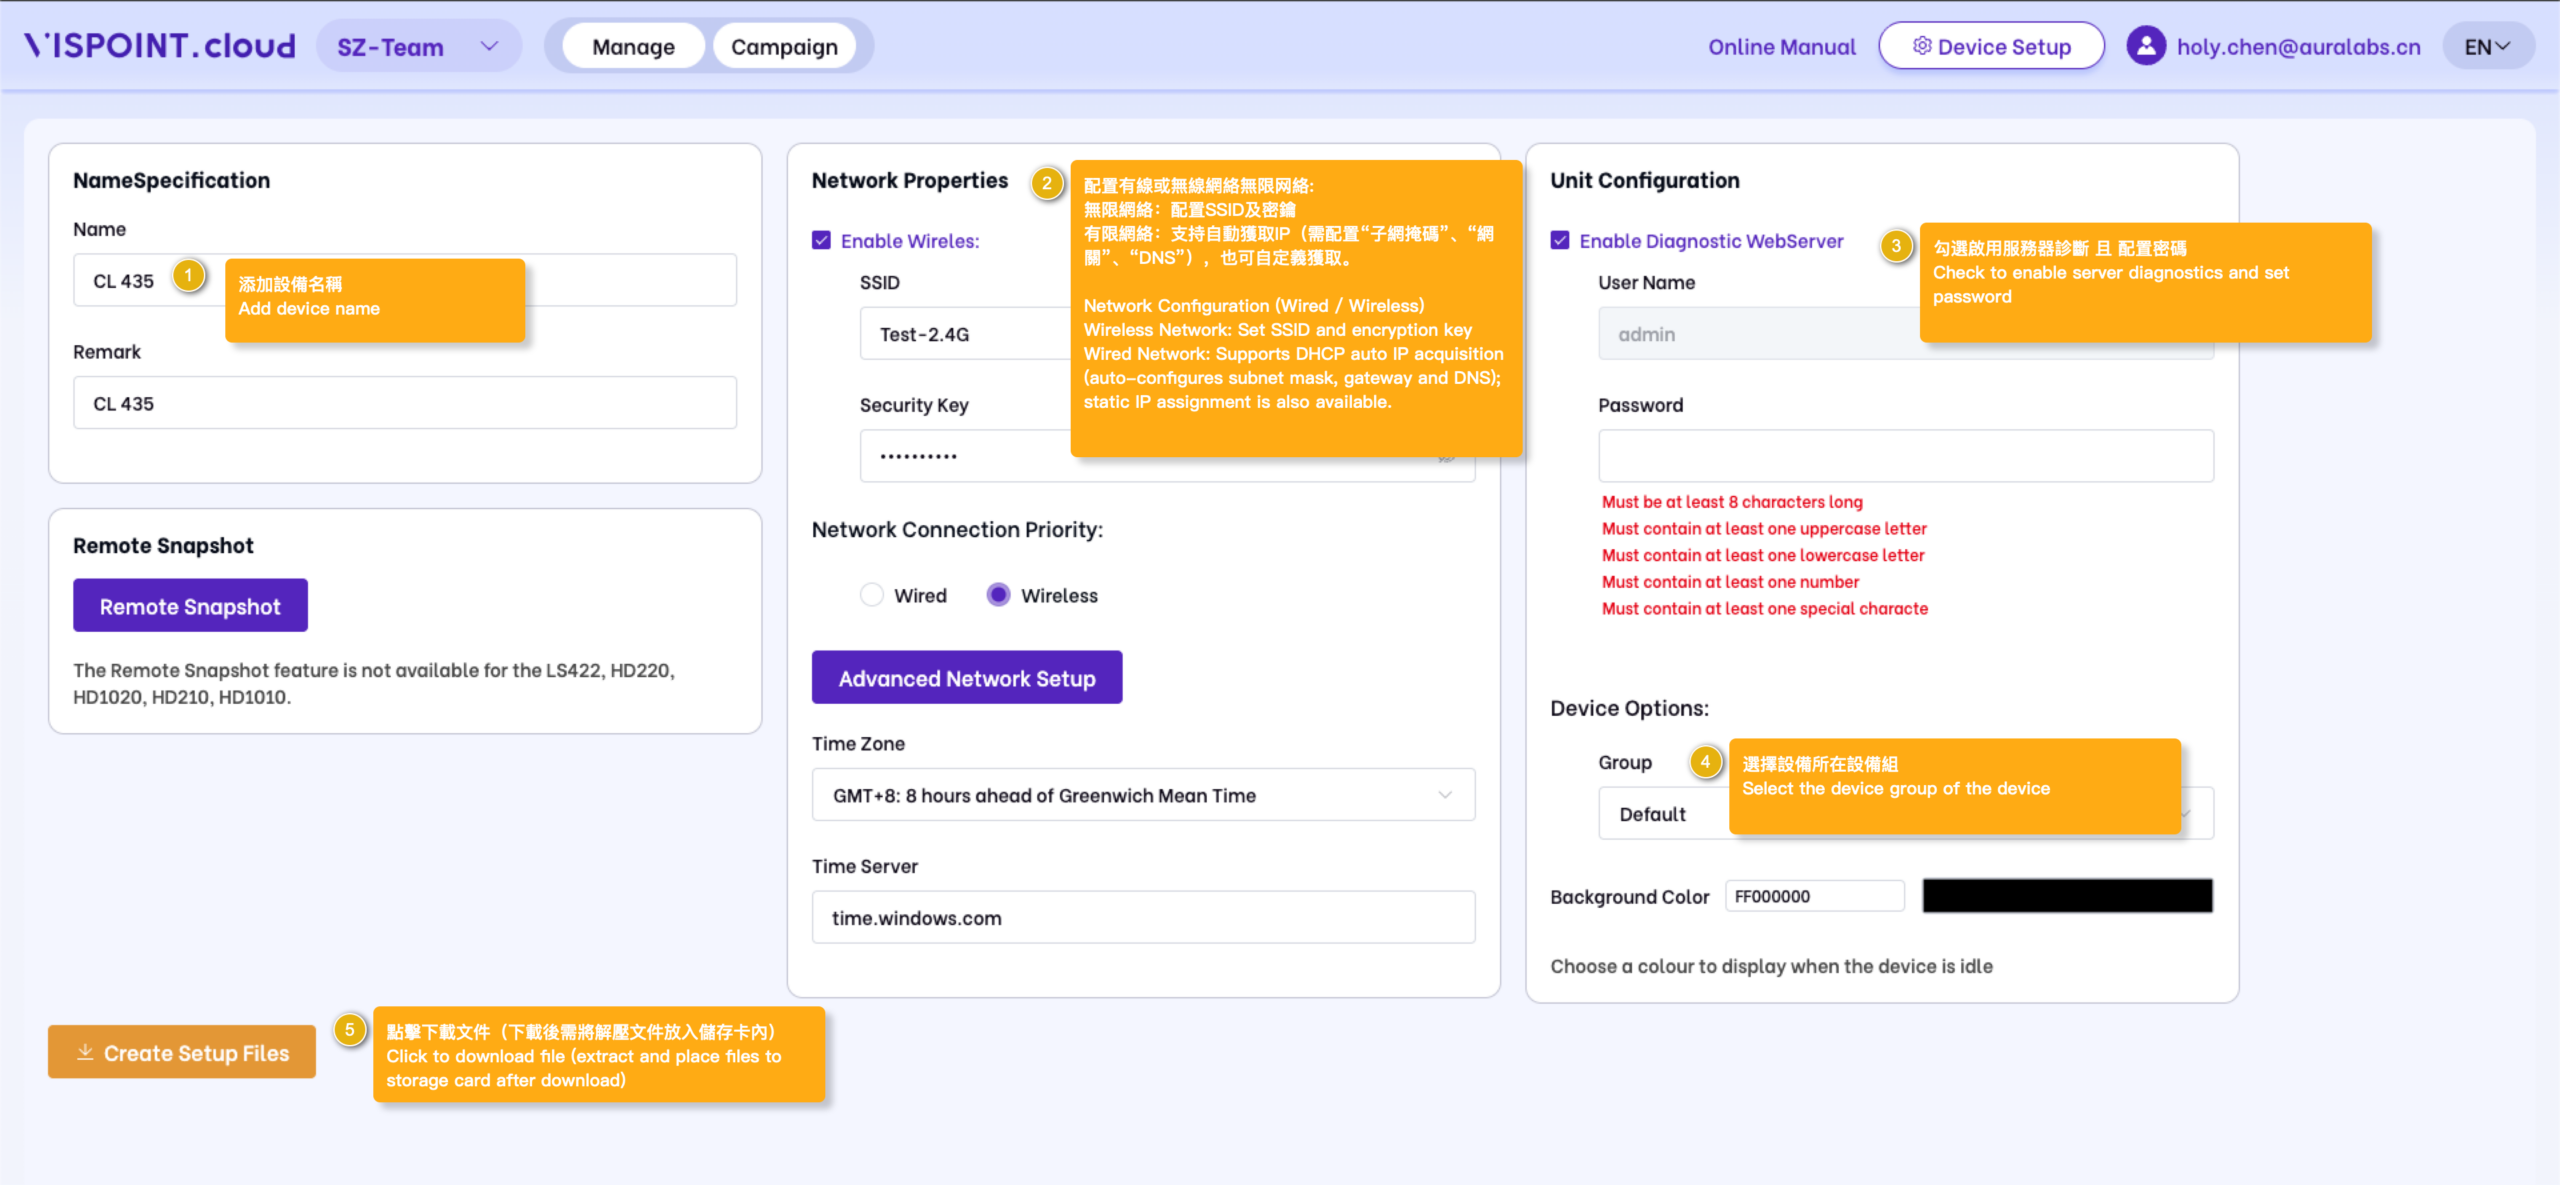
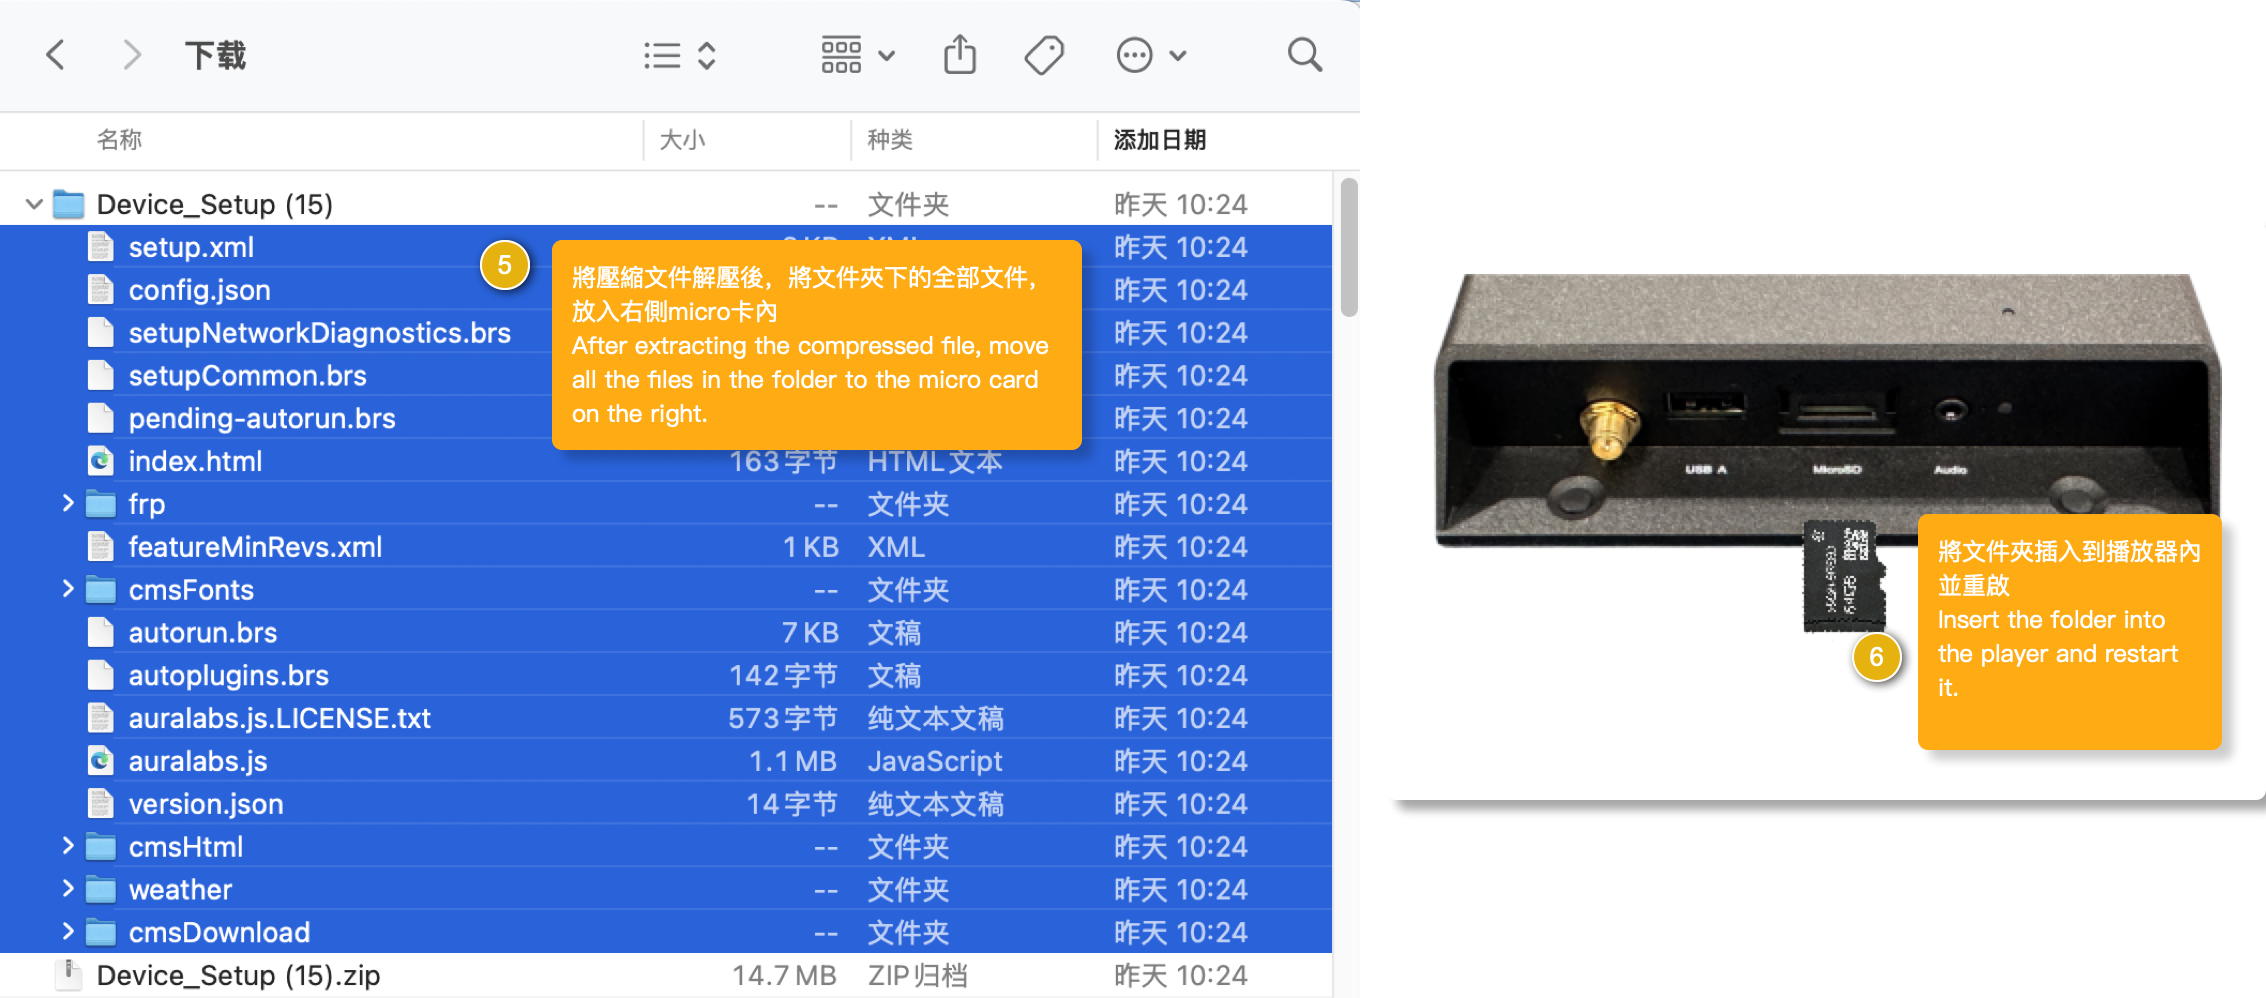
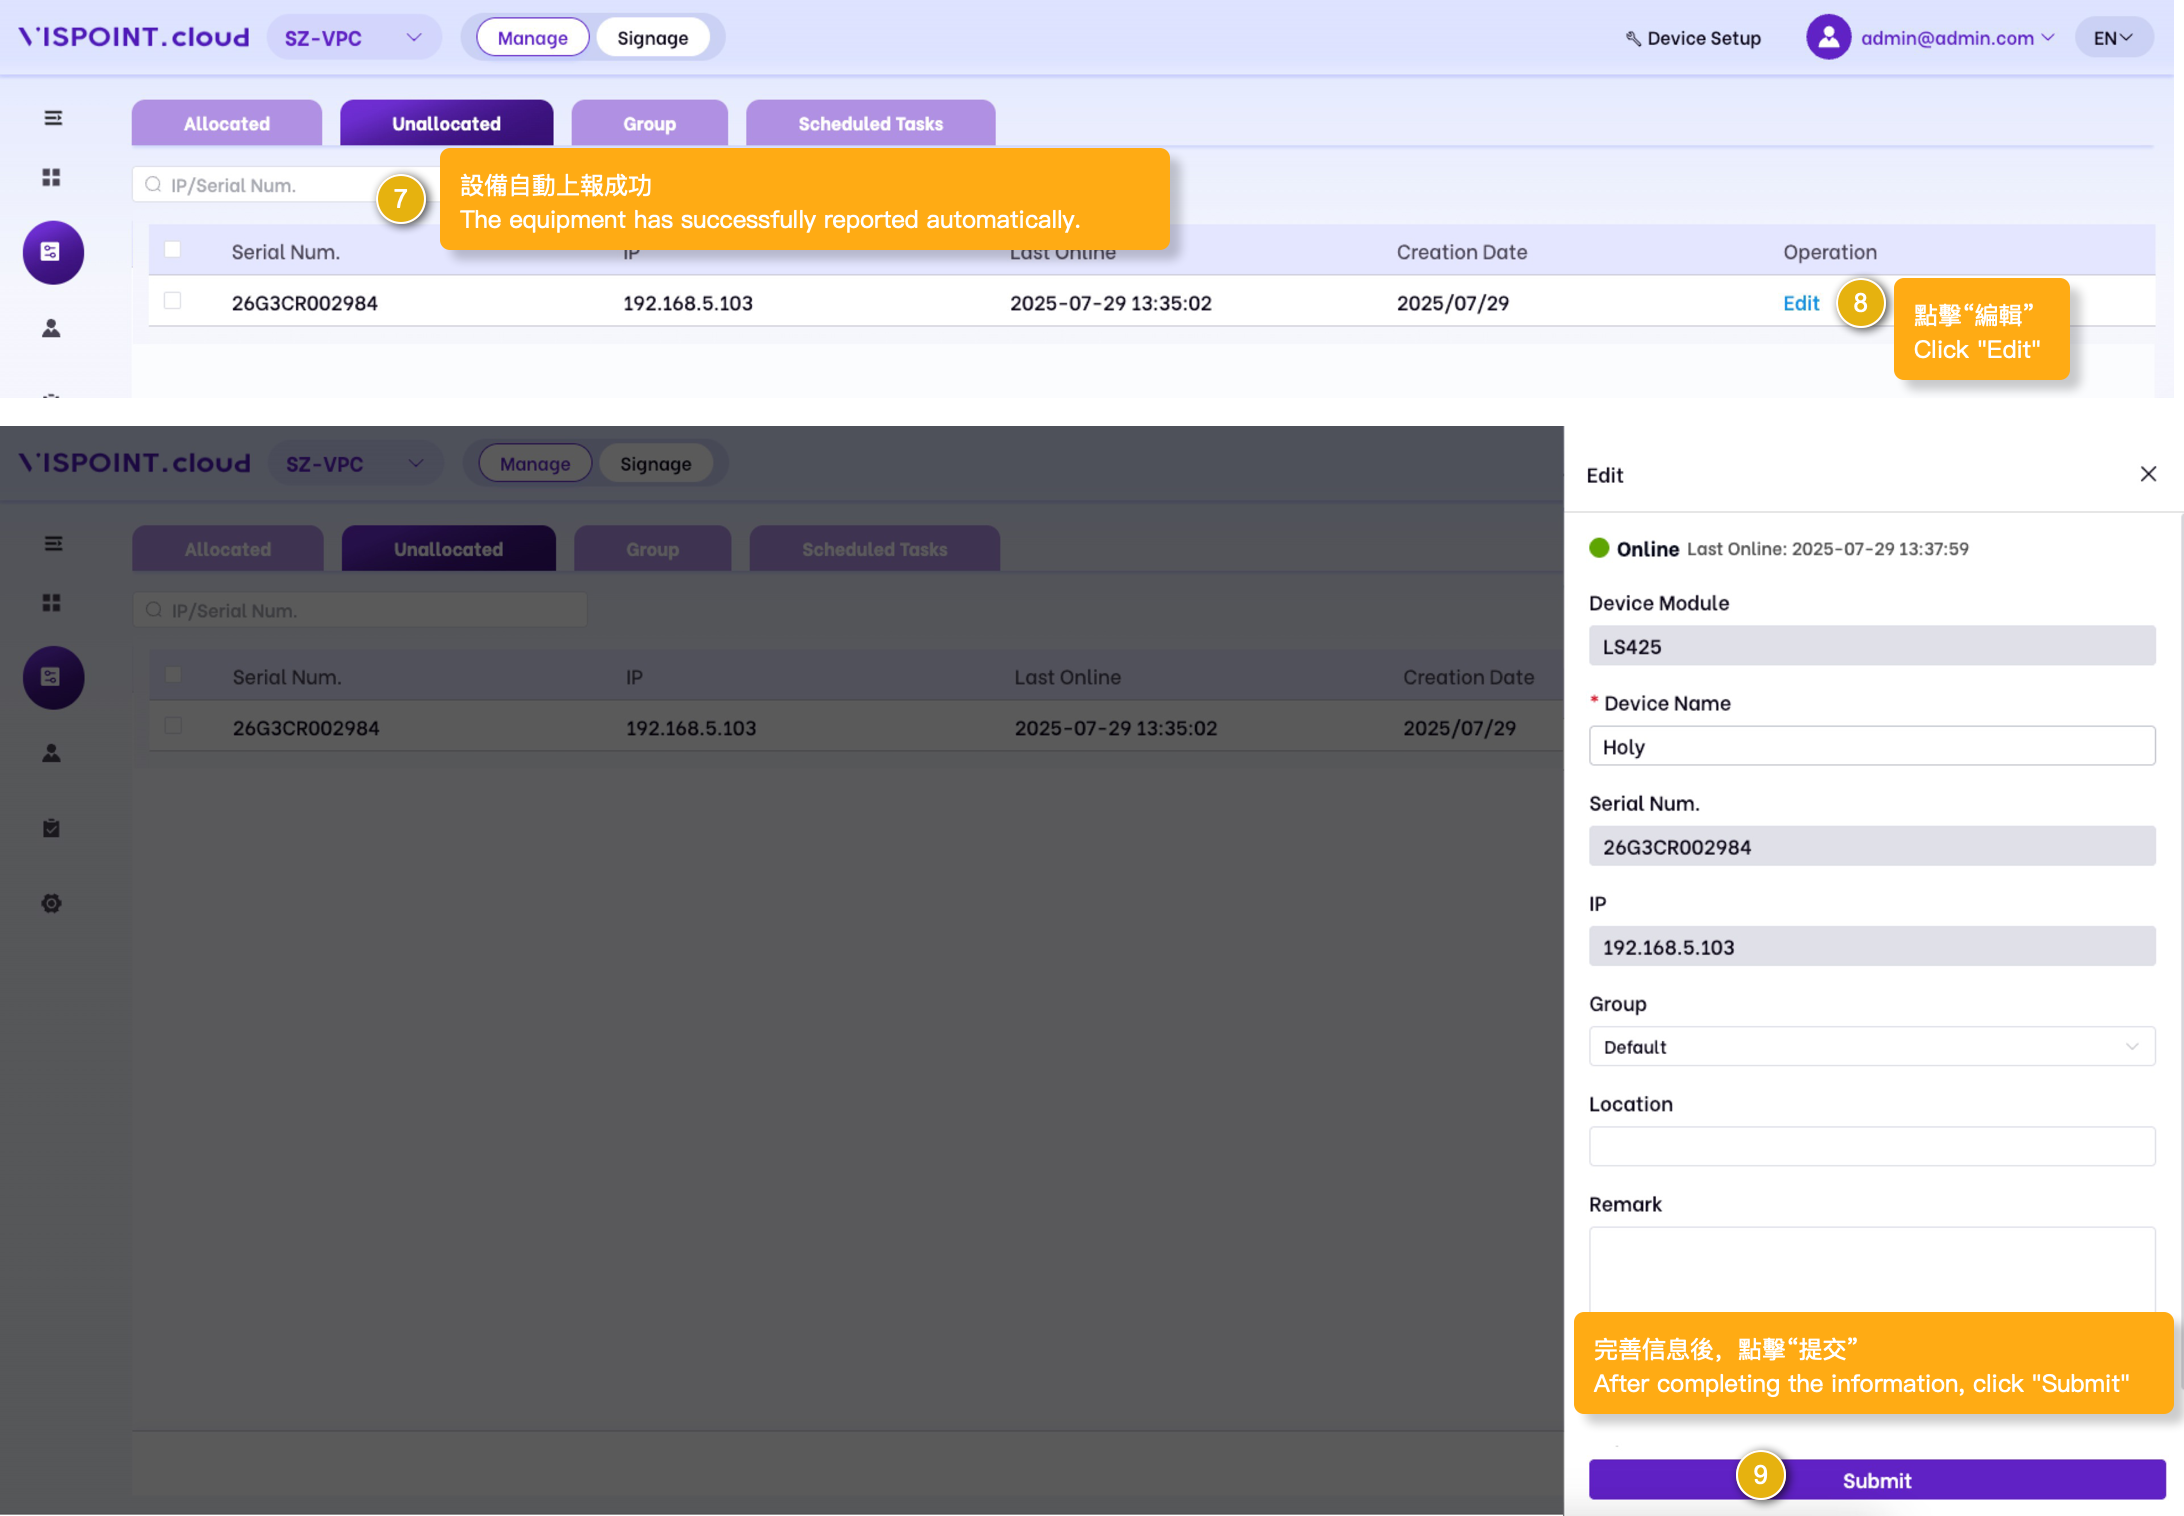
    After entering the Vispoint.cloud platforms, new users must complete “Device Configuration”. Extract the downloaded compressed package and copy it to the root of the memory card. Then, insert the memory card into the playback device and power it on. This will report the playback device to the Vispoint.cloud platforms.

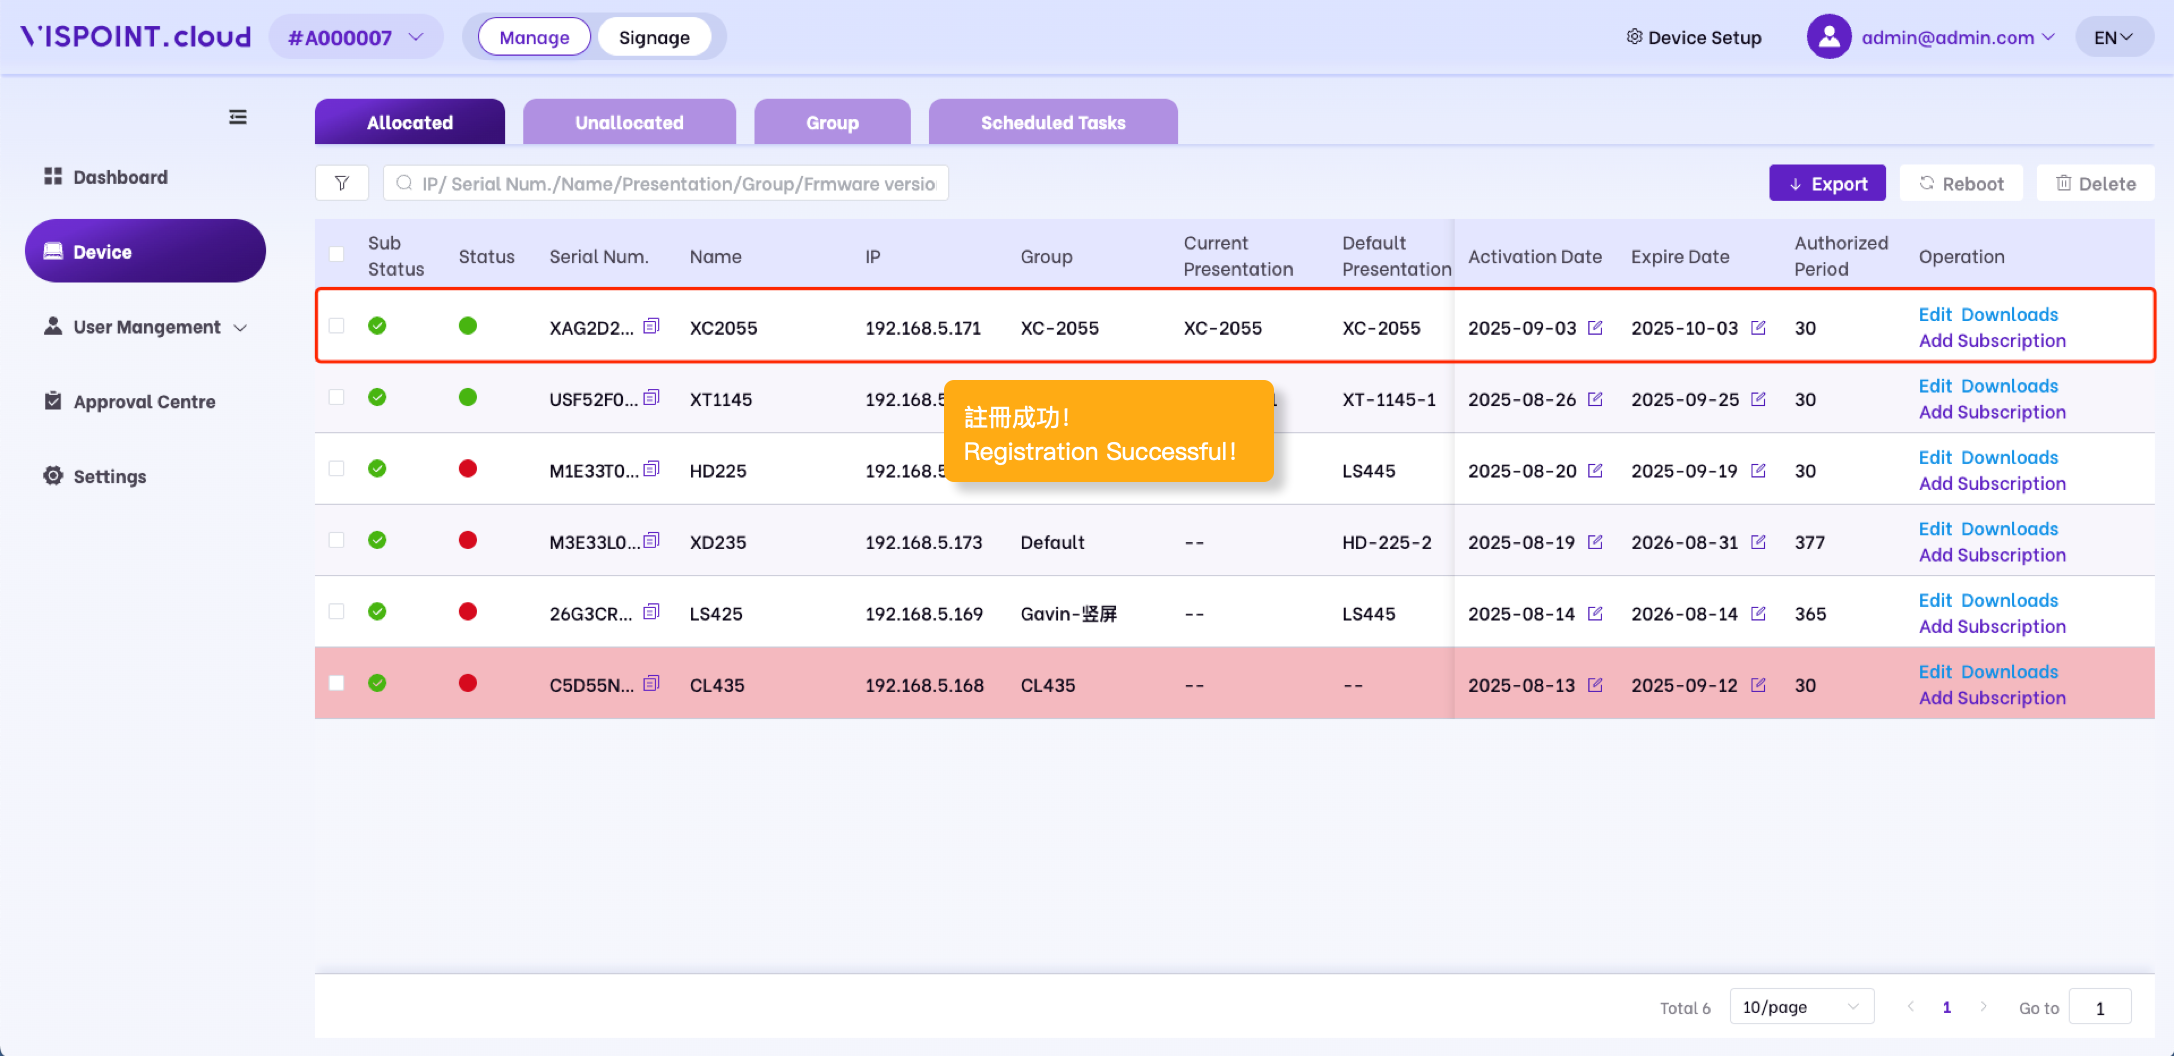
    New playback devices successfully reported to the Vispoint.cloud platforms are eligible for a 30-day trial period. After the trial period, a device license must be purchased from the official website to continue using the device.

Vispoint.cloud Workflow Process

New User Registration

  • After successful submission, you will receive an email containing a temporary password.
    On the login page, enter your email address and the temporary password, then click Sign In to access Vispoint.cloud platform.

Device setup

Player registration and authentication

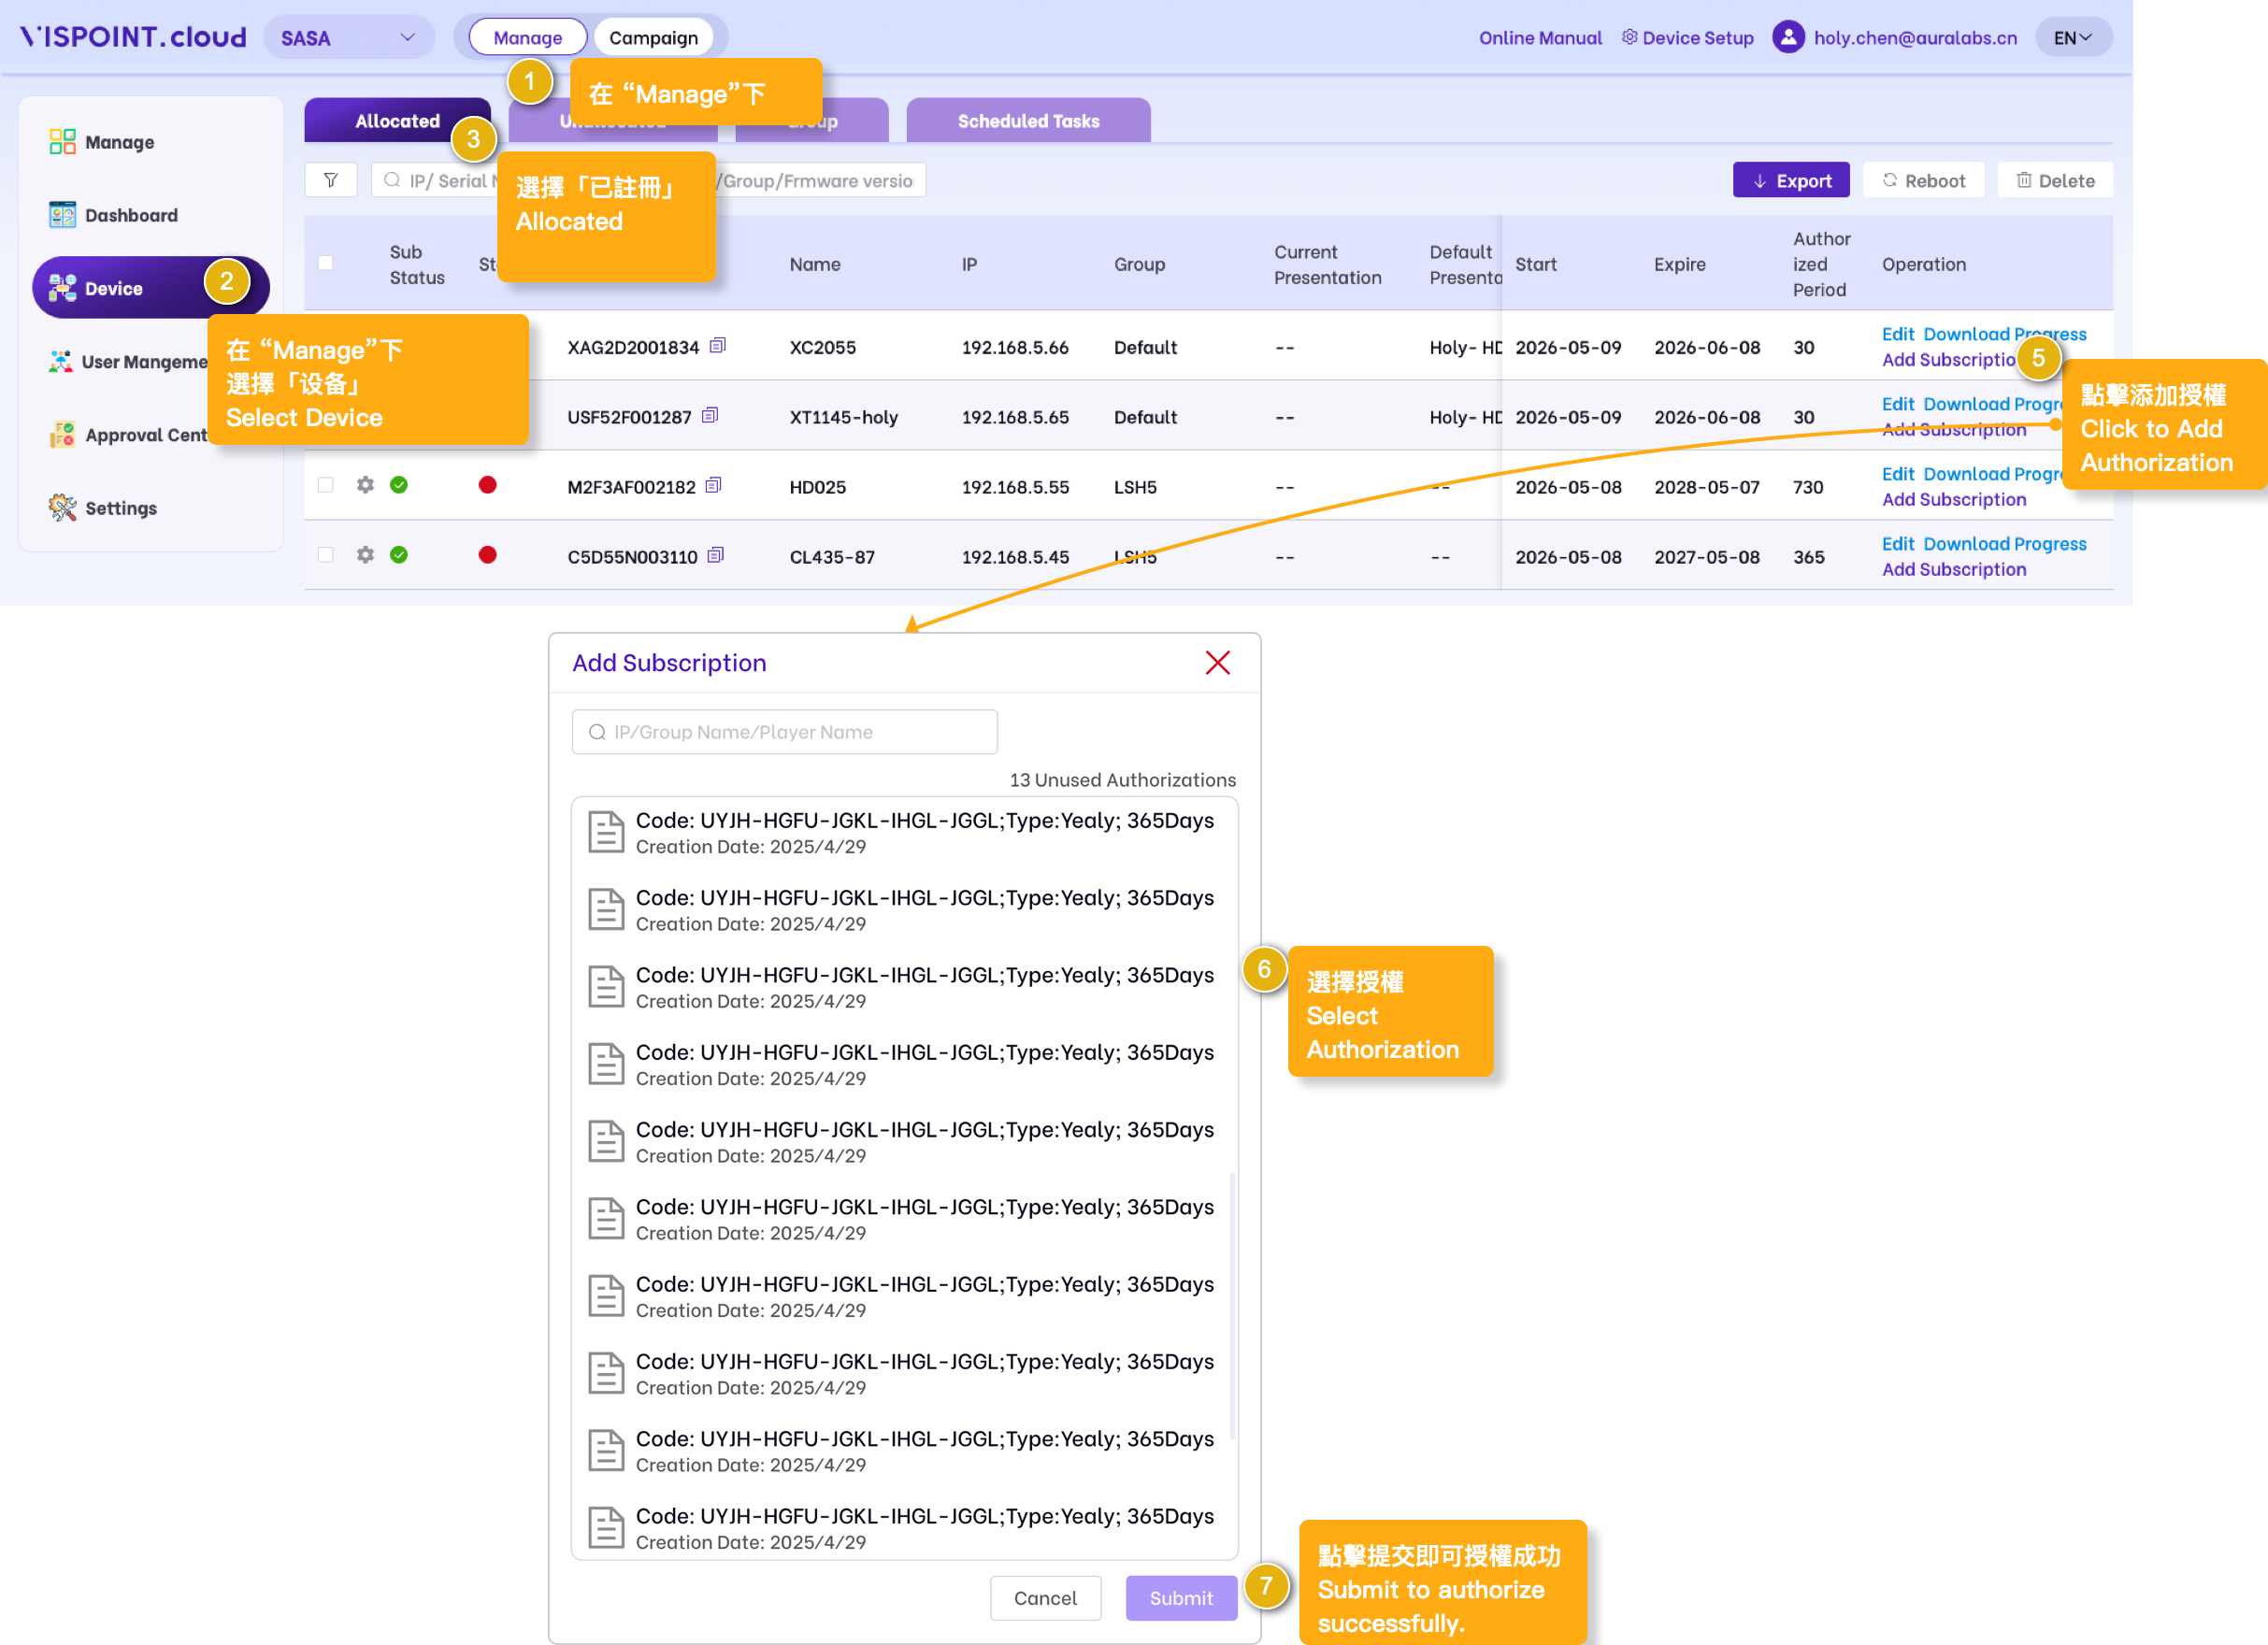
Device Authorisation.

  • Method 1: The system automatically grants authorisation by default, which can be disabled on the device edit page.

    Method 2: Single device authorisation manually.

Device

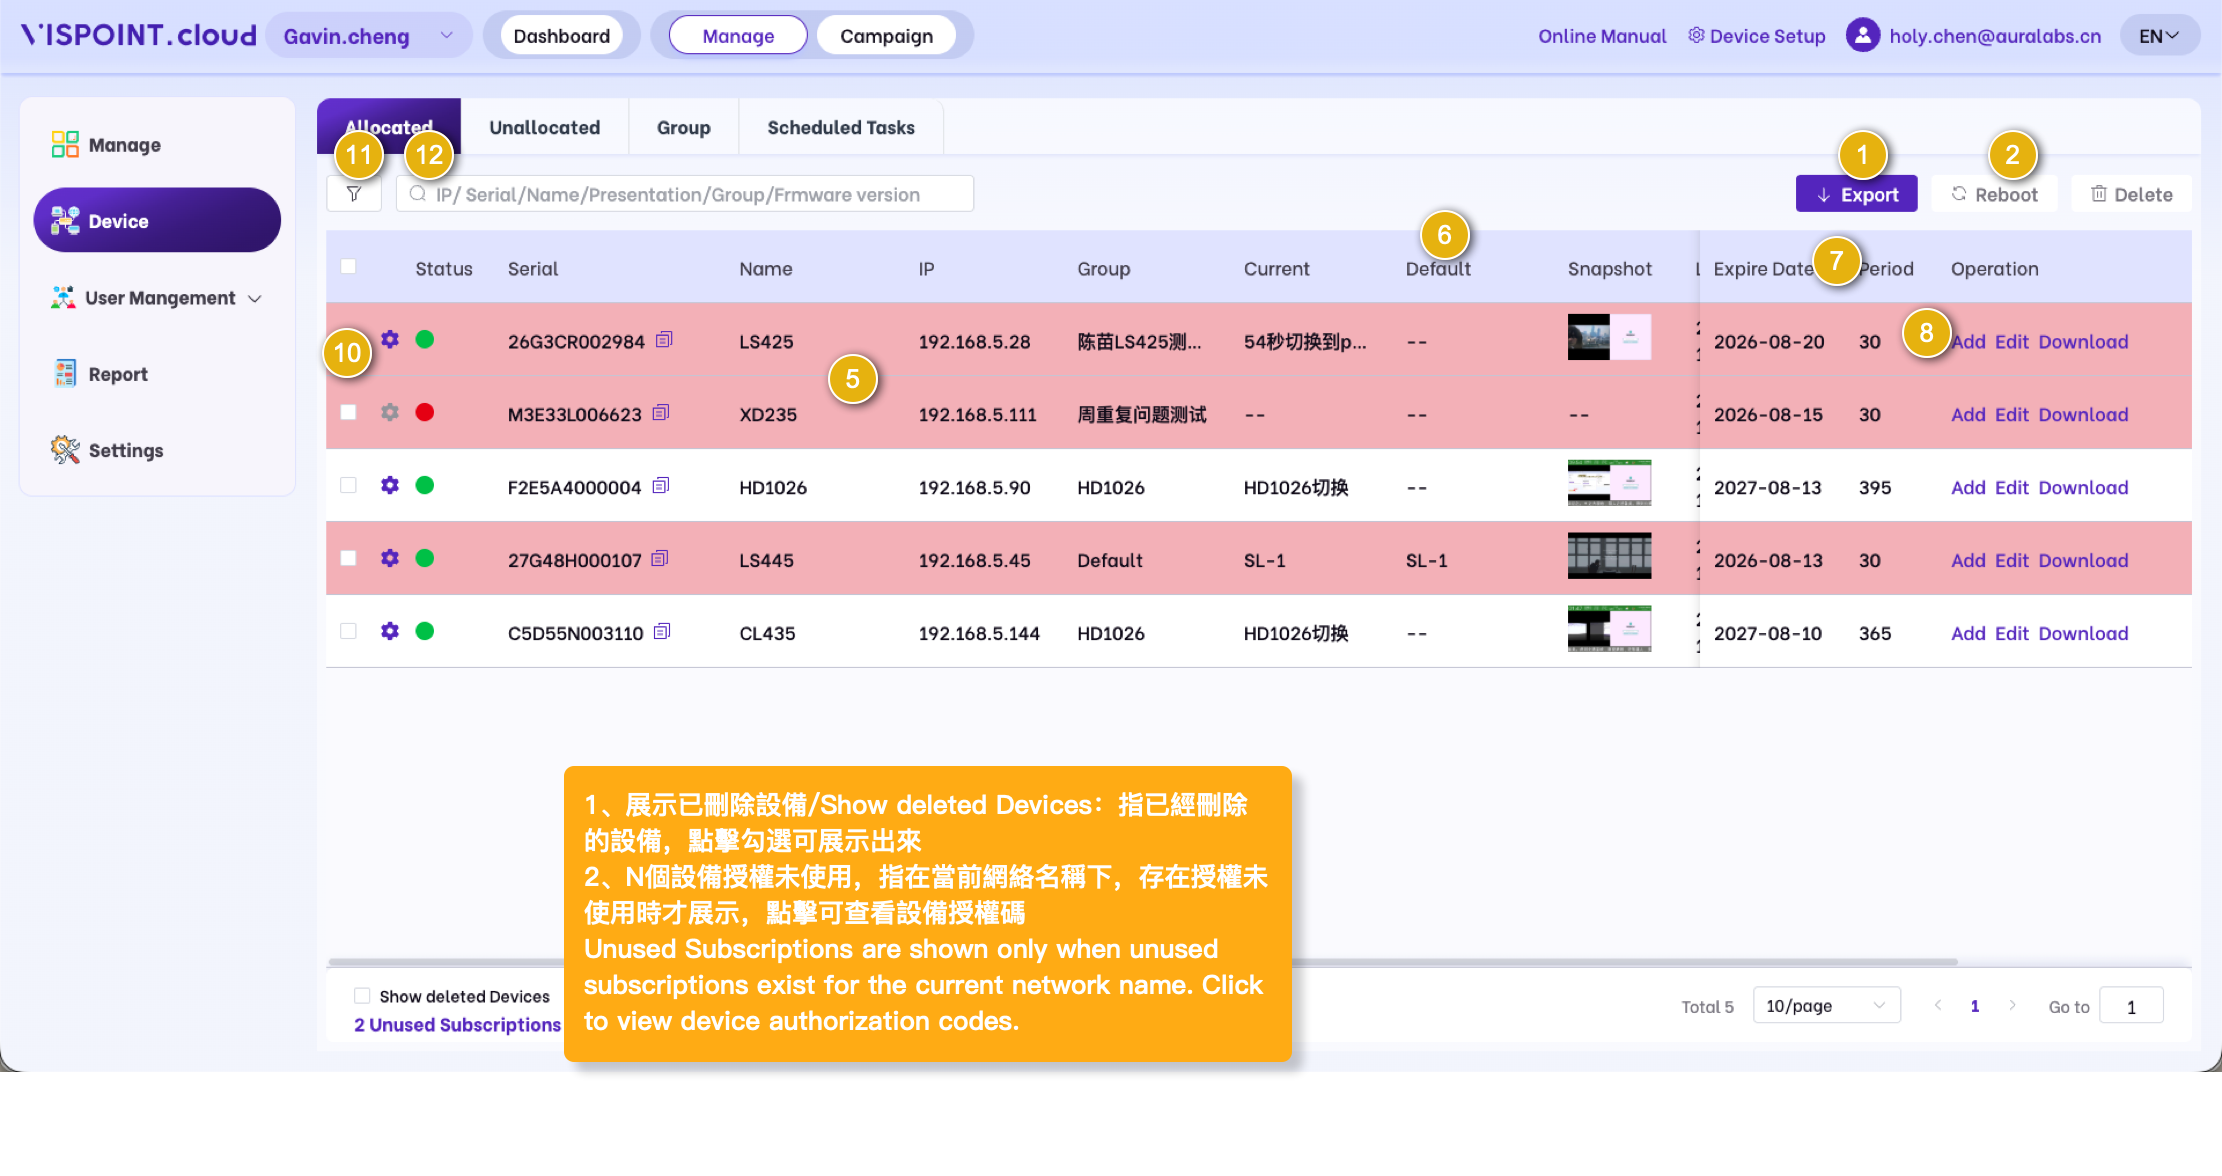
1、Export: Click Export to export list data per filter criteria.
2、Reboot: Select devices from the list, click Reboot, then confirm to reboot the devices.
3、Delete: Select devices from the list, click Delete, then confirm to remove the devices.
5、Light red background: Device subscription is expiring or expired.
6、Default : Demo template played by default when no content is scheduled.
7、Expiry Date: Displays the device expiration date. The device will no longer receive content updates upon expiry.
8、Add : Click Add Subscription and select a license to add. (Licenses must be purchased from the vendor and activated under Management/Dashboard before use.)
9、Download : Click Download Progress to view ongoing content downloads on the device.
10、Device Management Page: Click to enter the device management page; accessible only when the device is online.
11、Filter: Query by Creation Time and Status.
12、Search: Fuzzy search device data by keywords including IP, Serial Number, Device Name, Active Demo Template, Device Group, etc.

Editing Page

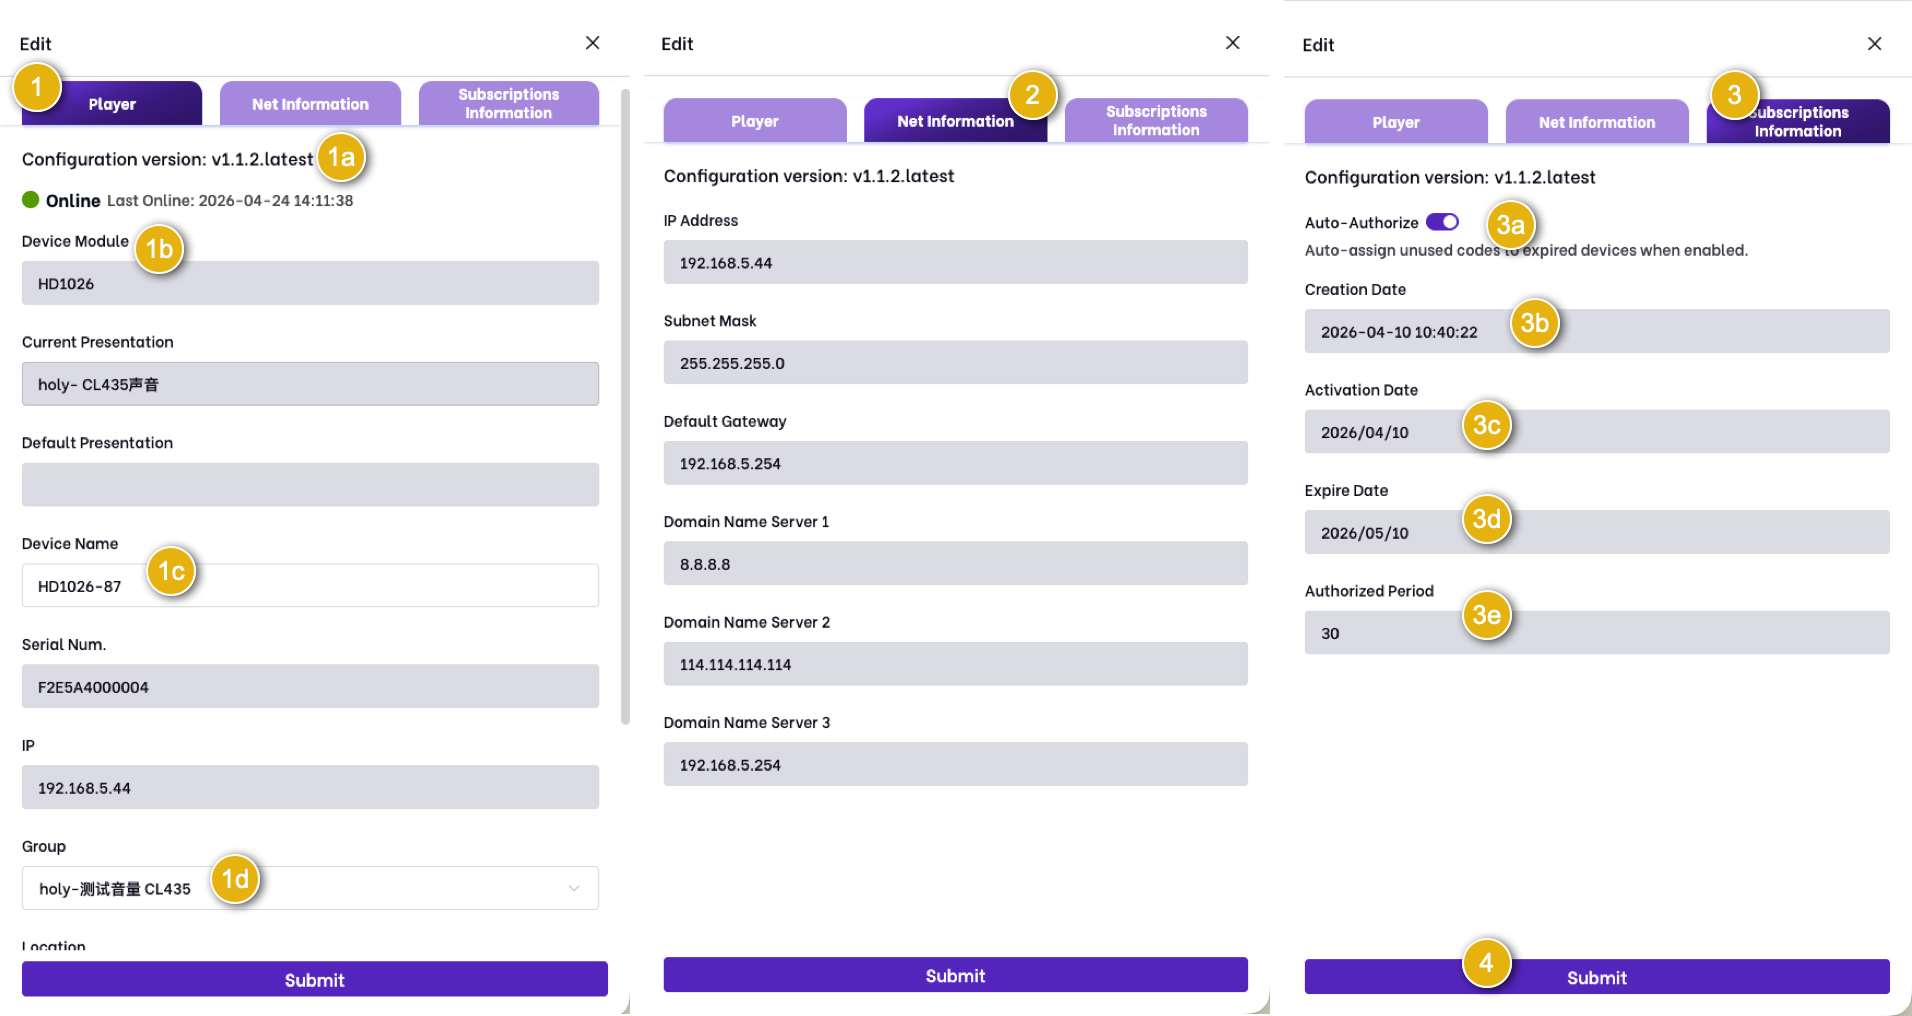
1.Player the basic information related to the player is as follows:

1a.Status:Show the player’s online or offline status and their last communication time.

1b.Model:Show the current device model.

1c.Name:Show the current device name, which can be changed manually.

1d.Device Group:Display the device group that this player belongs to, which can be manually modified; device group information can be added in the “Group” section.

2. Display device network information, which can be configured in “Device Setup” and is shown here for display purposes only.

3.The authorization information is as follows:

3a.Click to disable automatic authorization for the current device.

3b.Creation Date:Display device successfully created date in Vispoint.cloud.

3c.Activation Date:Display the date when the equipment was last activated or successfully authorized.

3d.Expiration Date:Display the expiration date for device authorization.

3e.Authorized Days:Display the number of days for which the device has been authorized.

4.Submit:Click select “Submit” to successfully save and apply the modified information.

Group

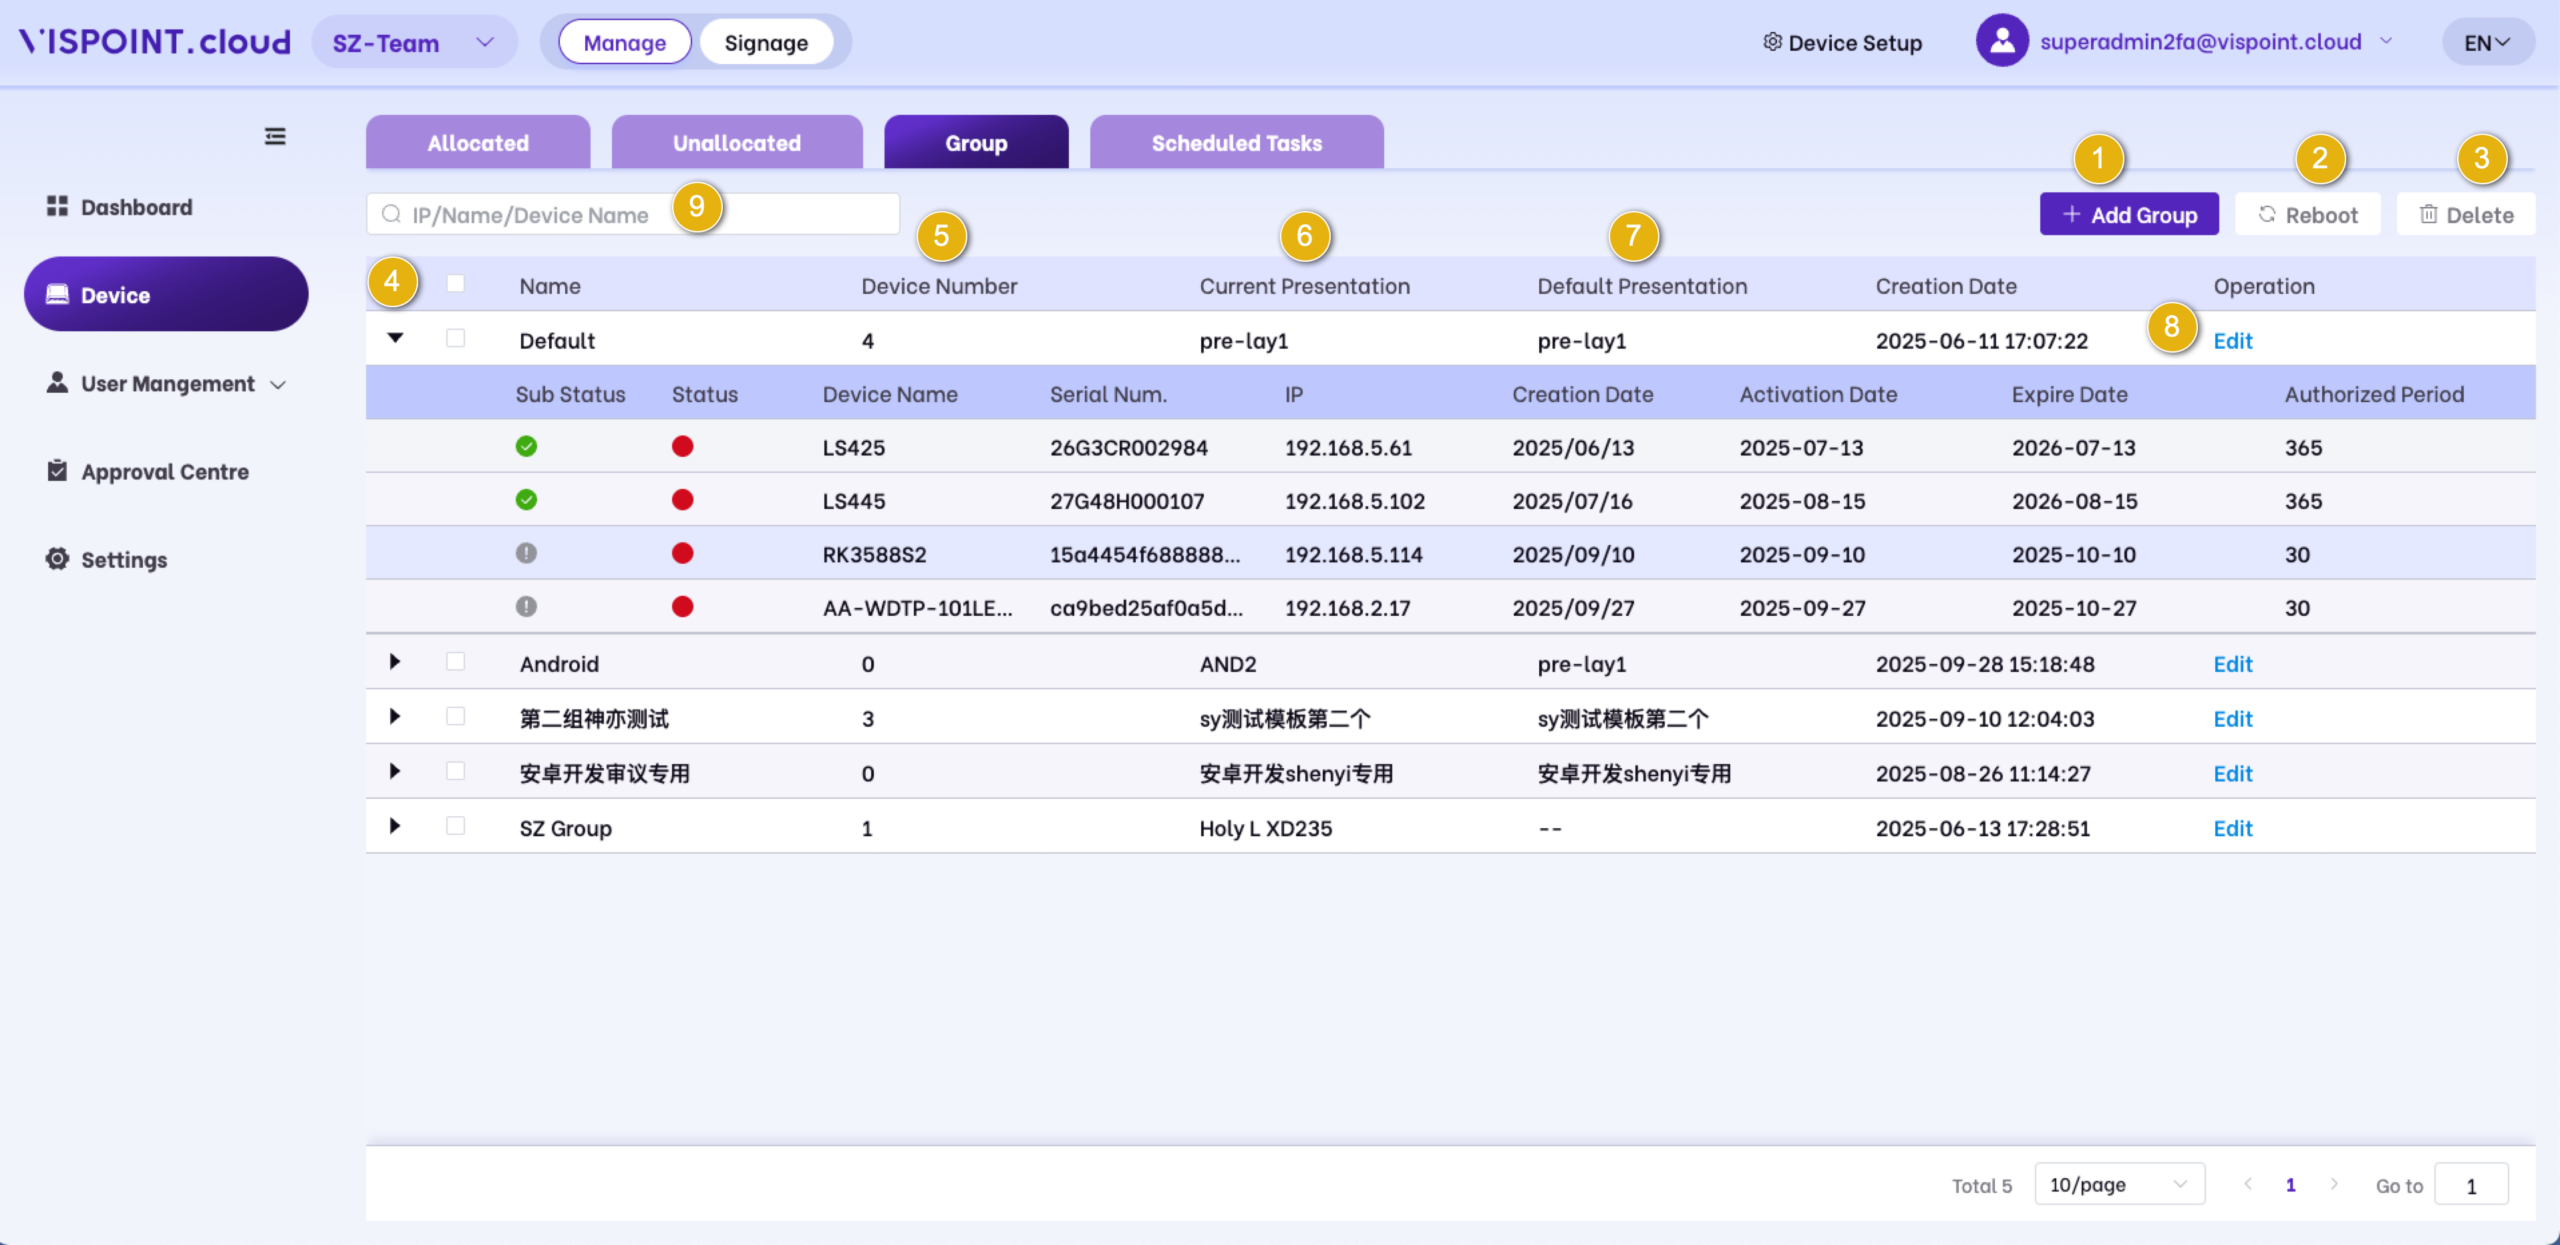
Description:Every player must belong to a device group.

  1. Add Group:Click “Add”, and the right-side drawer interface will slide out for you to add.
  2. Reboot:After selecting the device group(s) from the list, click ‘Restart’ and confirm the action to reboot all devices in the group.
  3. Delete:After selecting the target device group(s) from the list, click ‘Delete’ and confirm the action to remove the group(s). Upon successful deletion, all devices within the deleted group(s) will automatically be reassigned to the ‘Default Group’.
  4. General Group: A default non-deletable group exists in the device group list. Devices removed from other groups will be automatically assigned to this group.
  5. Device Number:Displaying the total number of players in the device group
  6. Current Presentation:Shows the name of the currently playing demo presentation module for each player in the device group.
  7. Default Presentation:Presentation module name that activates group players when no content is scheduled.
  8. Edit: Click ‘Edit’ to change the device group name and establish default demo templates.
  9. Search:The system enables fuzzy searches on key fields (IP, device group name, device name) to filter device group entries in the list.

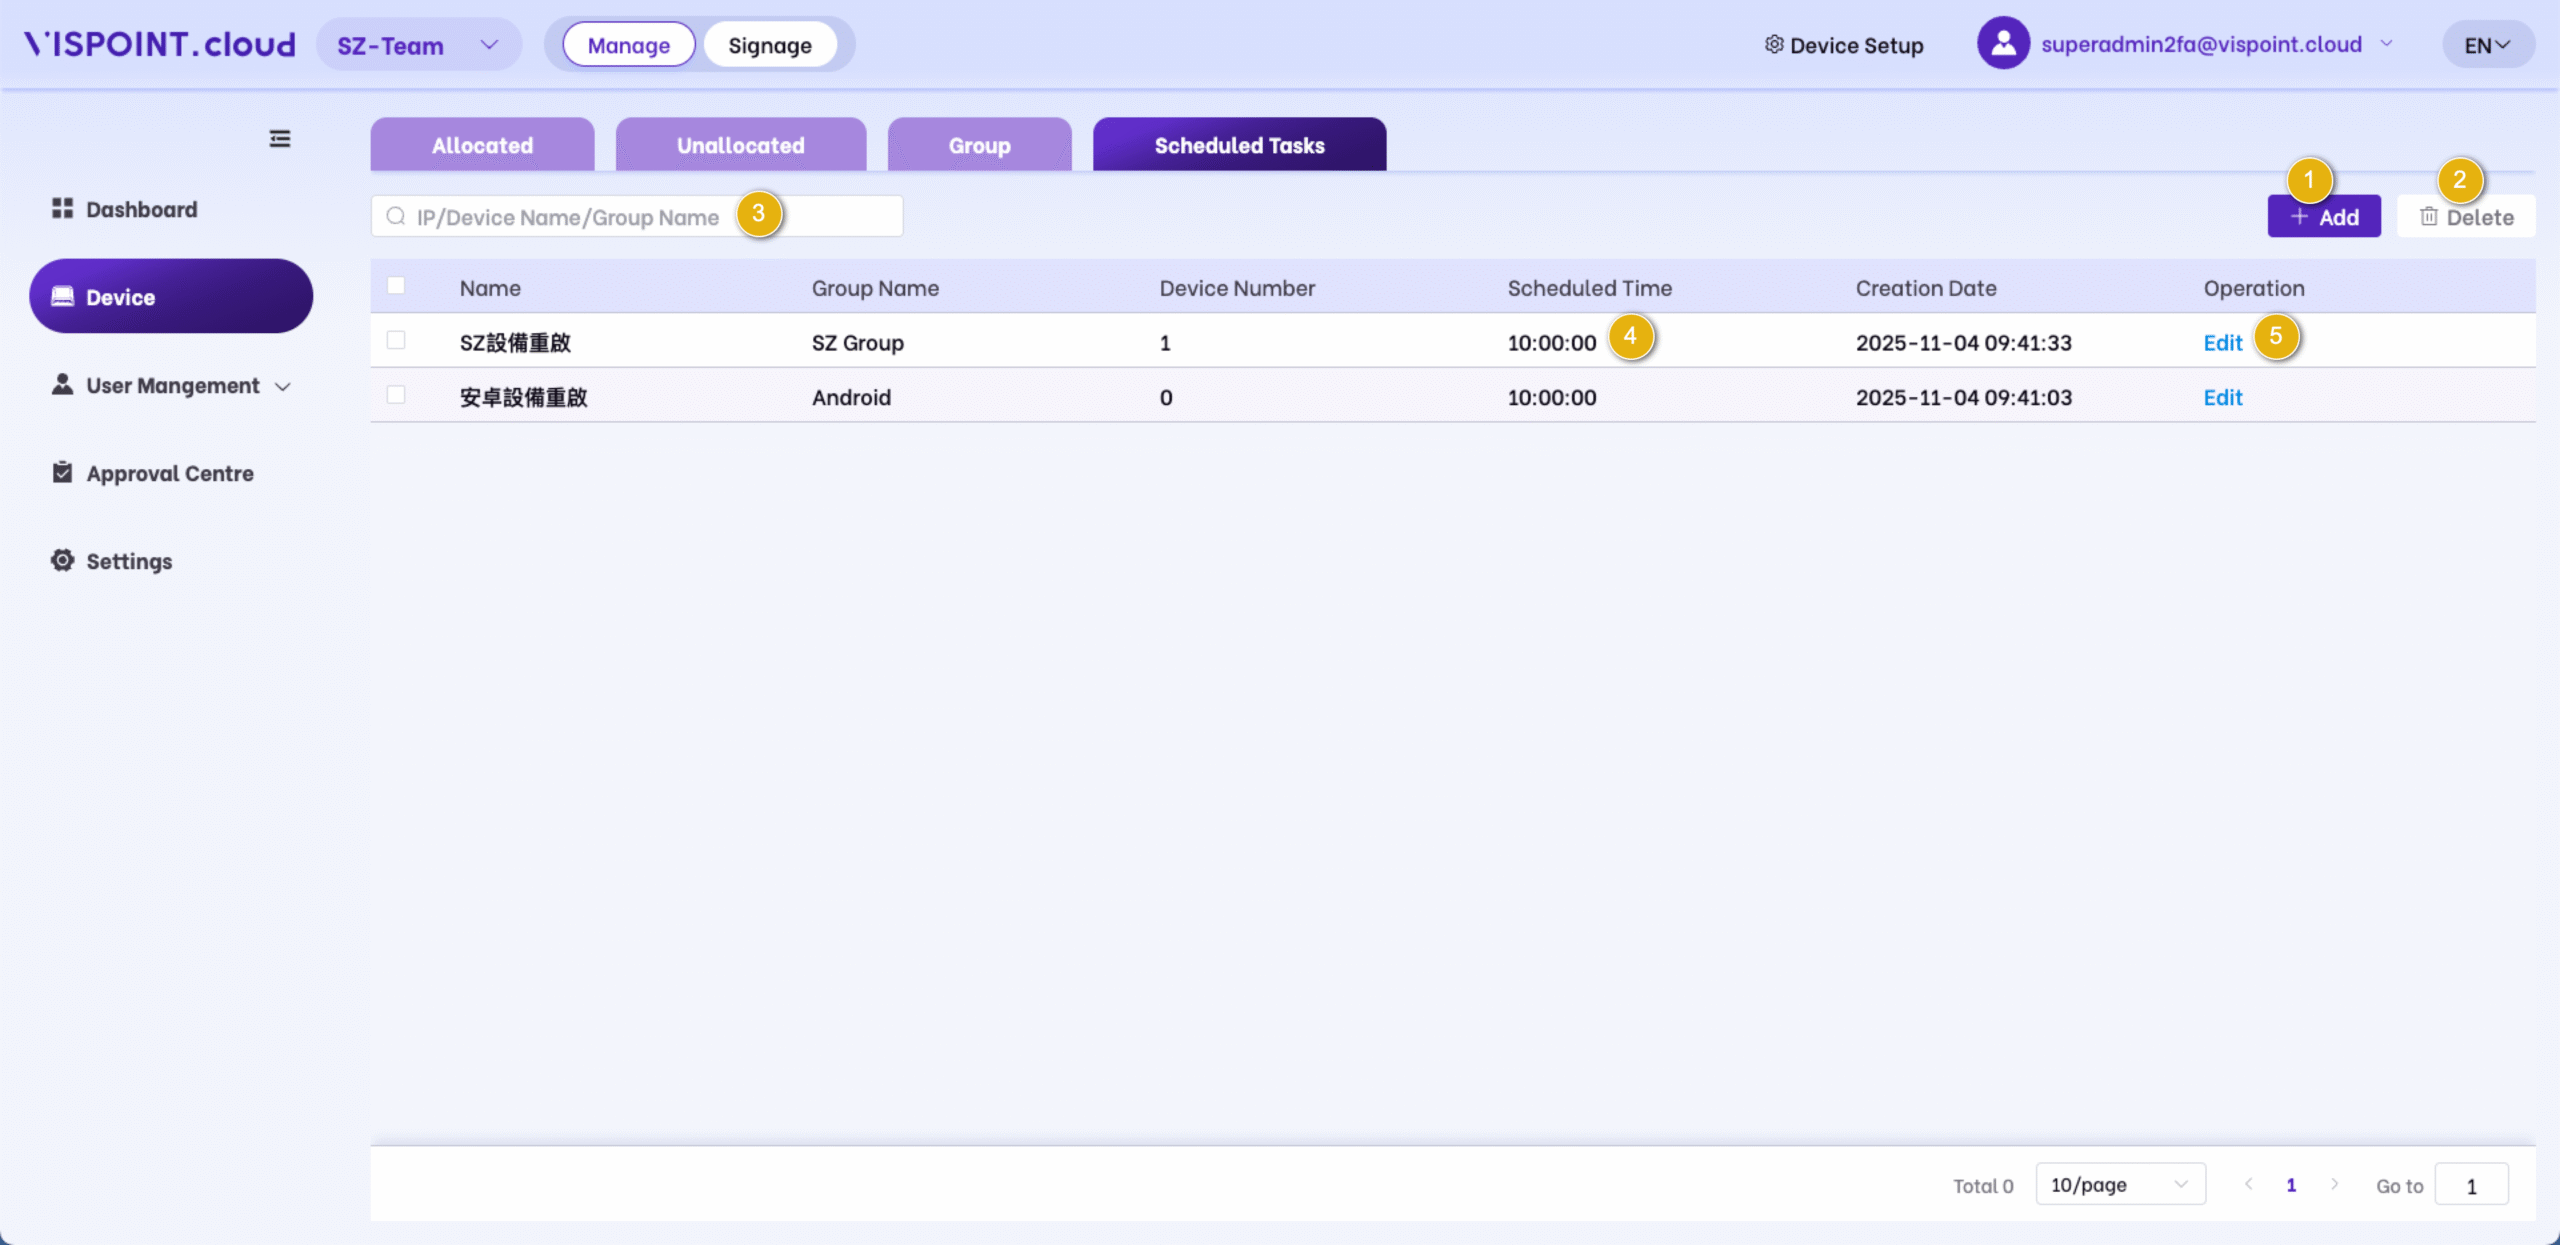
Scheduled Tasks

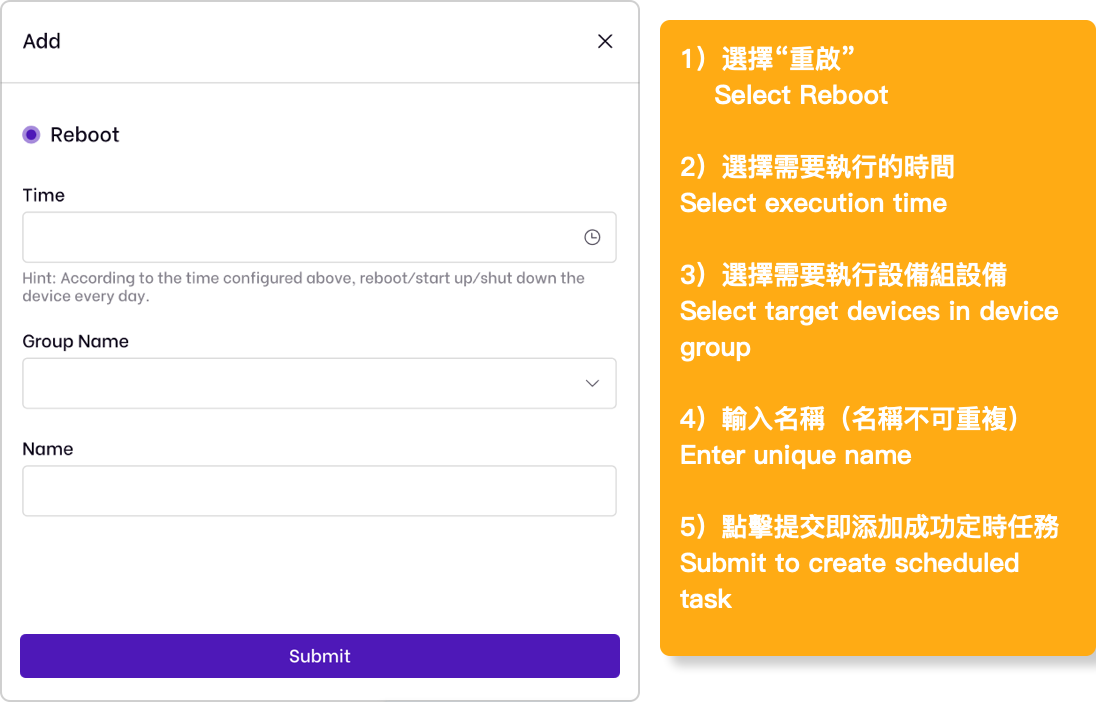
Description: The device group is restarted. After the operation is successful, all the designs within the device group will be restarted; The scheduled tasks are executed at the specified time points every day.

1.Add:Click ‘Add’ to reveal the side panel for Schedule new tasks.

2.Delete:After selecting tasks from the list, click ‘Delete’ and confirm the removal.

3.Search:Supports fuzzy search for scheduled tasks by player IP, device group name, or device name.

4.Scheduled Time:Daily Execution Times for Device Group Tasks.

5.Edit:Click ‘Edit’ to change settings.

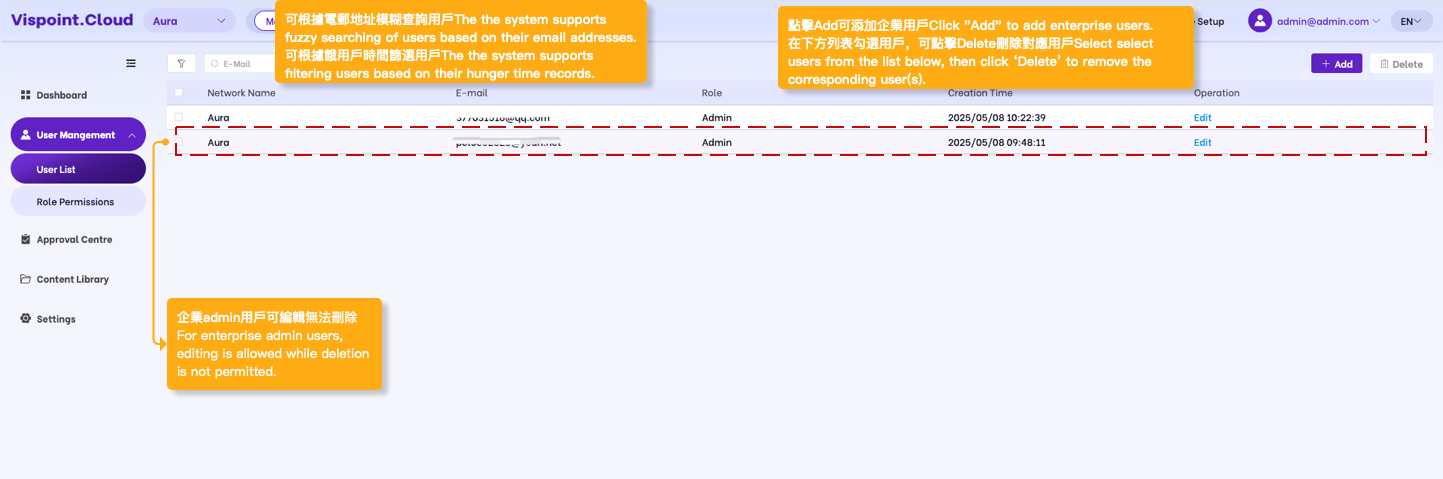
User Mangement

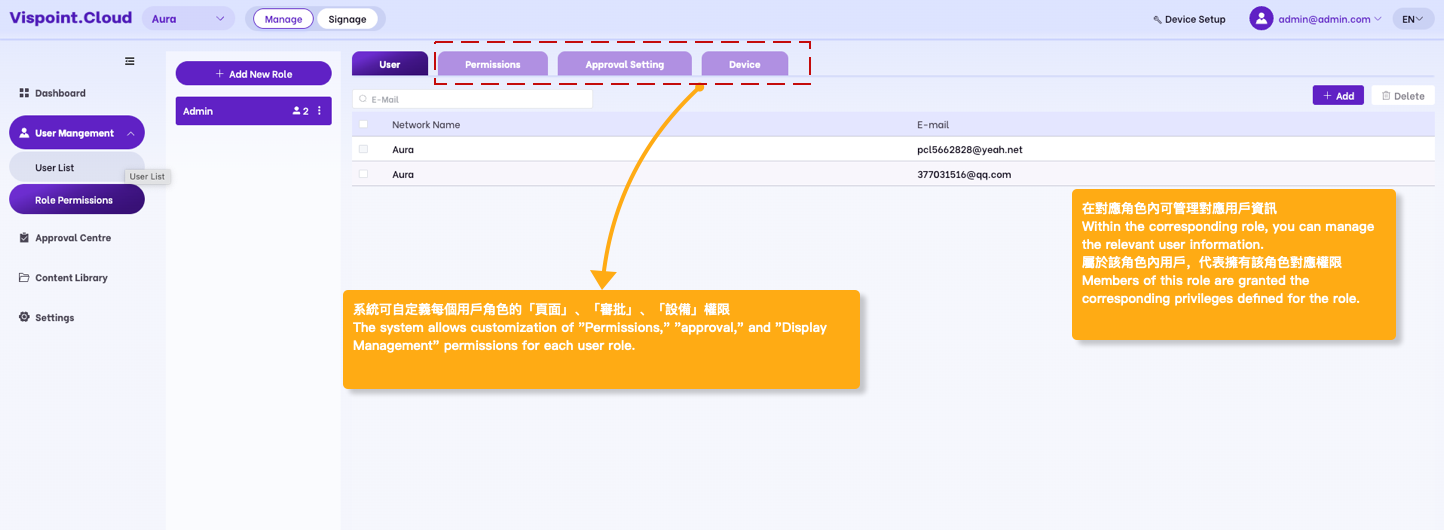
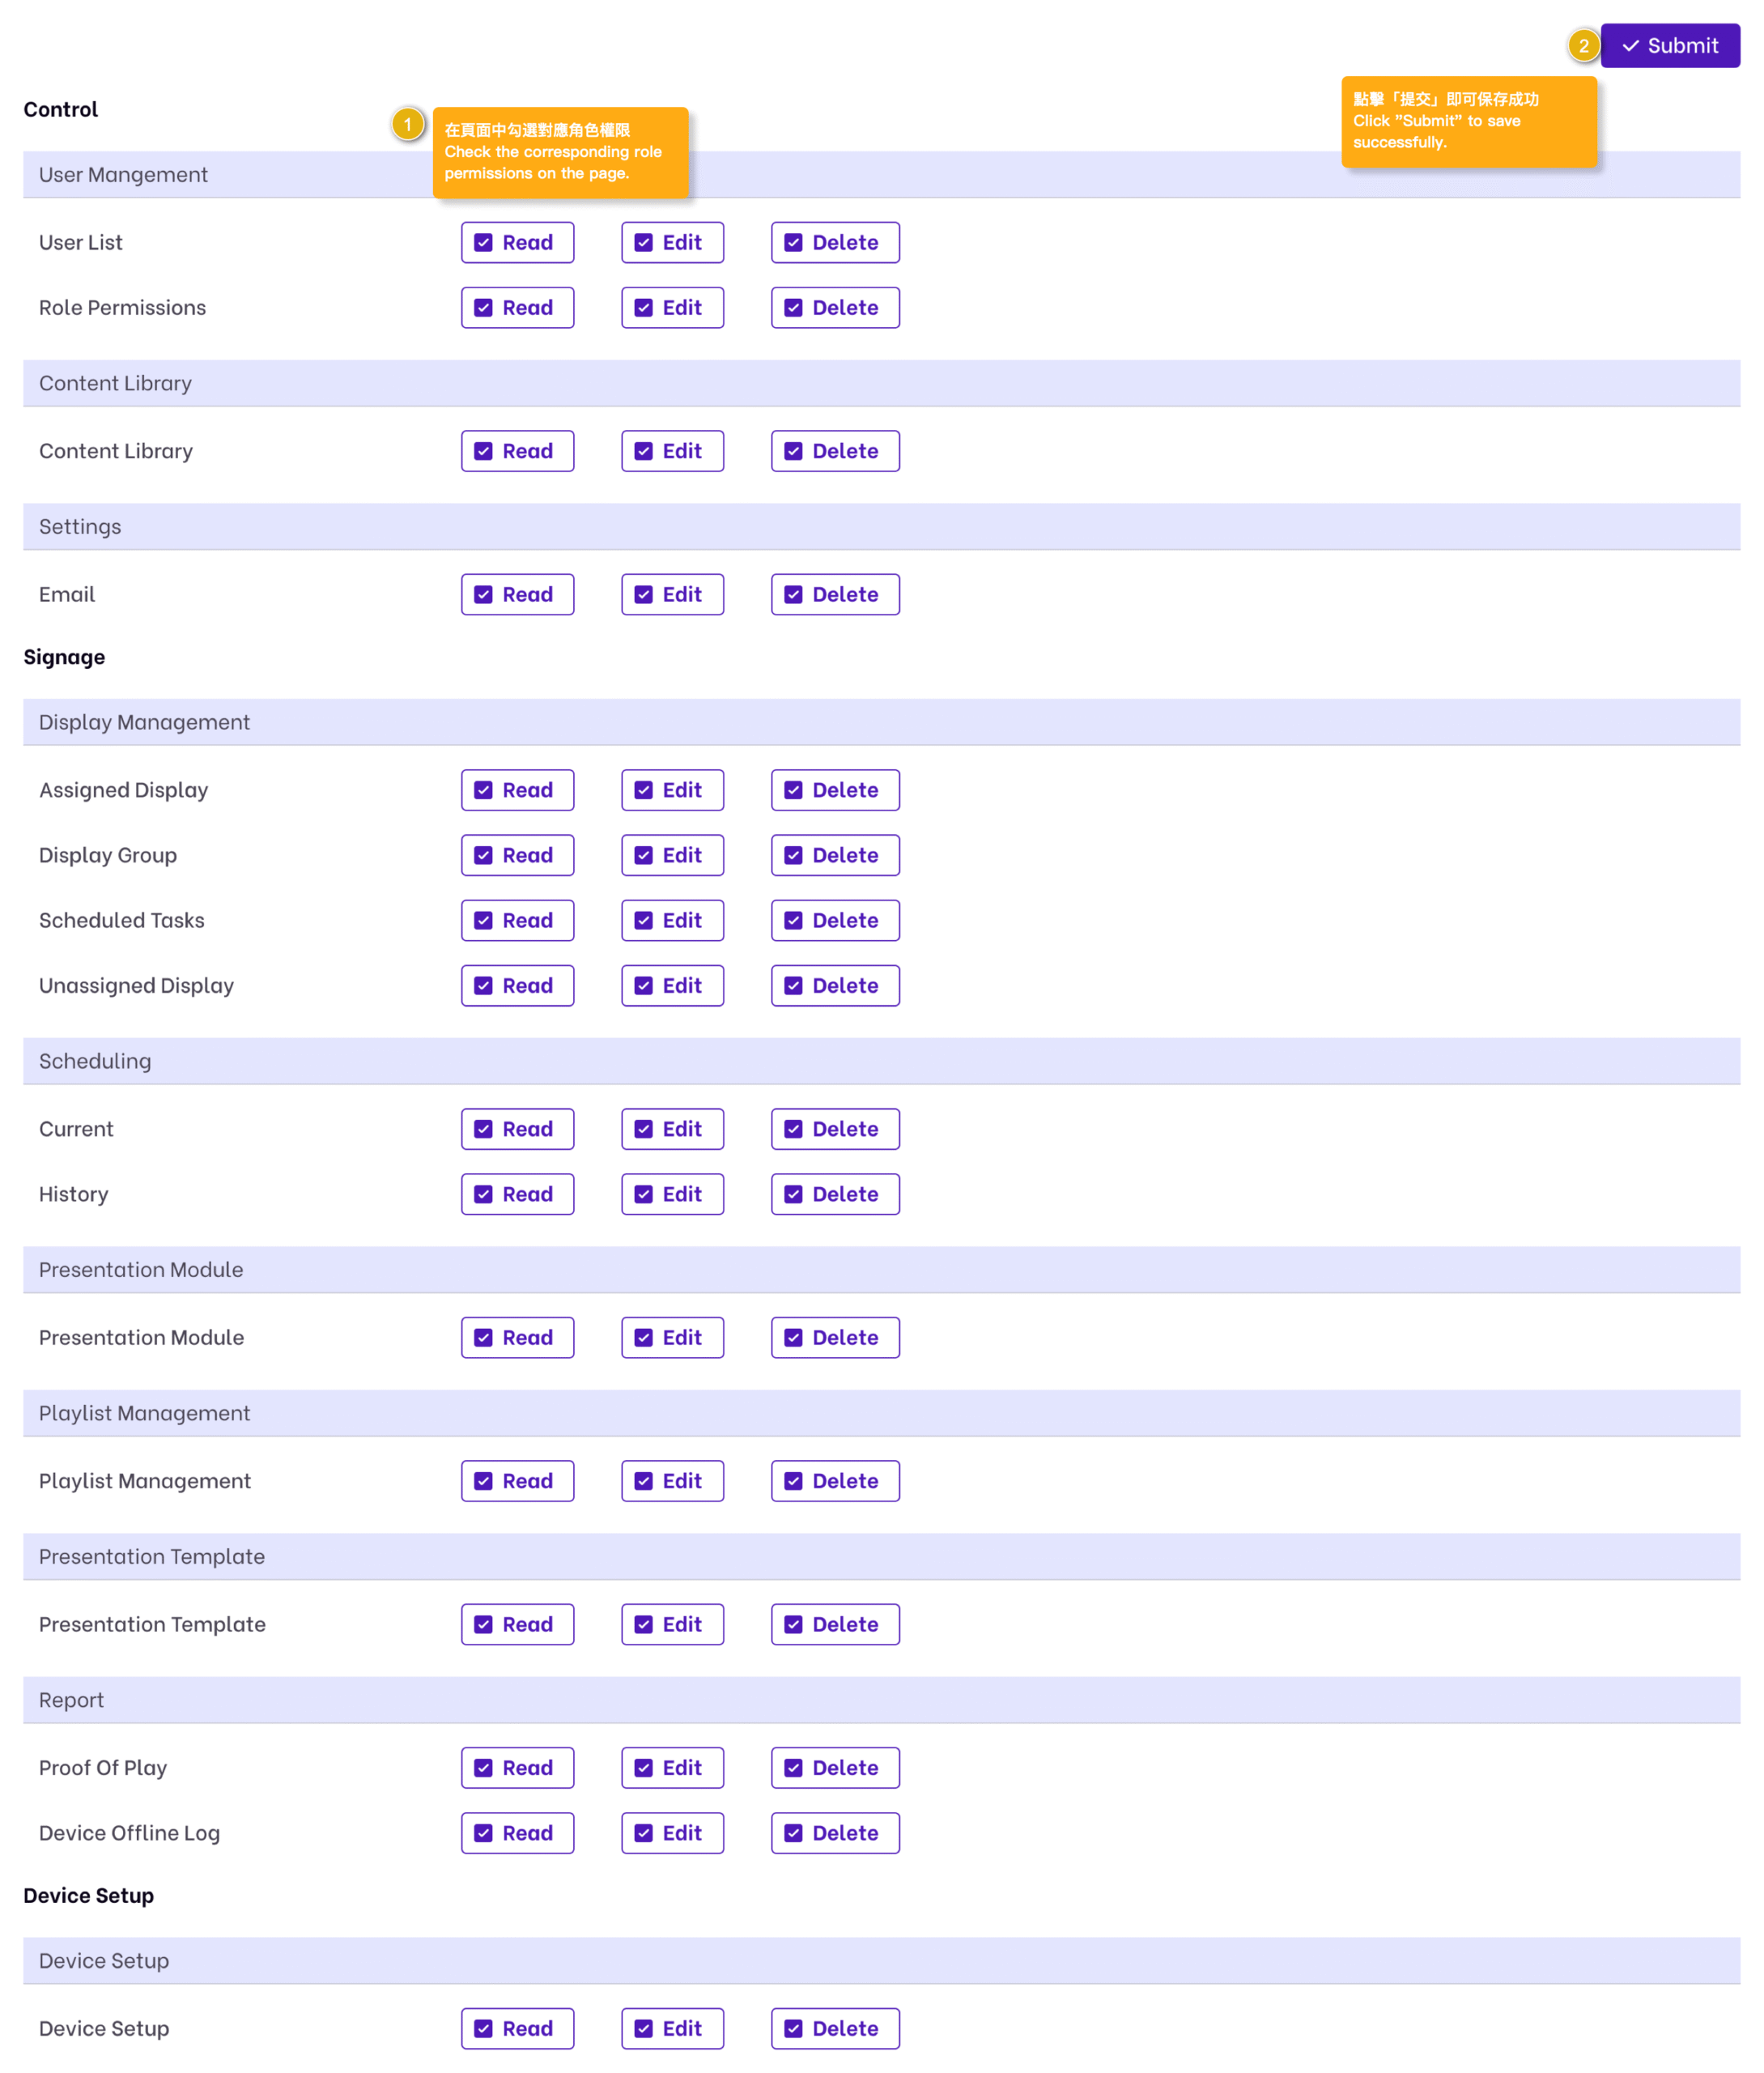
The Vispoint.cloud platform provides a customizable user role permission system, enabling you to accurately select system permissions based on your
organization’s needs.

  • ·Prerequisite: Have editing permissions for this module.

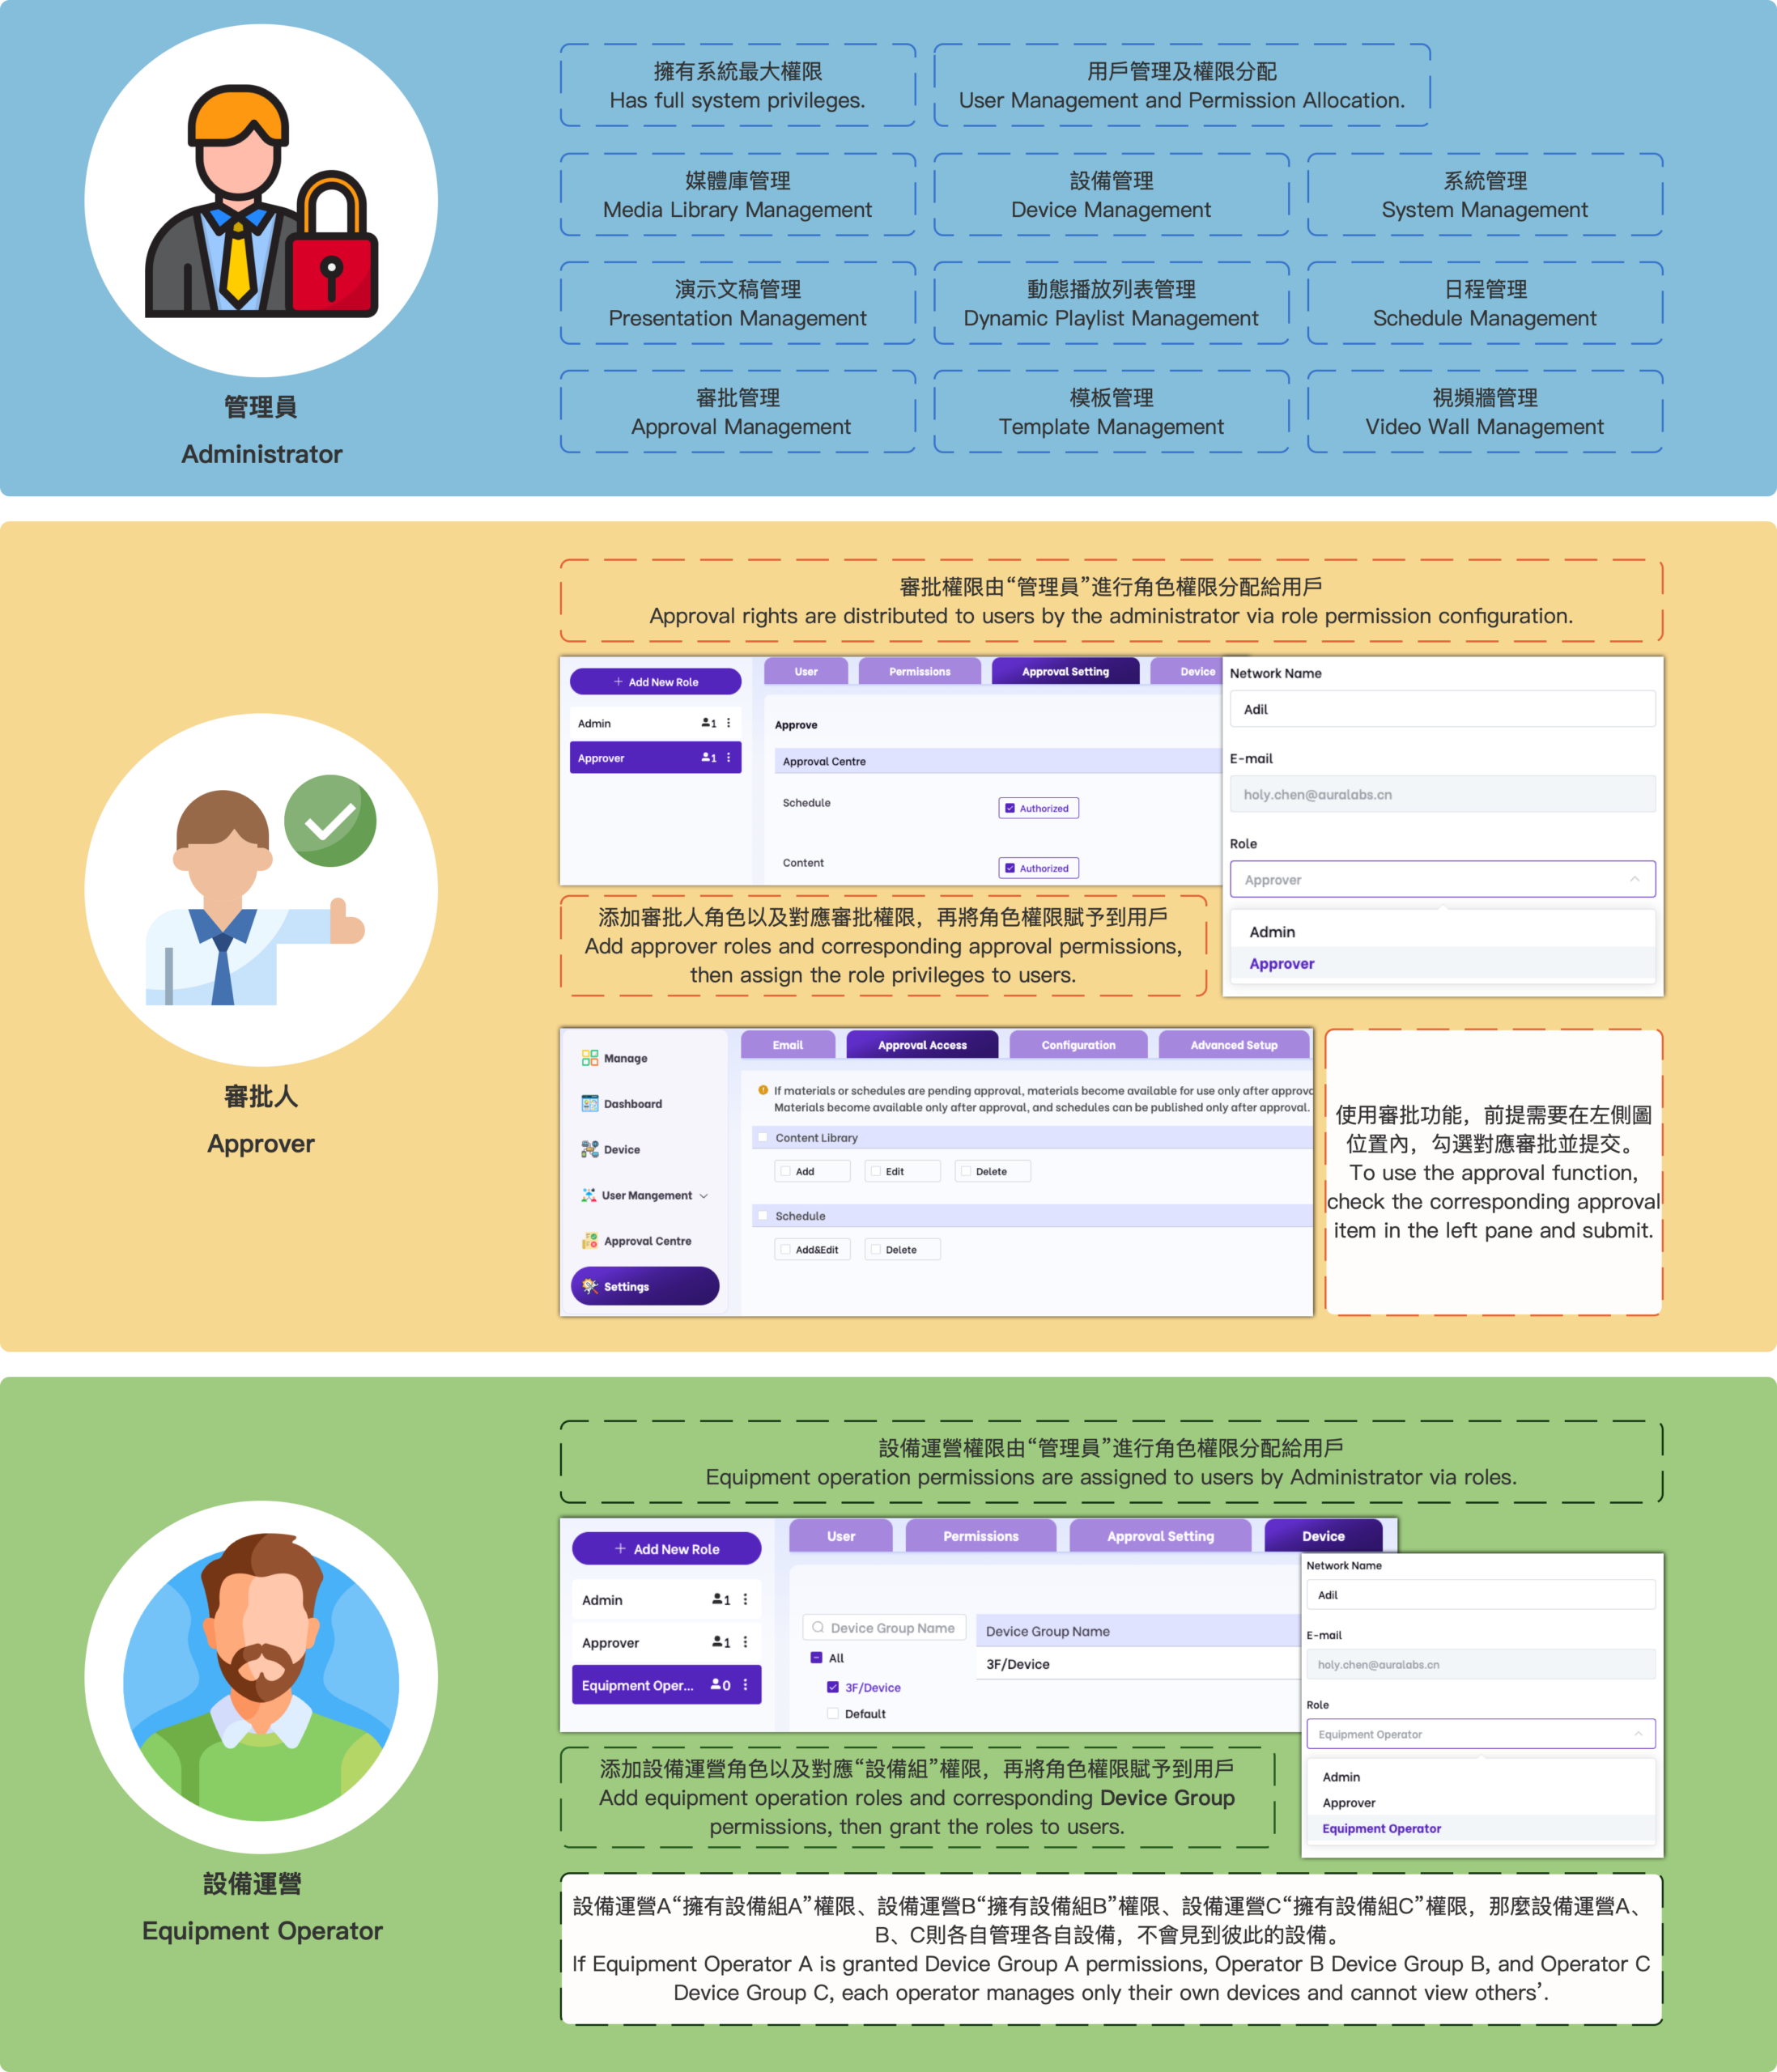
Role Description

Approval Centre

The Vispoint.cloud platform provides “Schedule Approval” and “Material Content Approval” systems. The approval functions can standardise the business process of releasing schedules, minimise human errors and arbitrariness, and effectively control risks to ensure that key operations or decisions are reviewed and to reduce the likelihood of illegal operations or incorrect decision-making.

·Prerequisite: Have permissions for the appropriate device group and approval permissions.

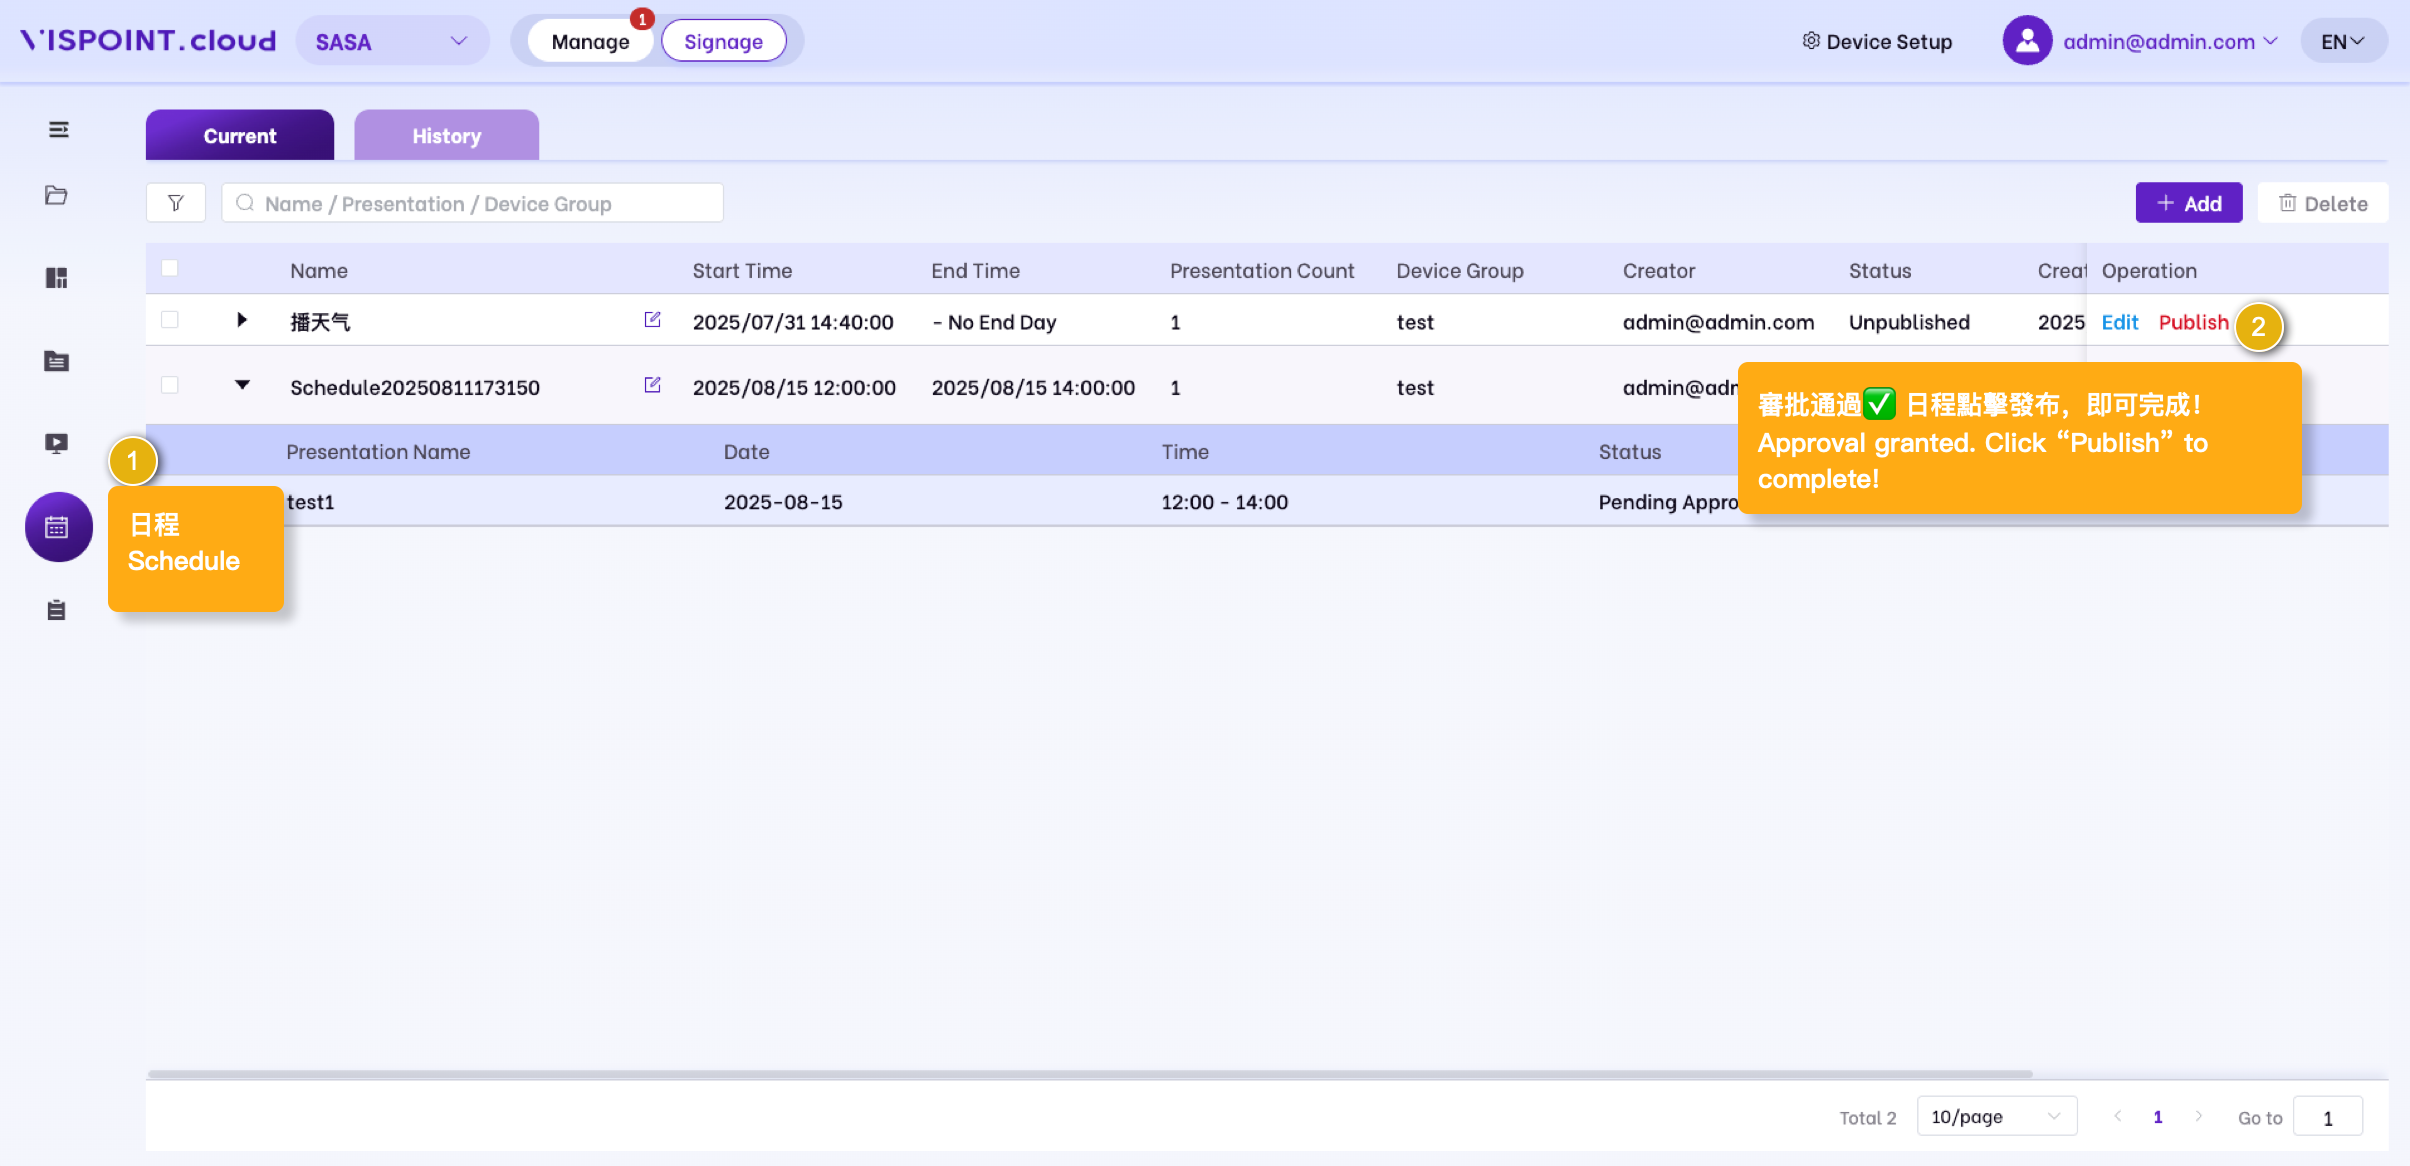
Publish after schedule approval.

Settings

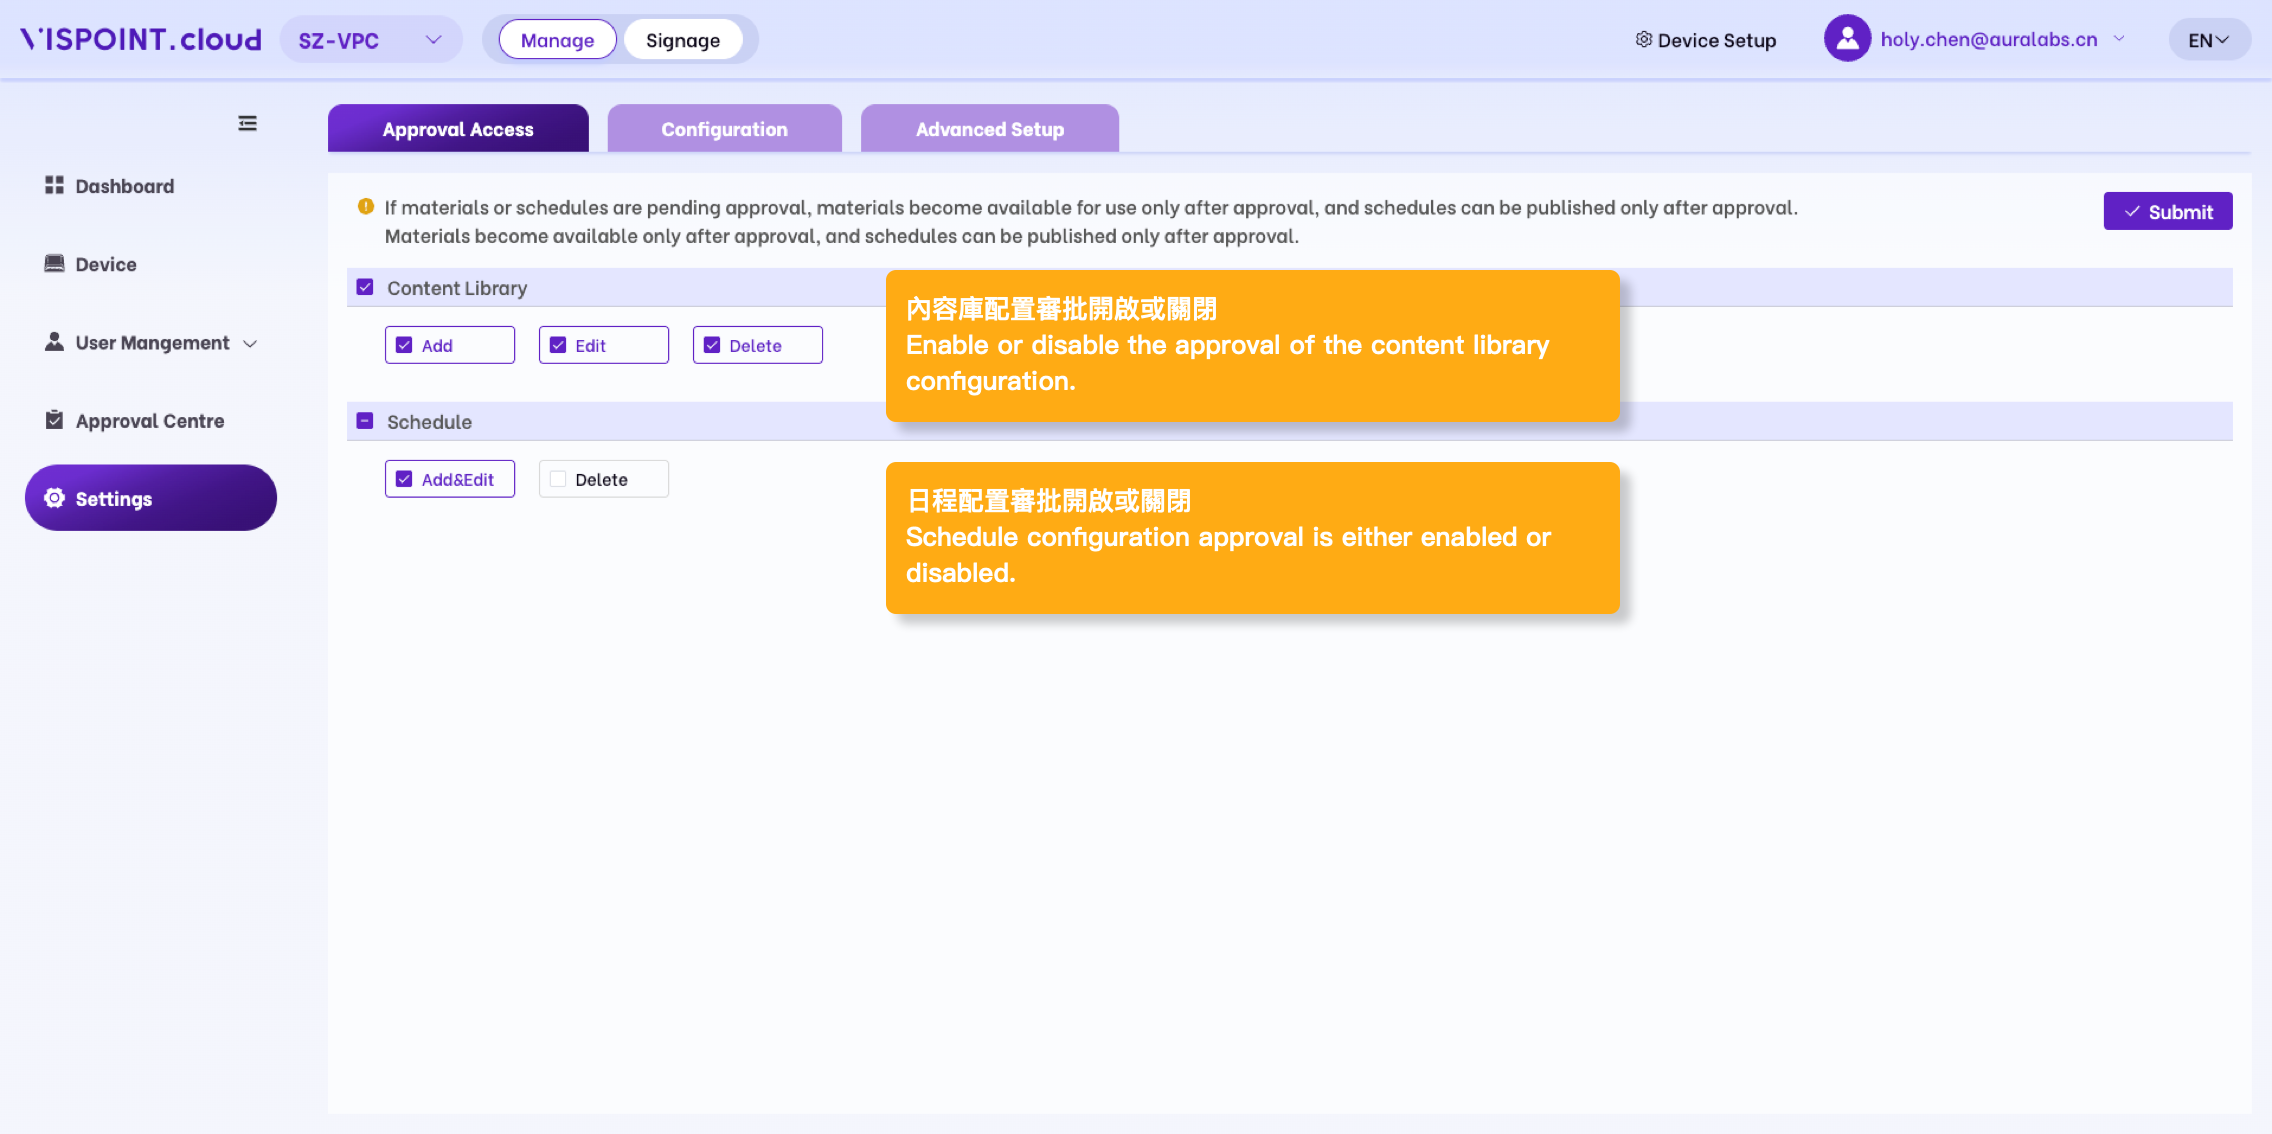
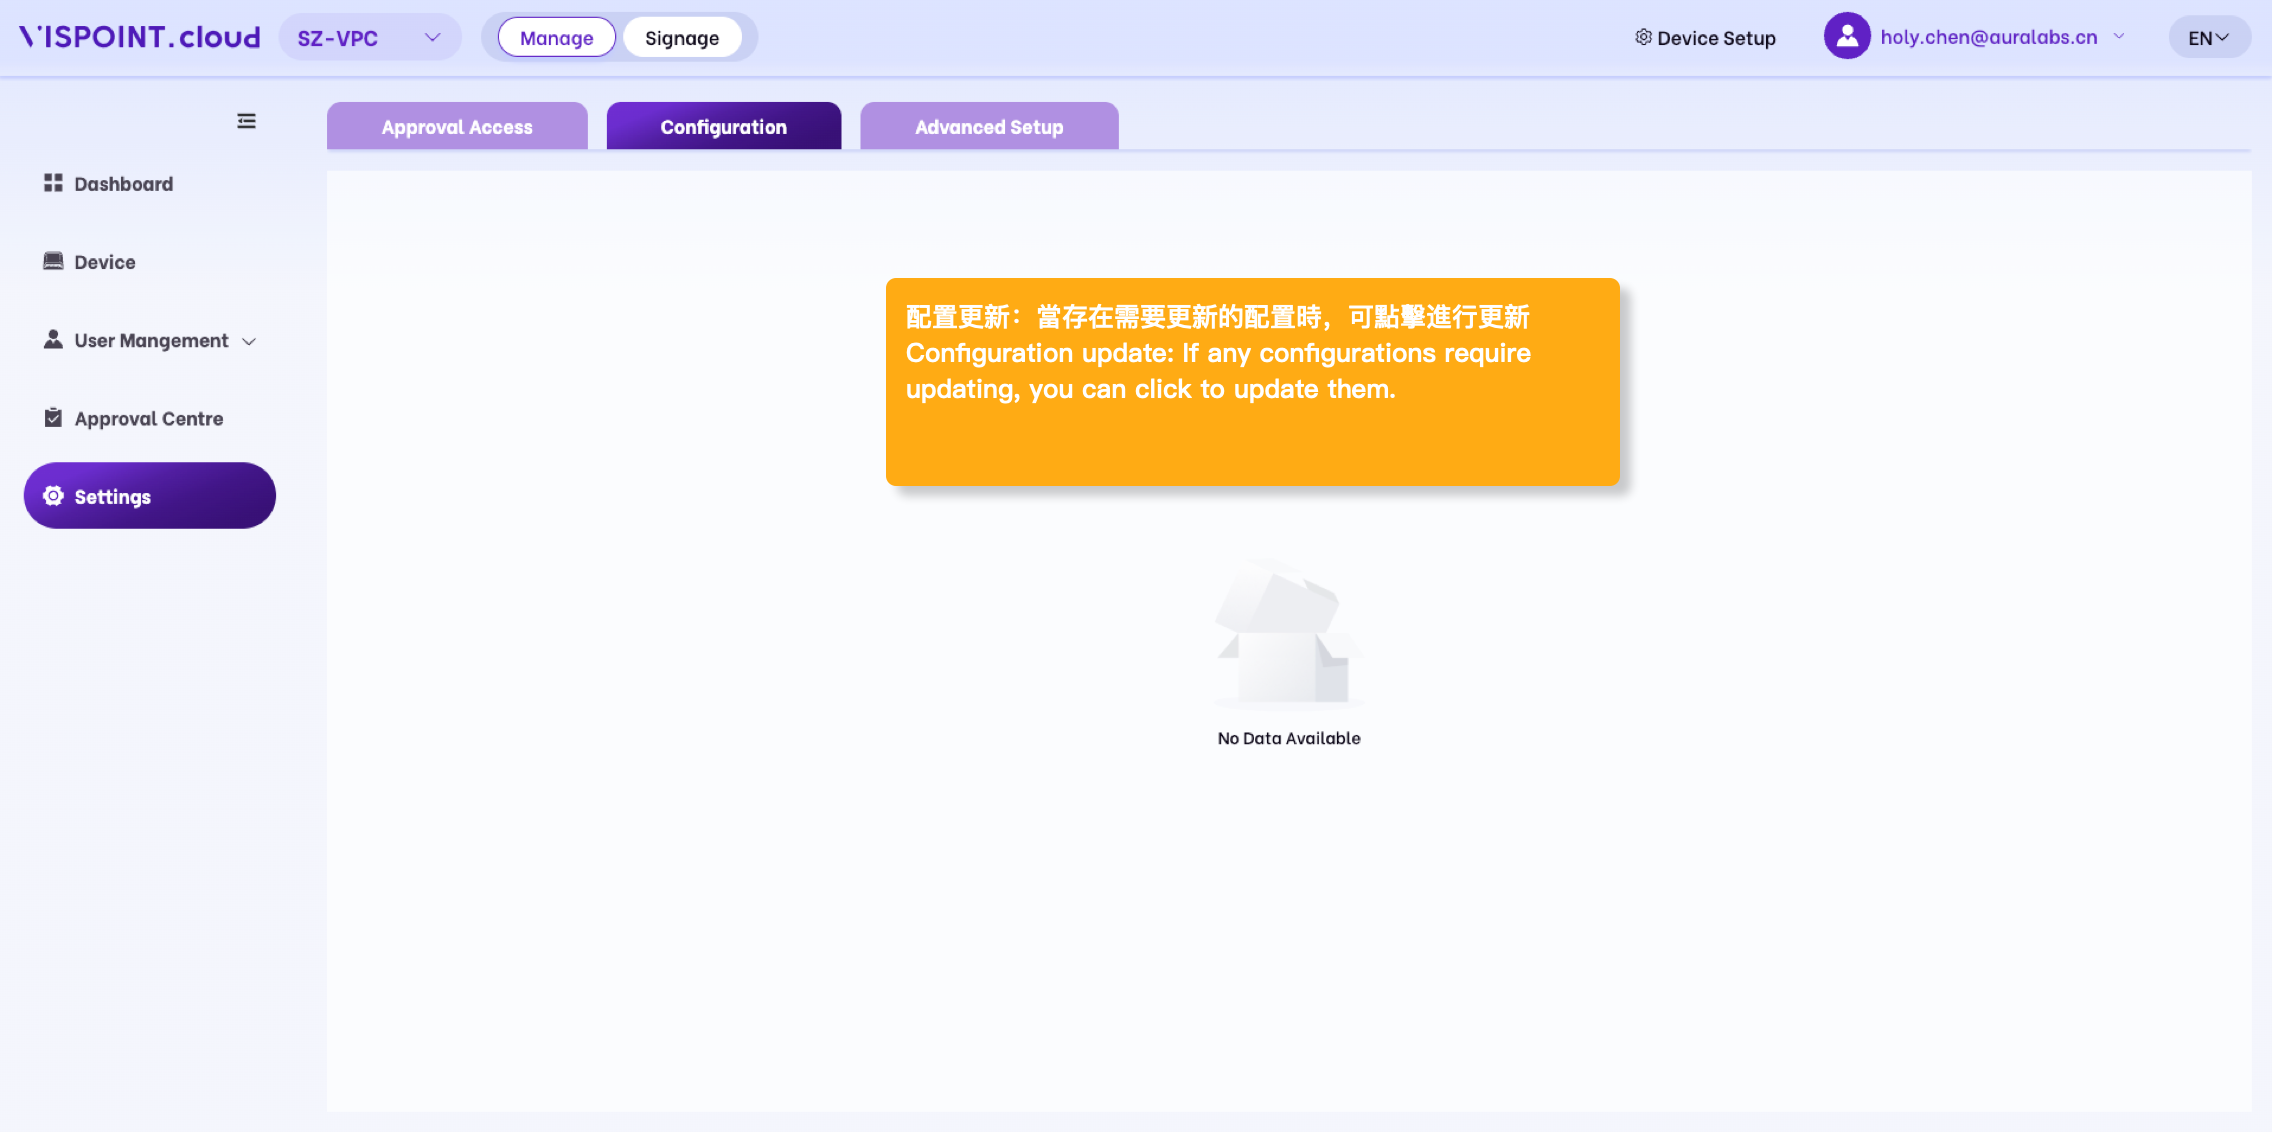
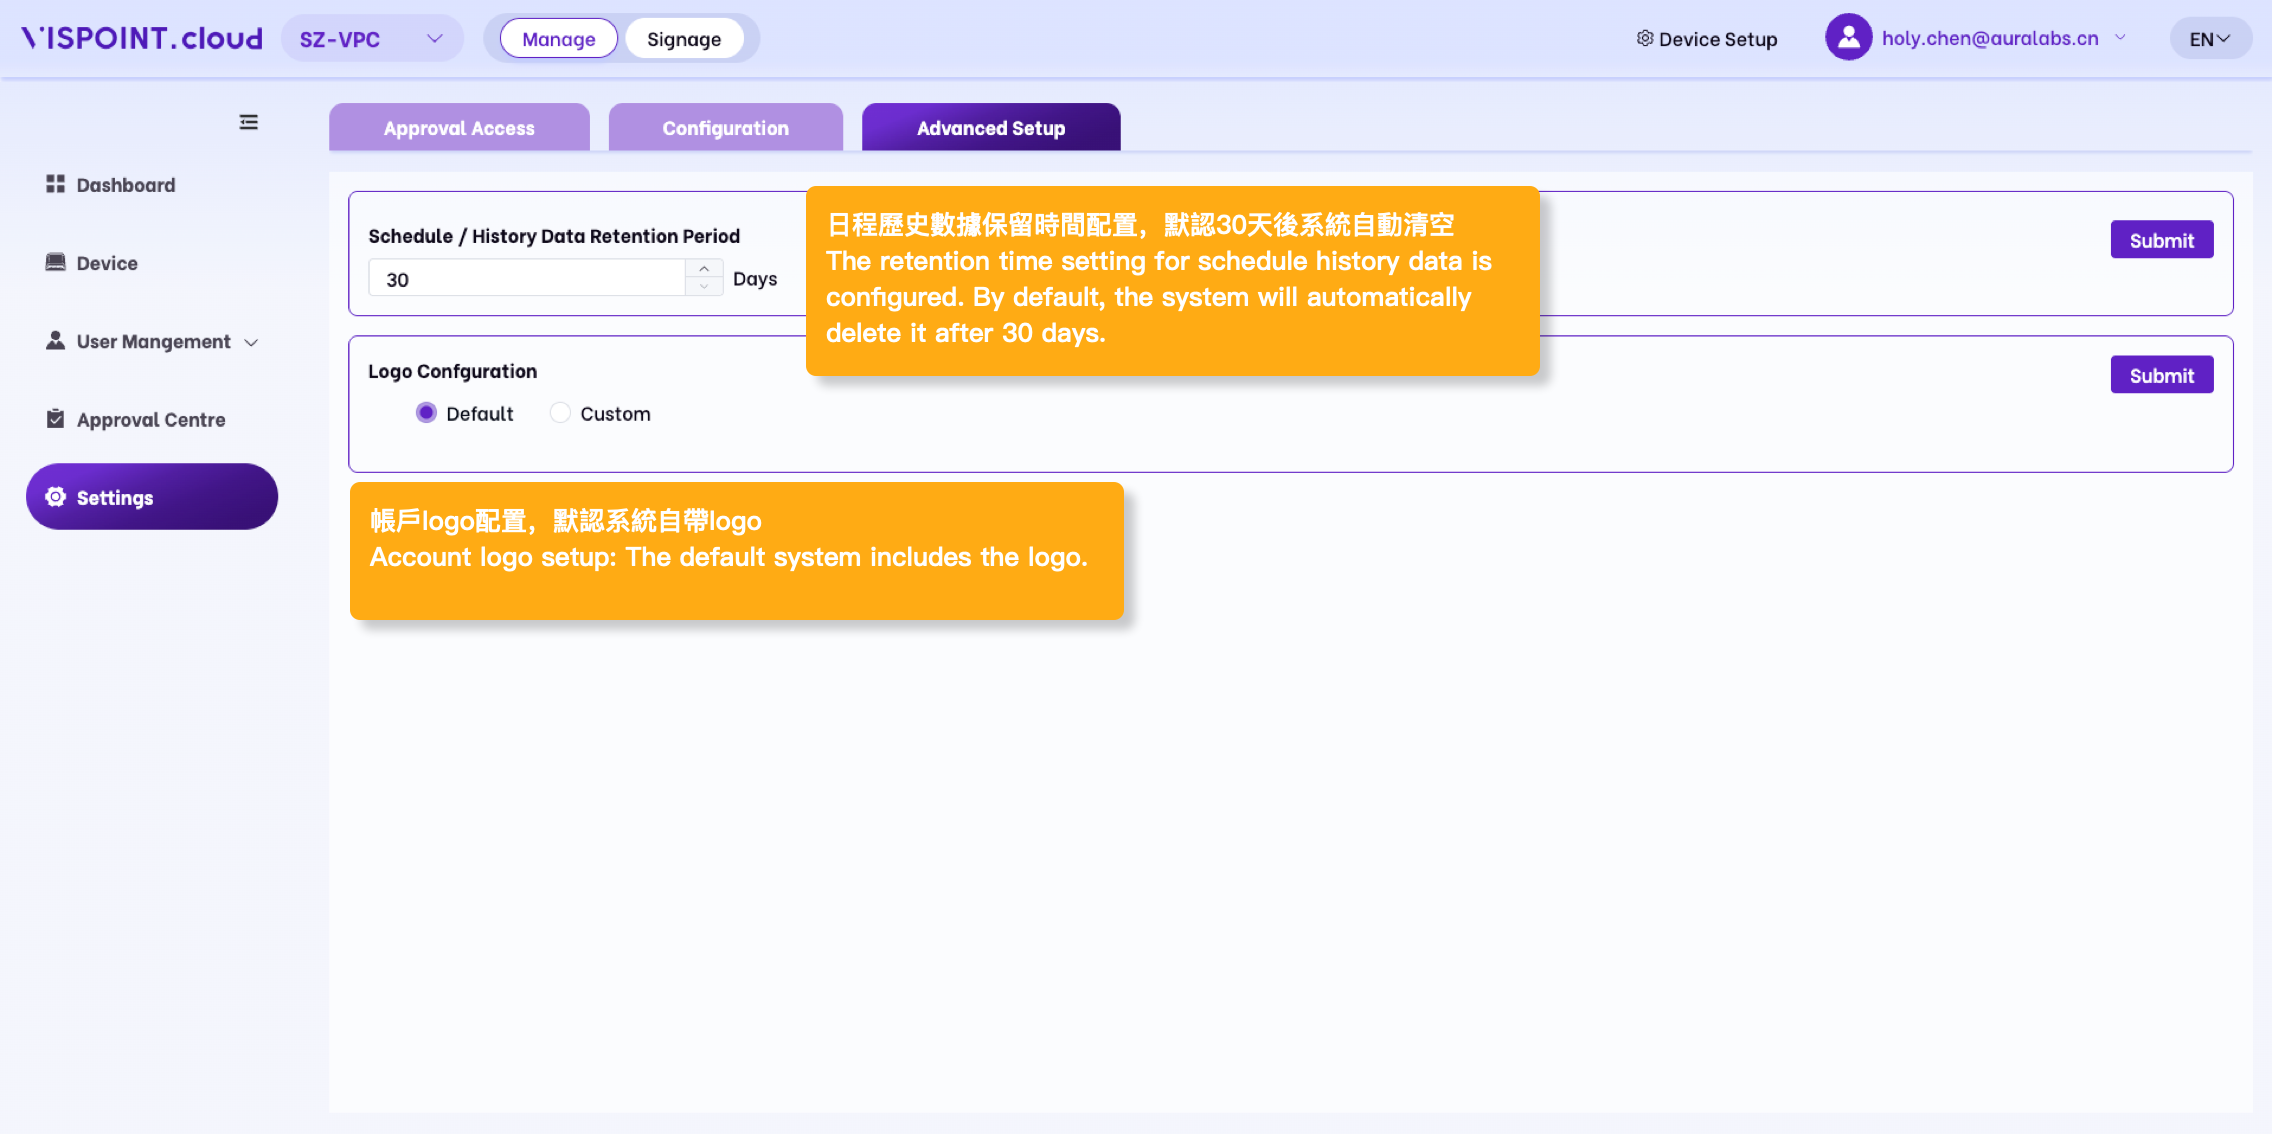
System Settings include: enabling or disabling approval permissions, configuration updates, and advanced settings

  • Prerequisite: Have permission for this module.

Content Library

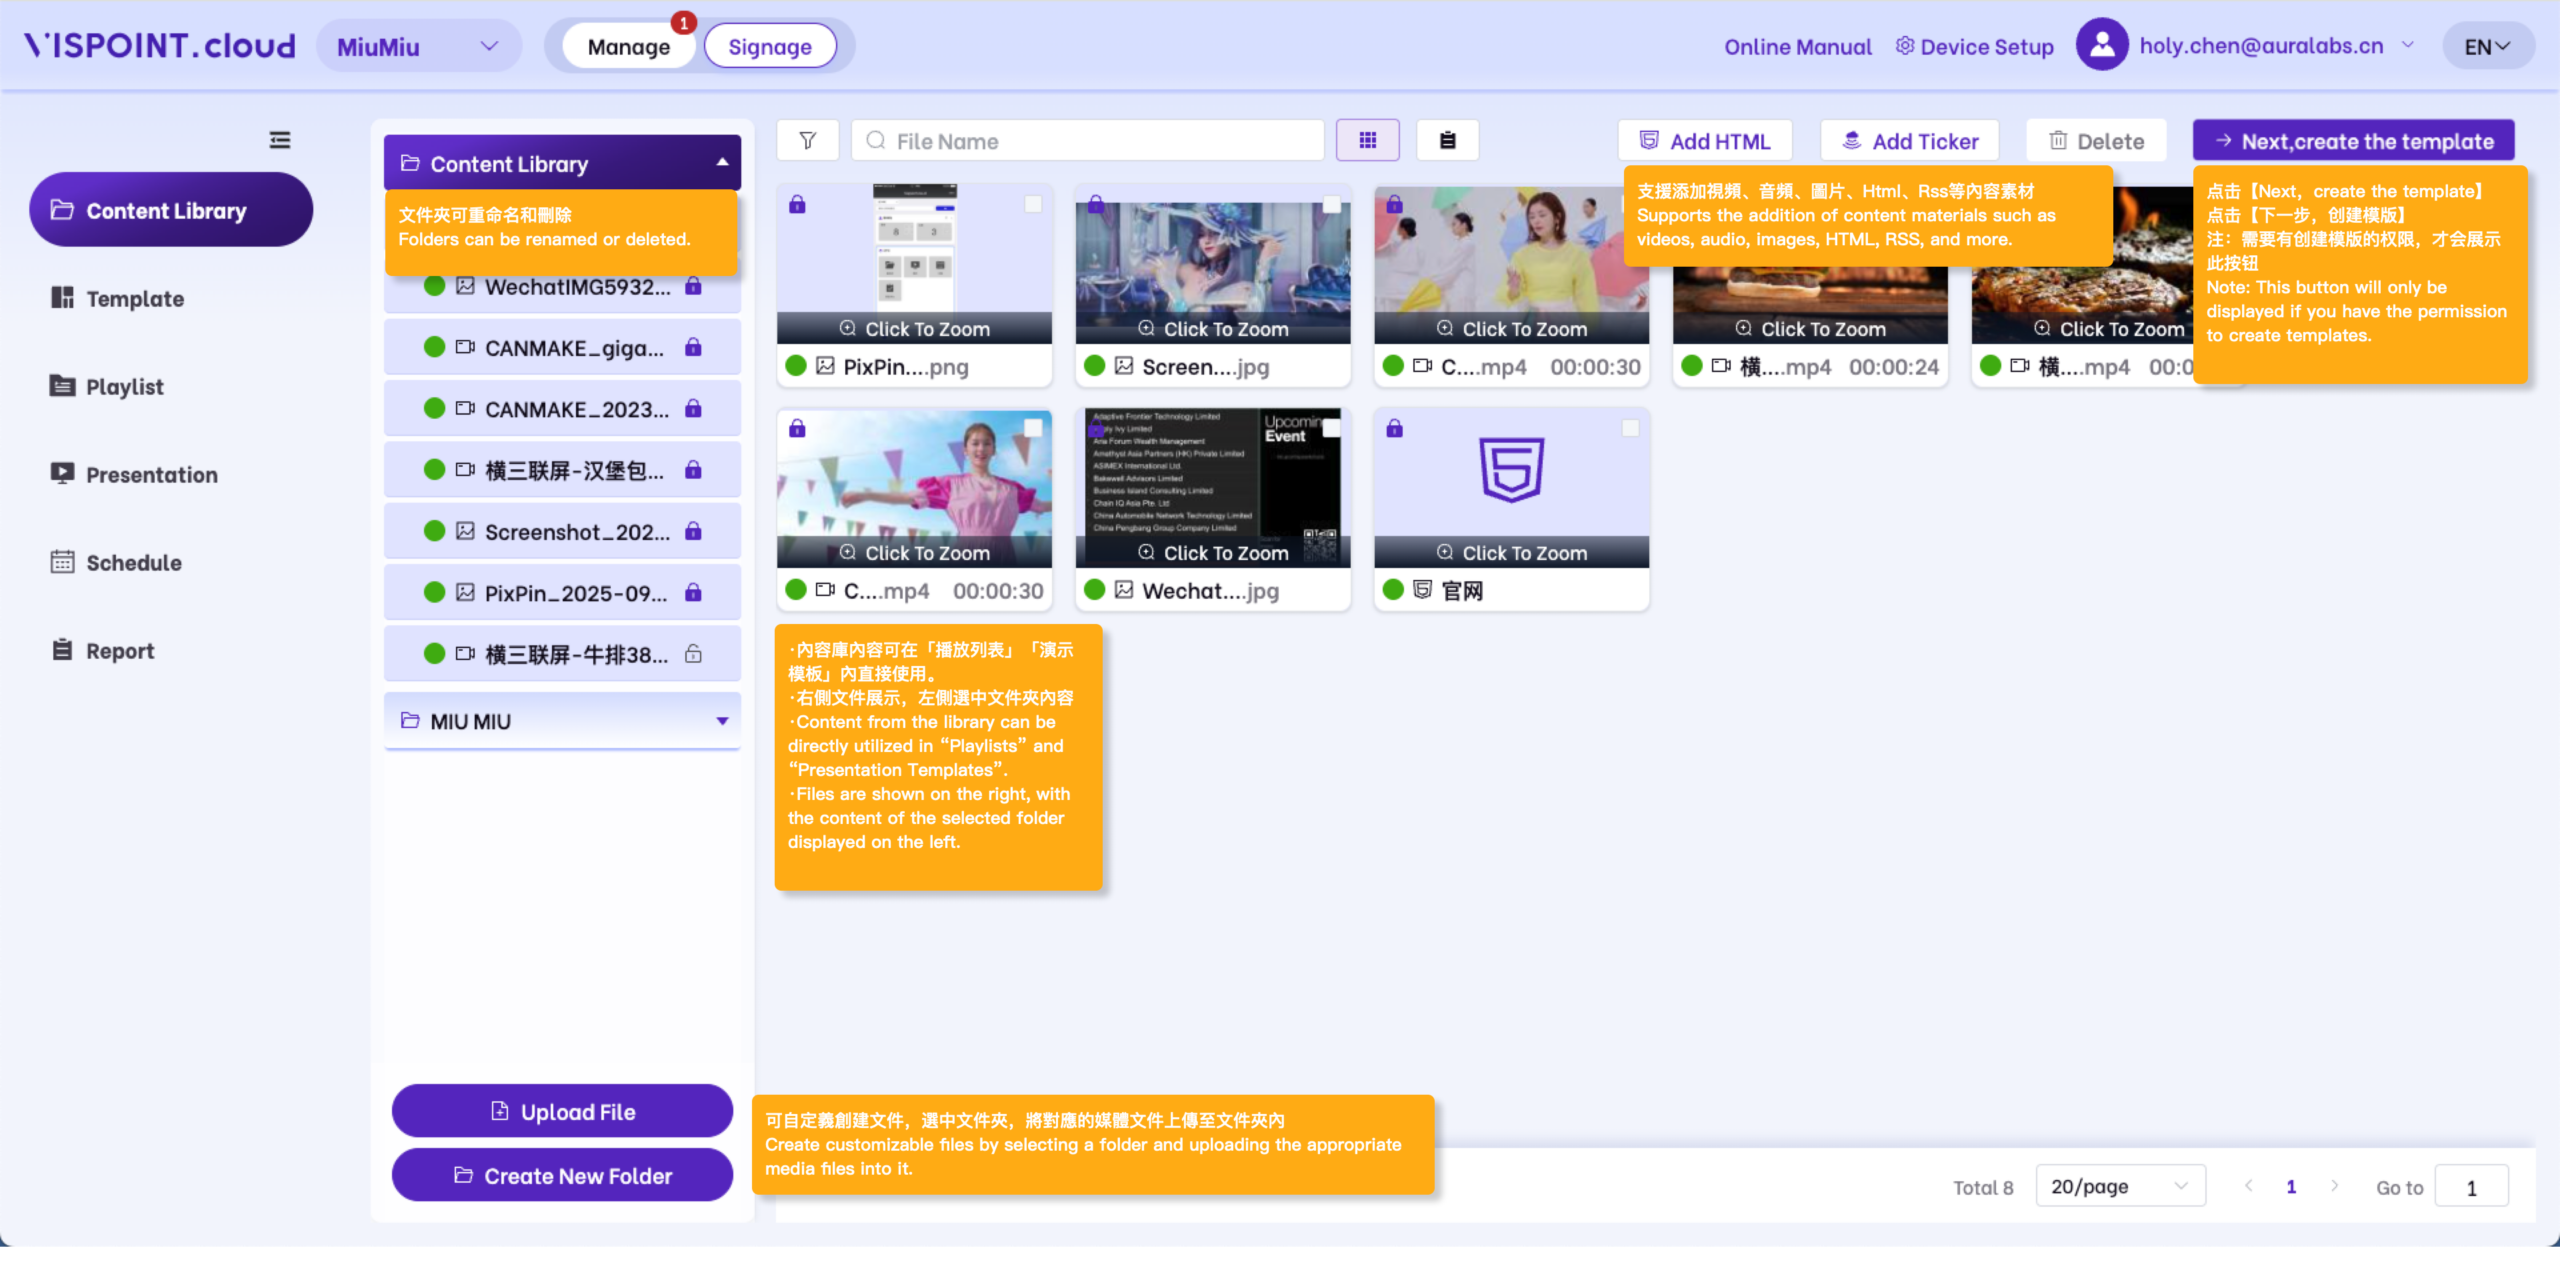
Uploading, Editing, and Deleting Files in the Vispoint.cloud Content Library
  • For Approved Schedules: Once a schedule is approved, modifying files within that schedule—whether uploading, editing, or deleting—will not impact the approved schedule.
  • For Pending Schedules (Before Approval): For unapproved schedules, any uploads, edits, or deletions of files will trigger real-time data synchronization and updates.
  • The content will be used in both [Playlists] and [Presentation].
  • Prerequisite: Have permissions for the relevant device group and receive approval permissions.

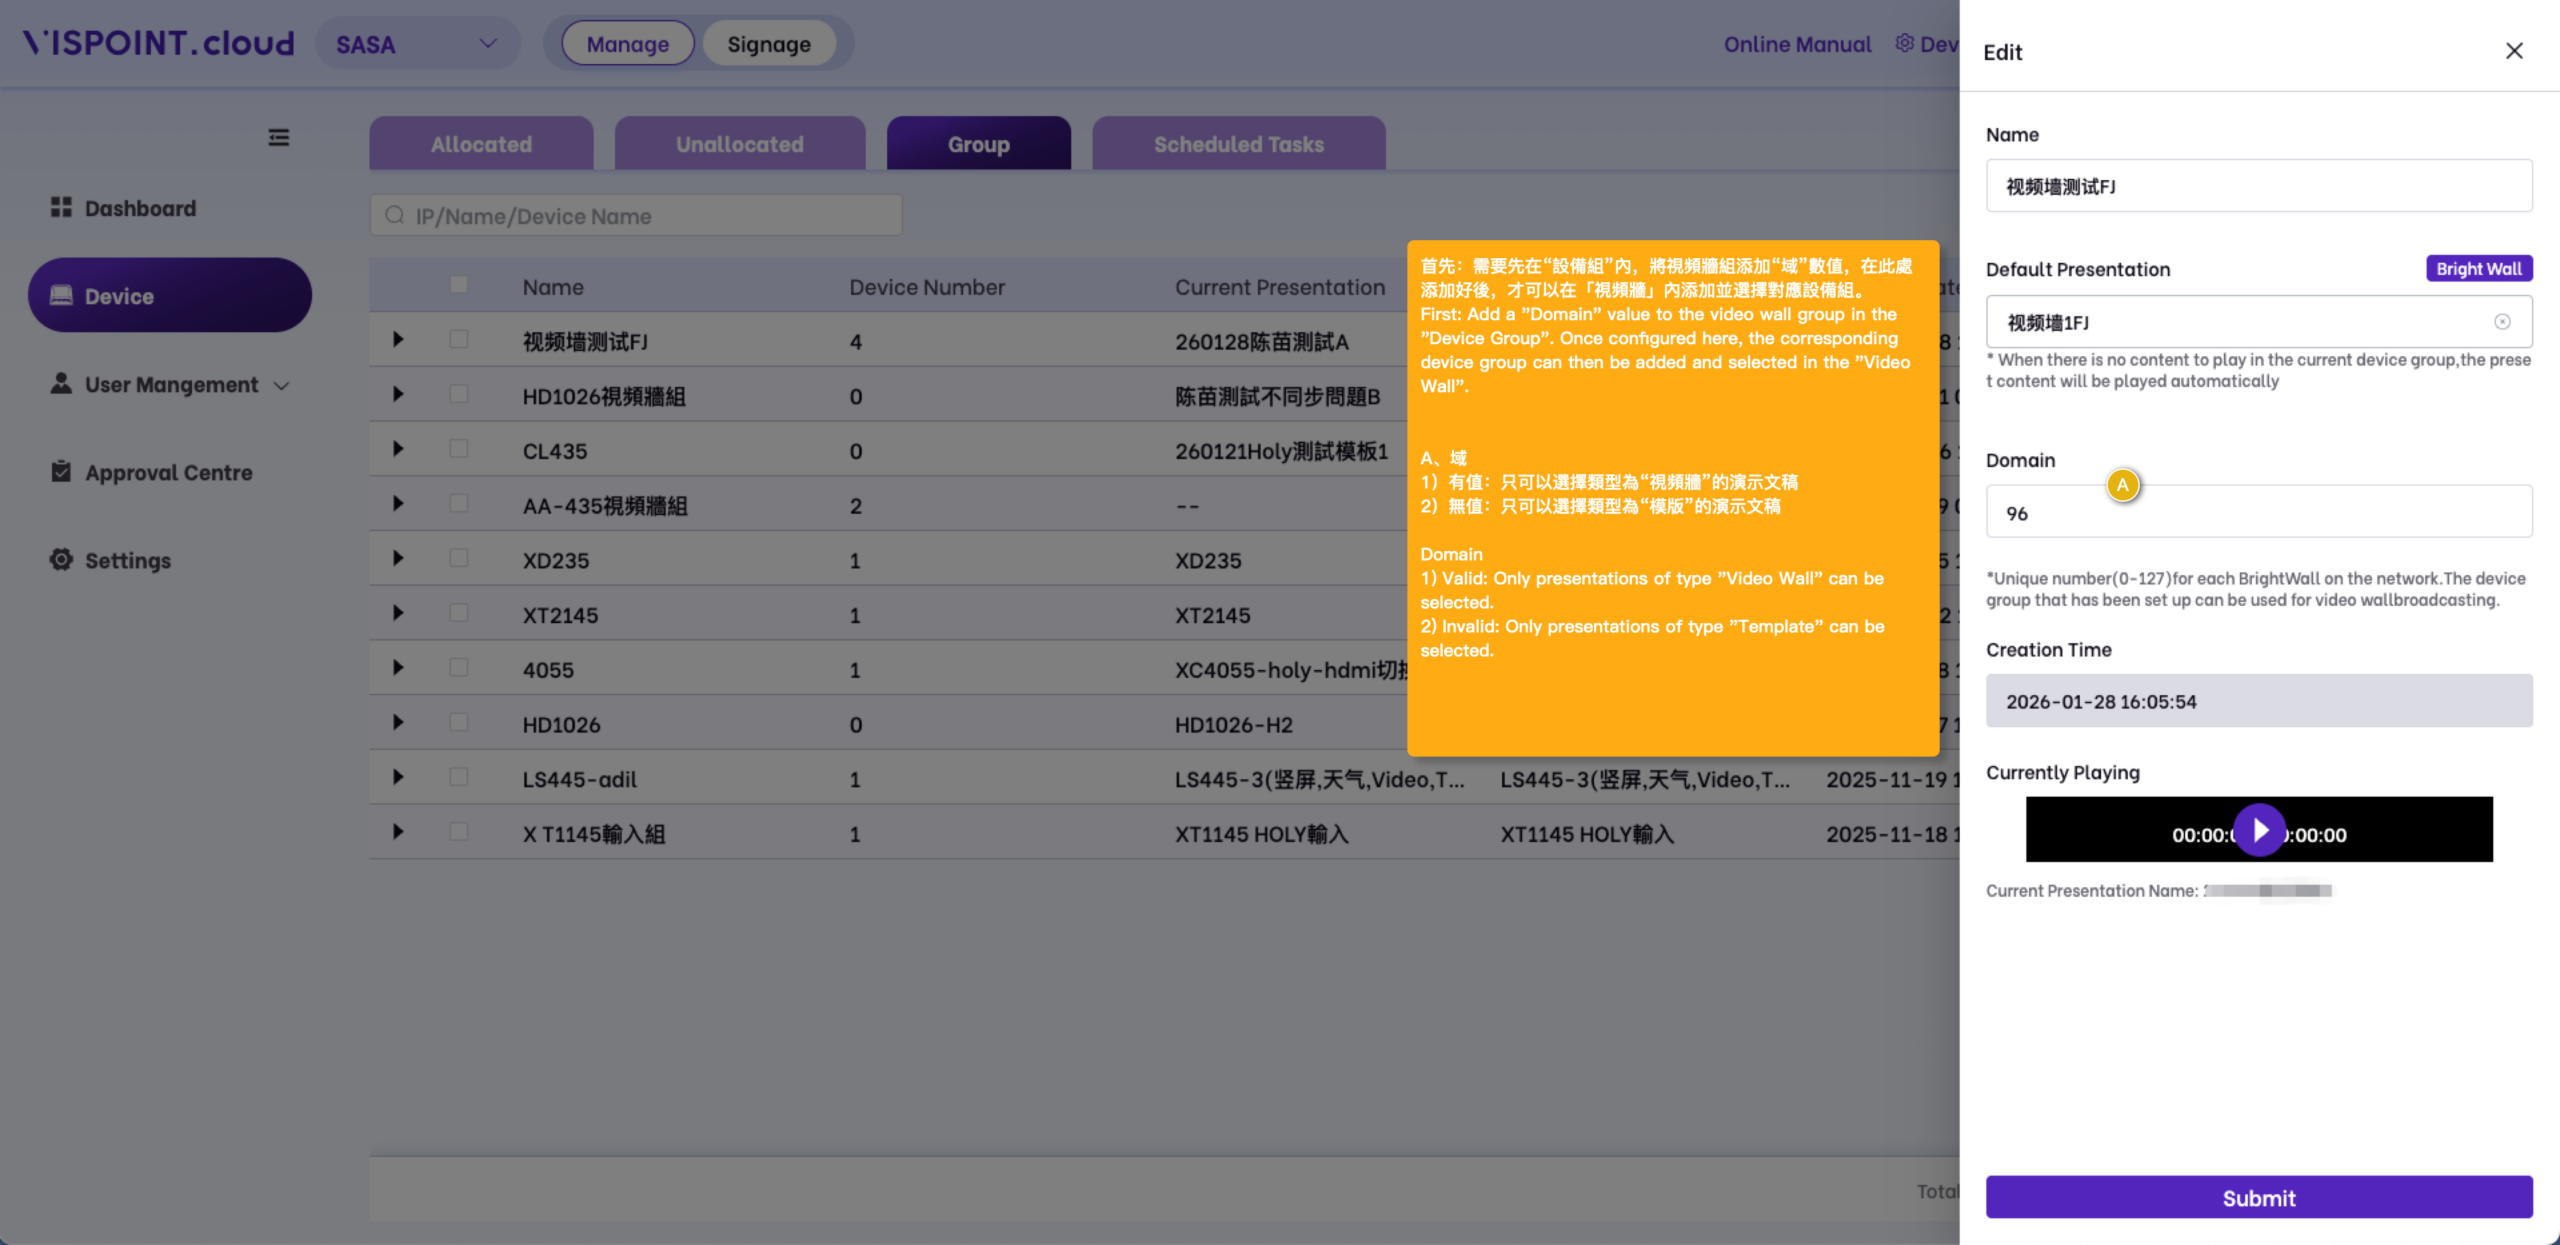
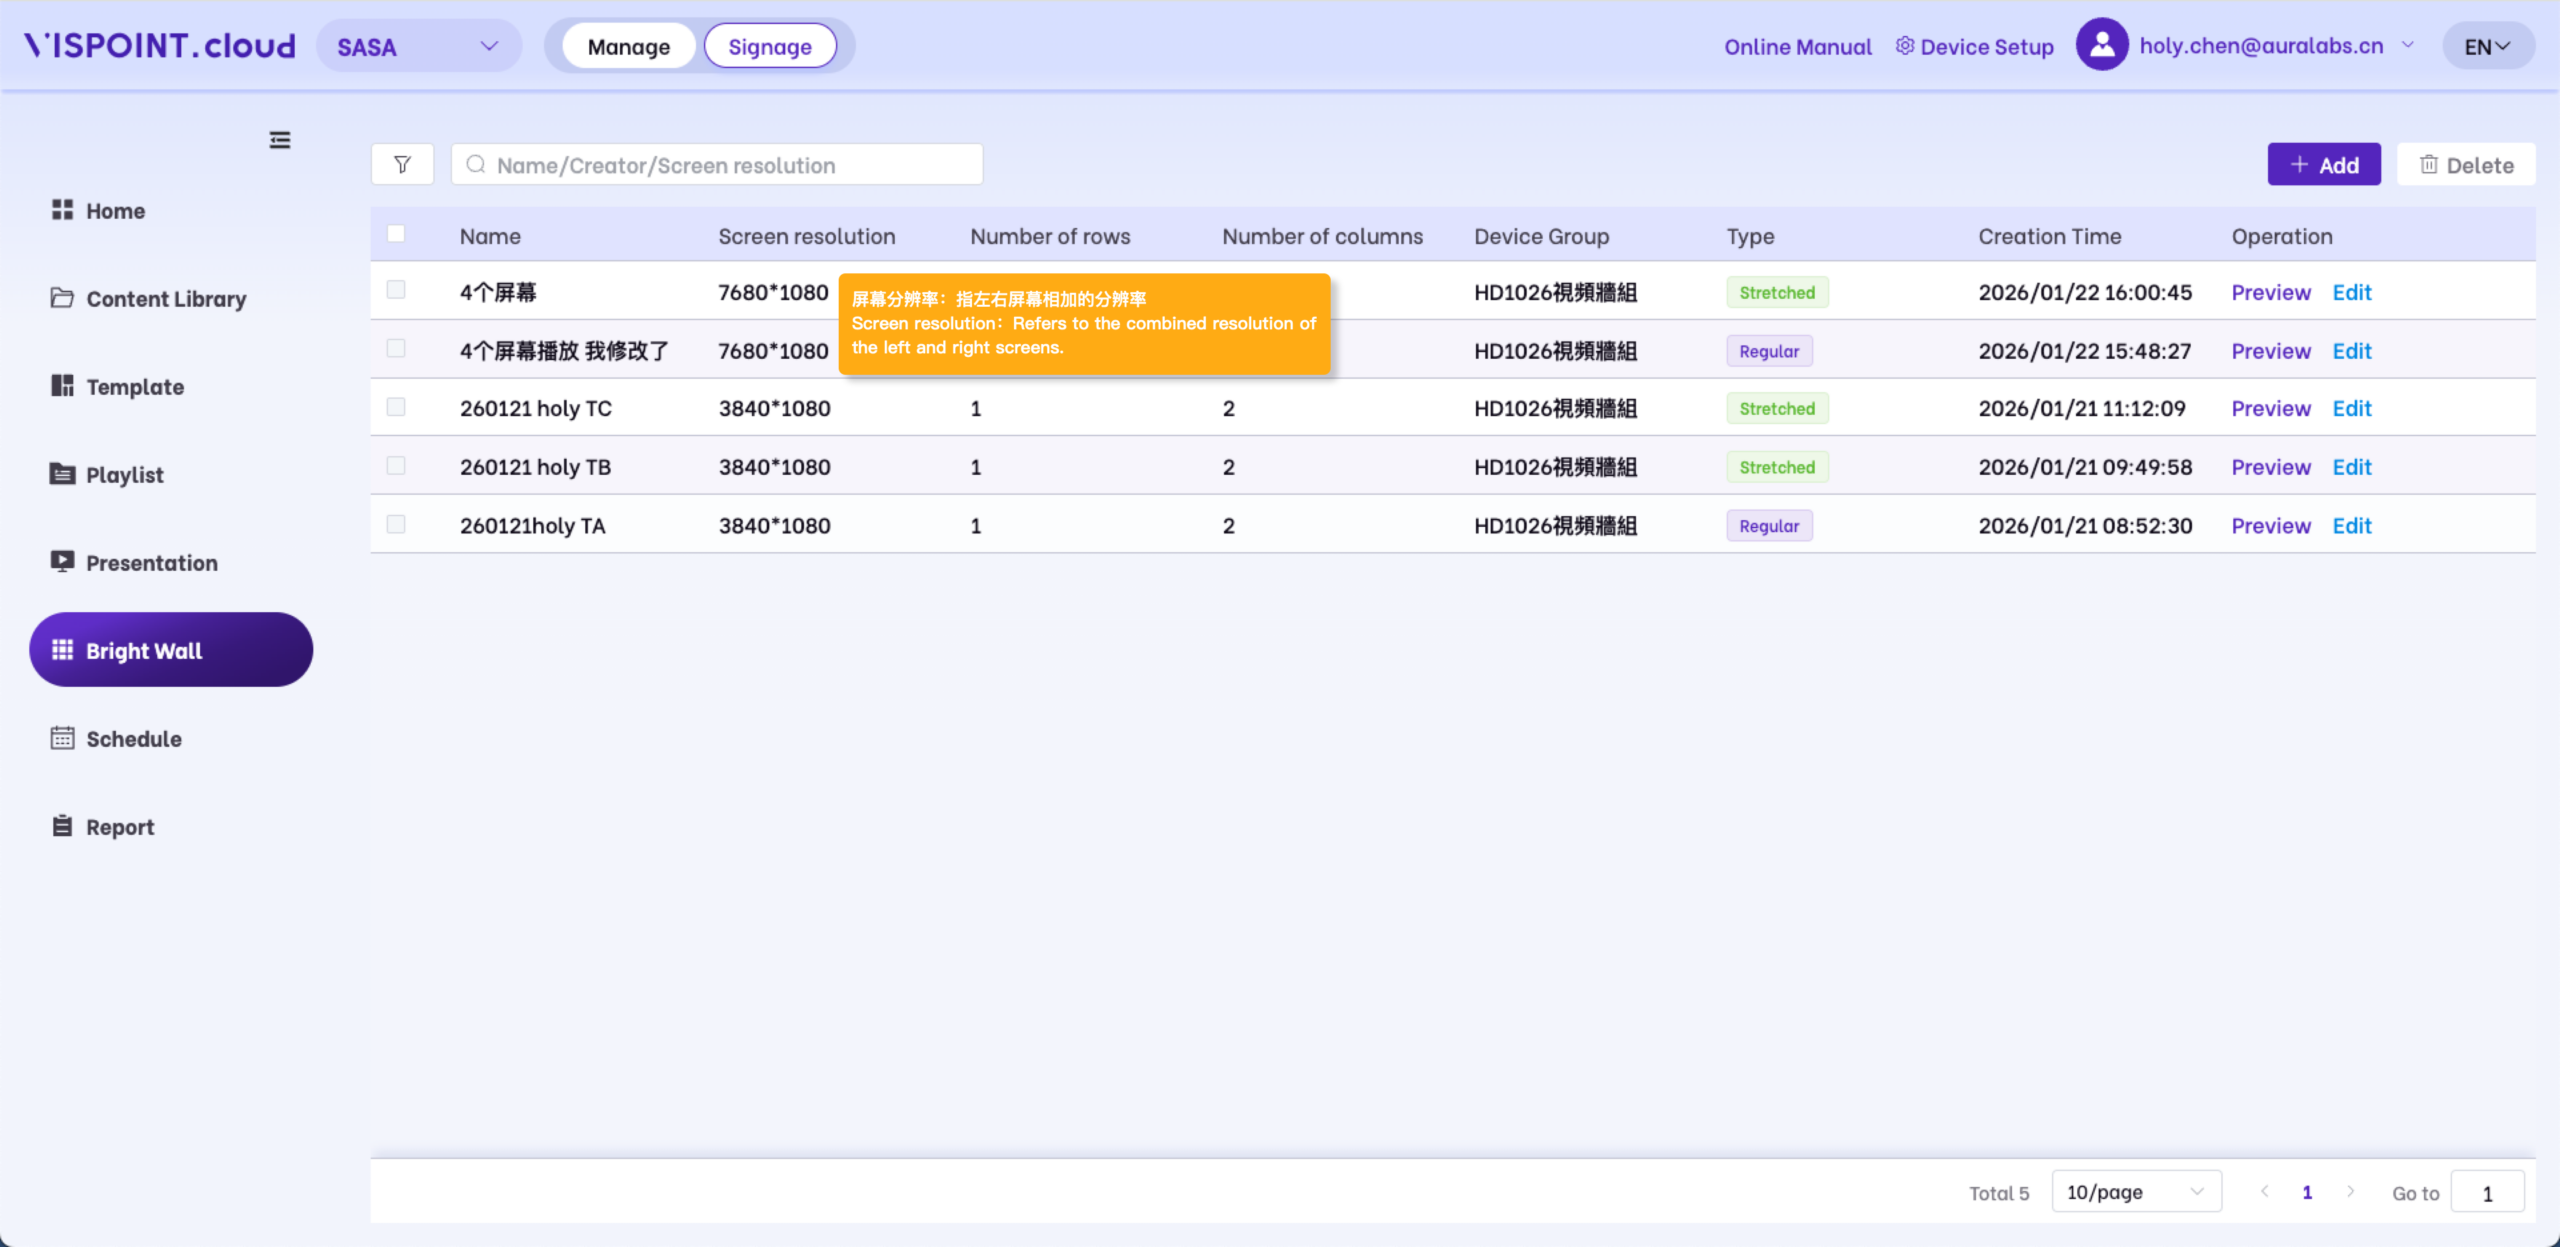
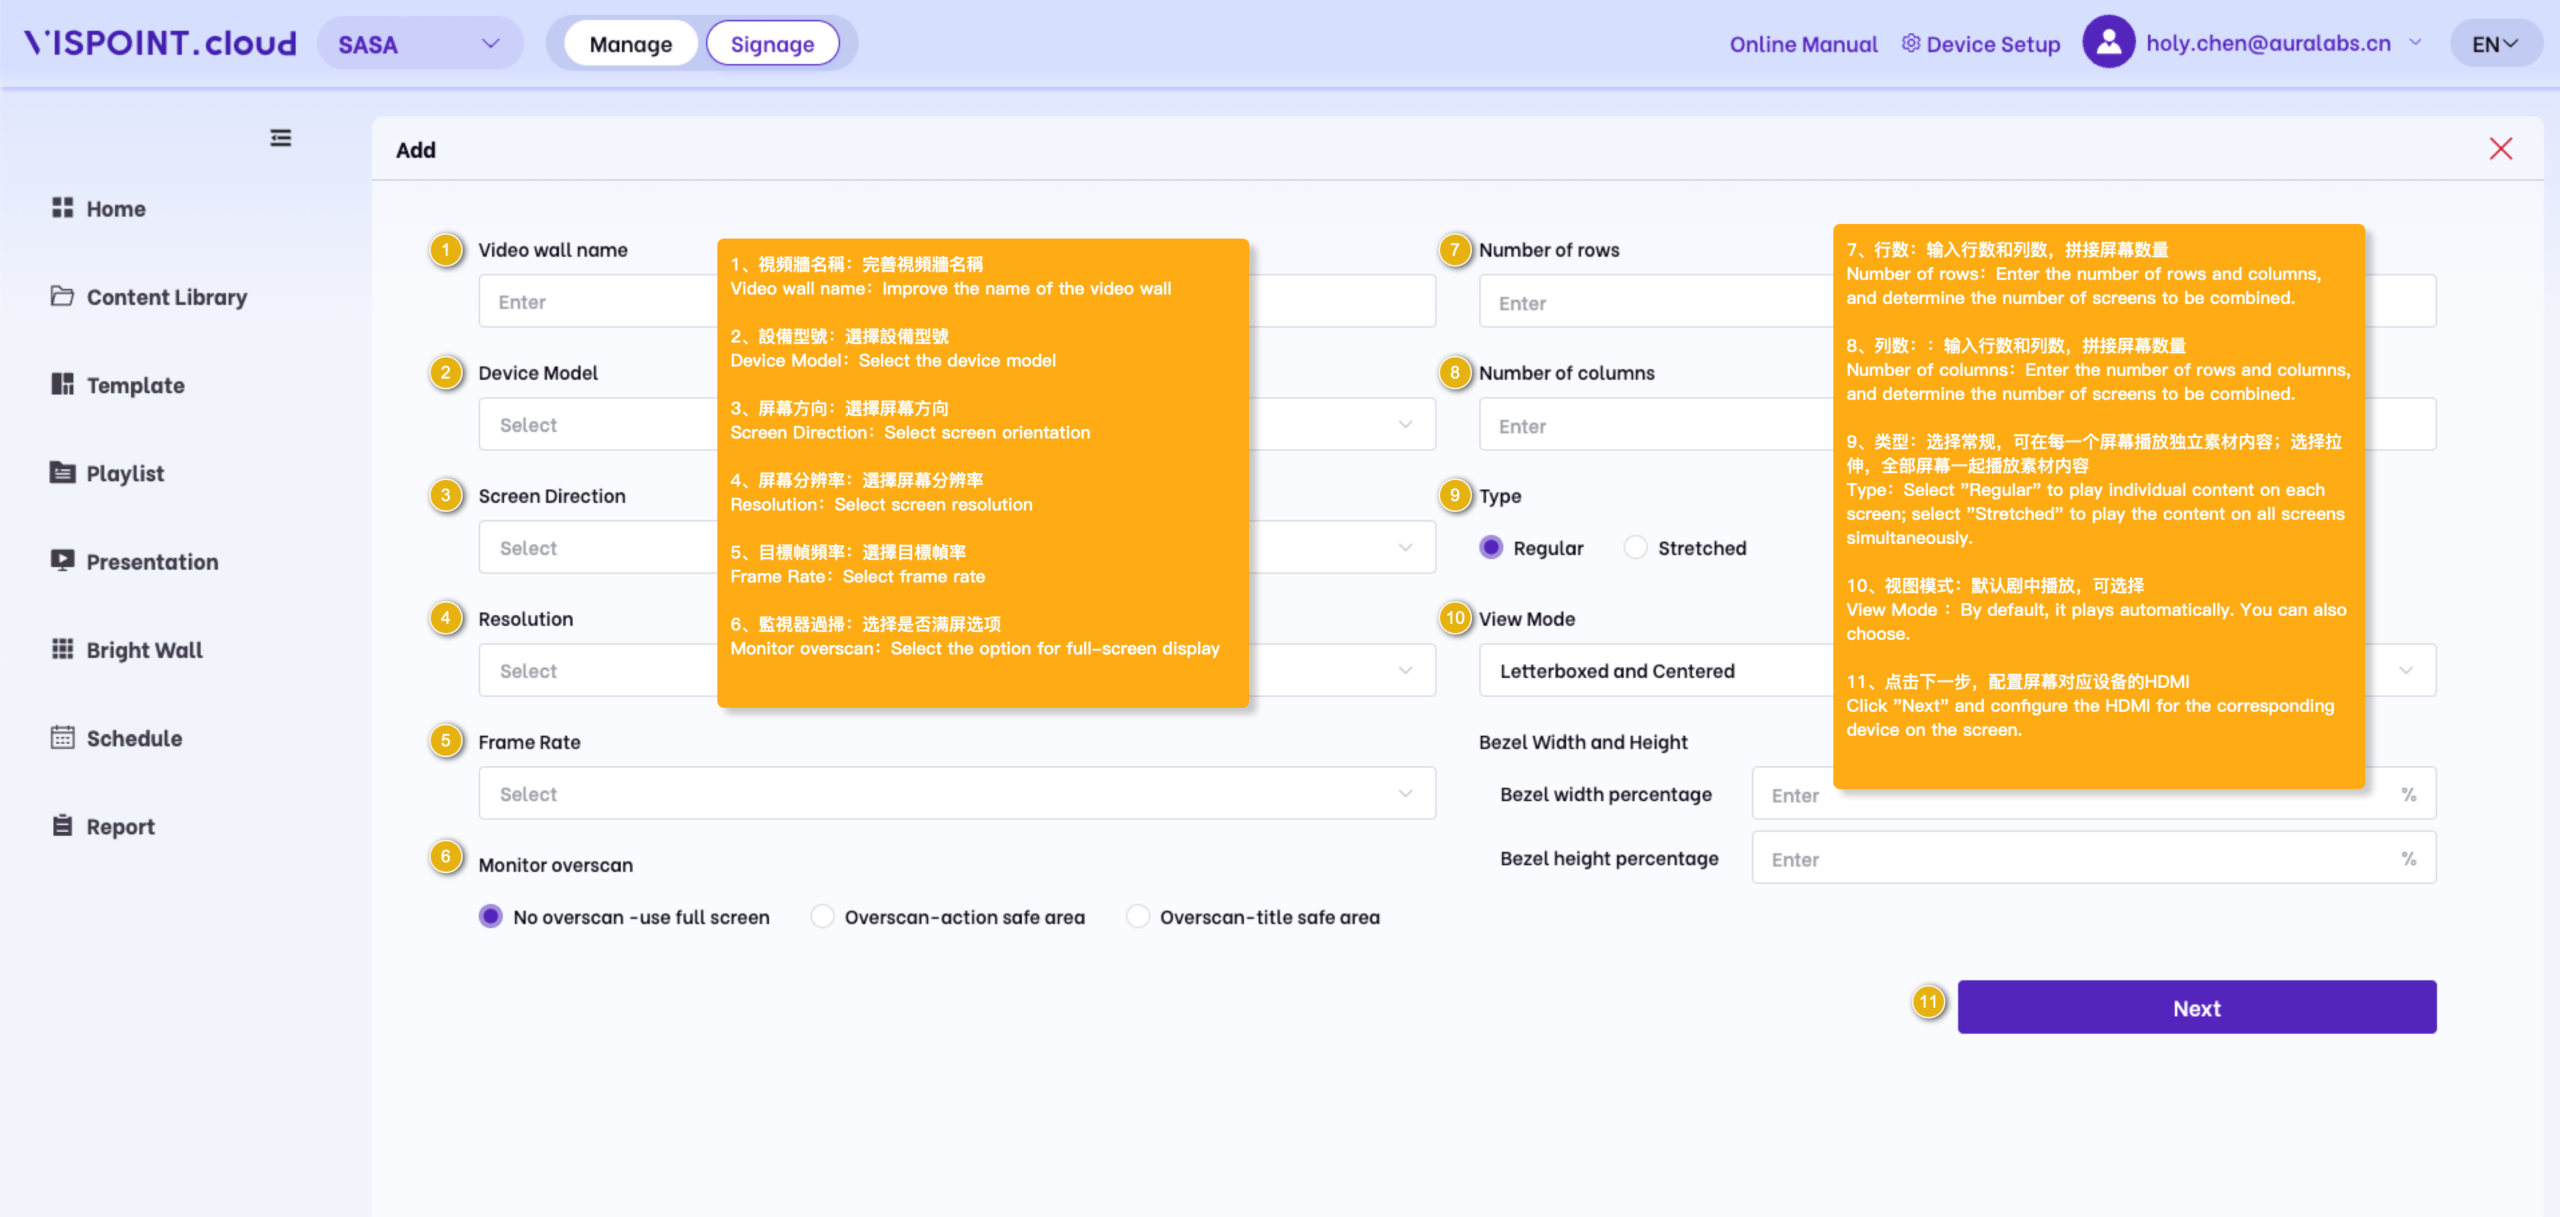
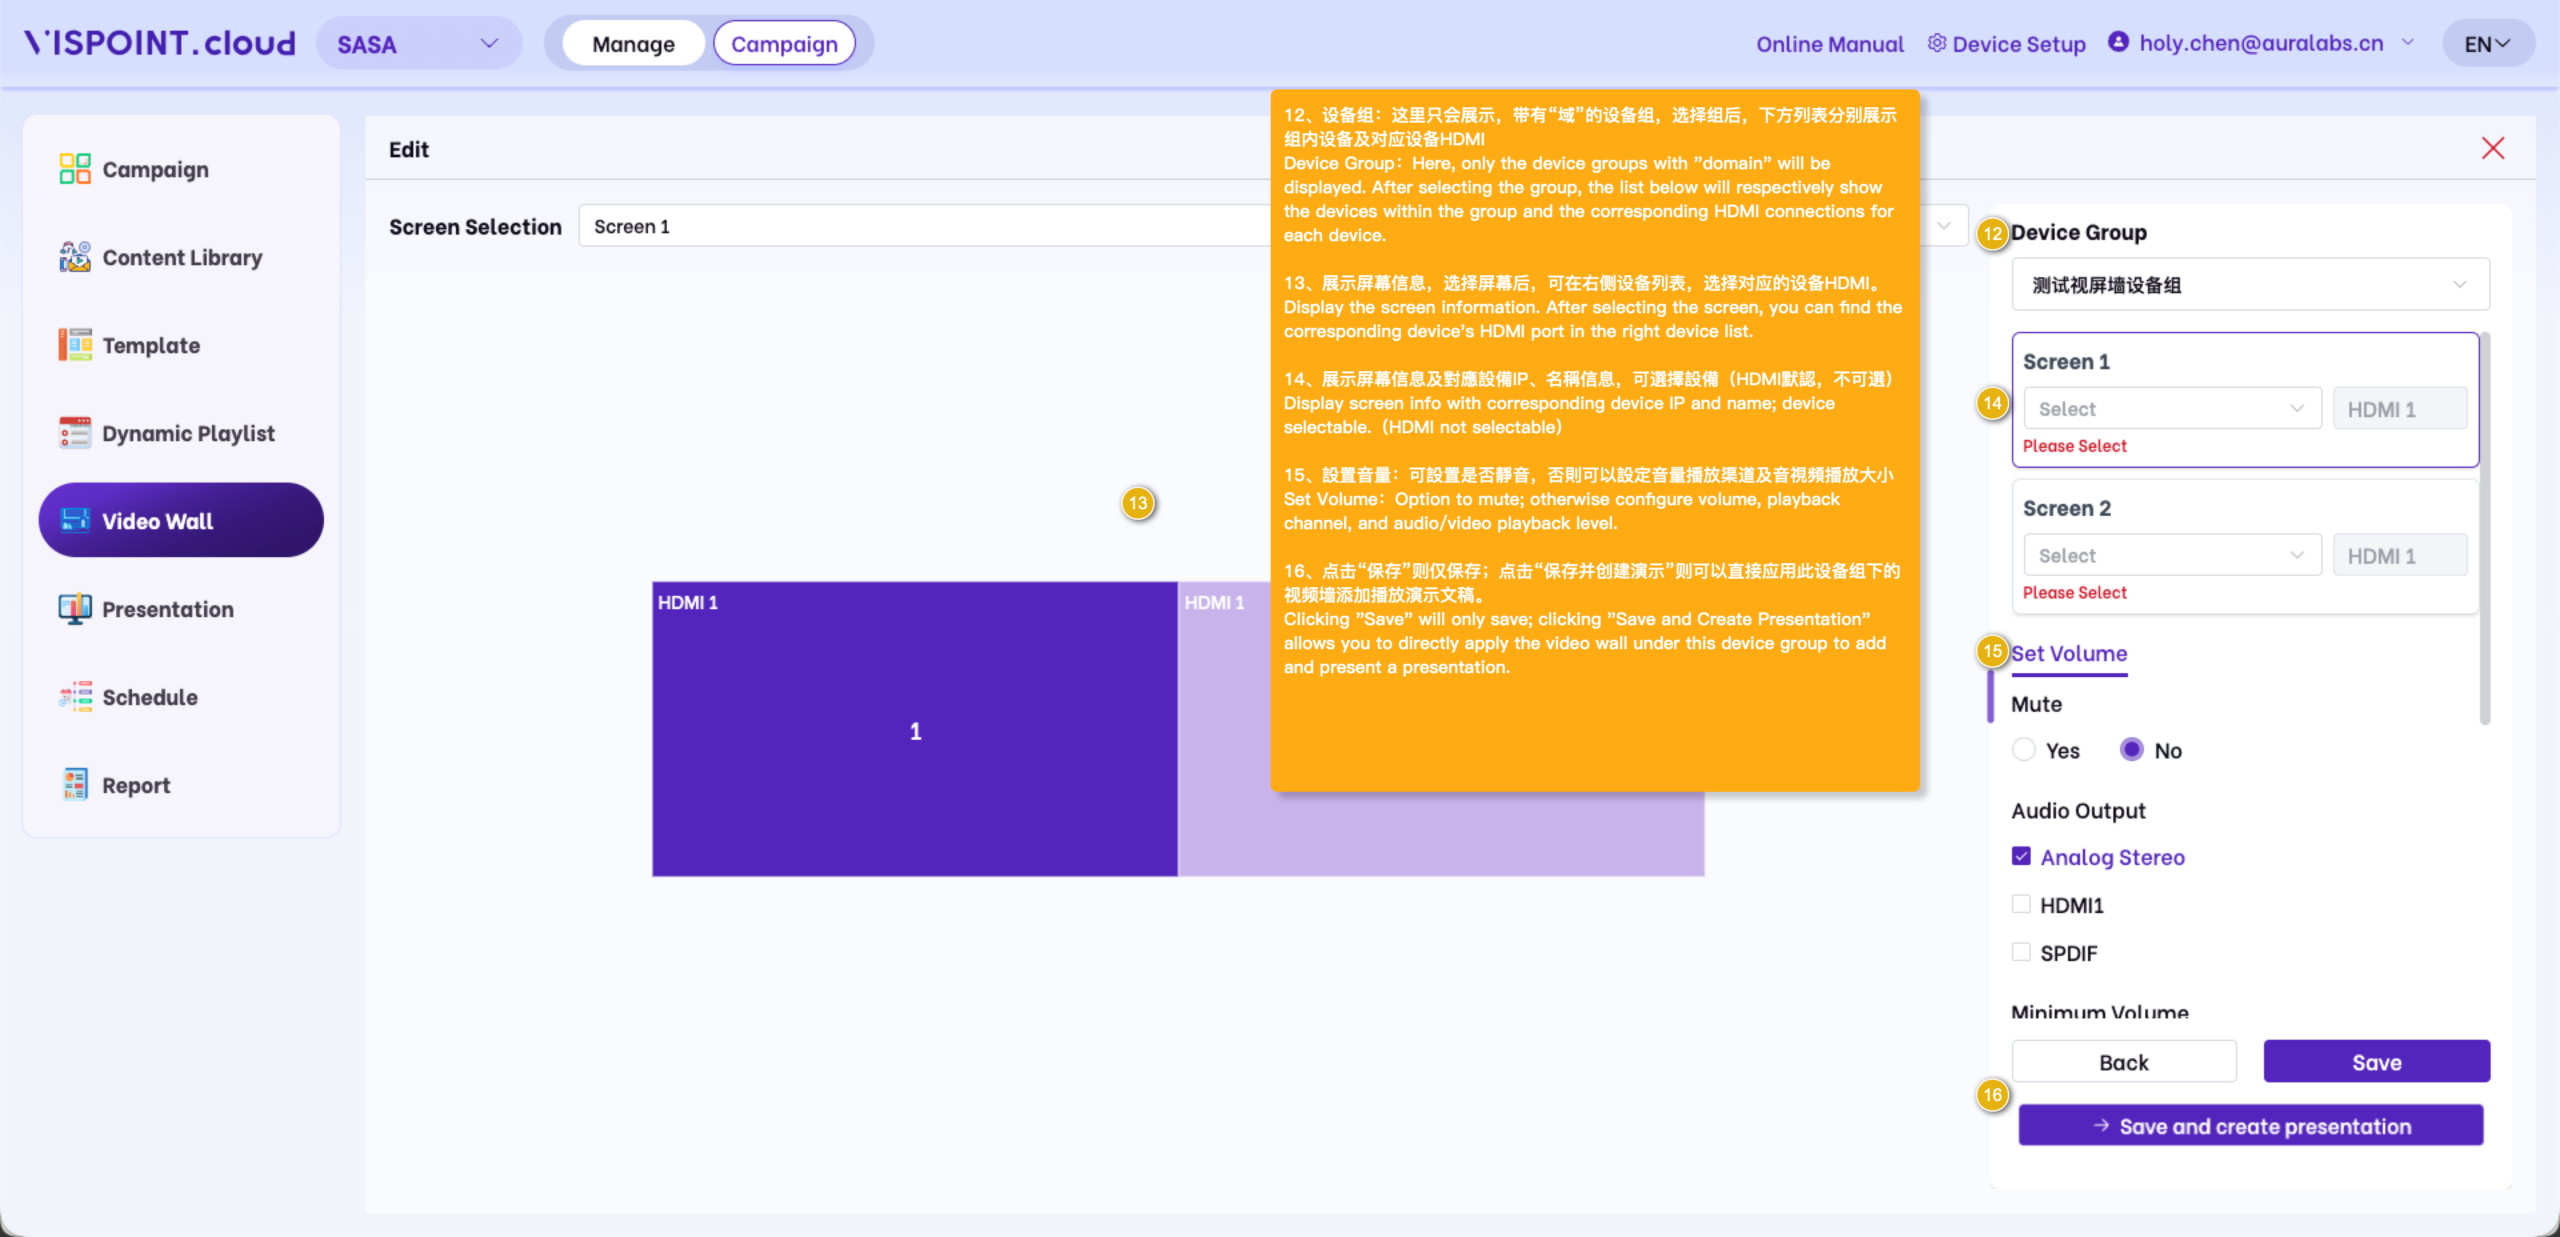
Video Wall

The Video Wall feature allows you to easily create, publish, and edit video-wall deployments. Video walls are created by synchronising the playback of multiple players using Genlock. Each player is connected to a different screen on the wall, and the players are linked over a local network connection. Simple looping video playlists are the only presentation type supported by Video Wall. Images and interactive playlists are not supported: Use this page.

Schedule

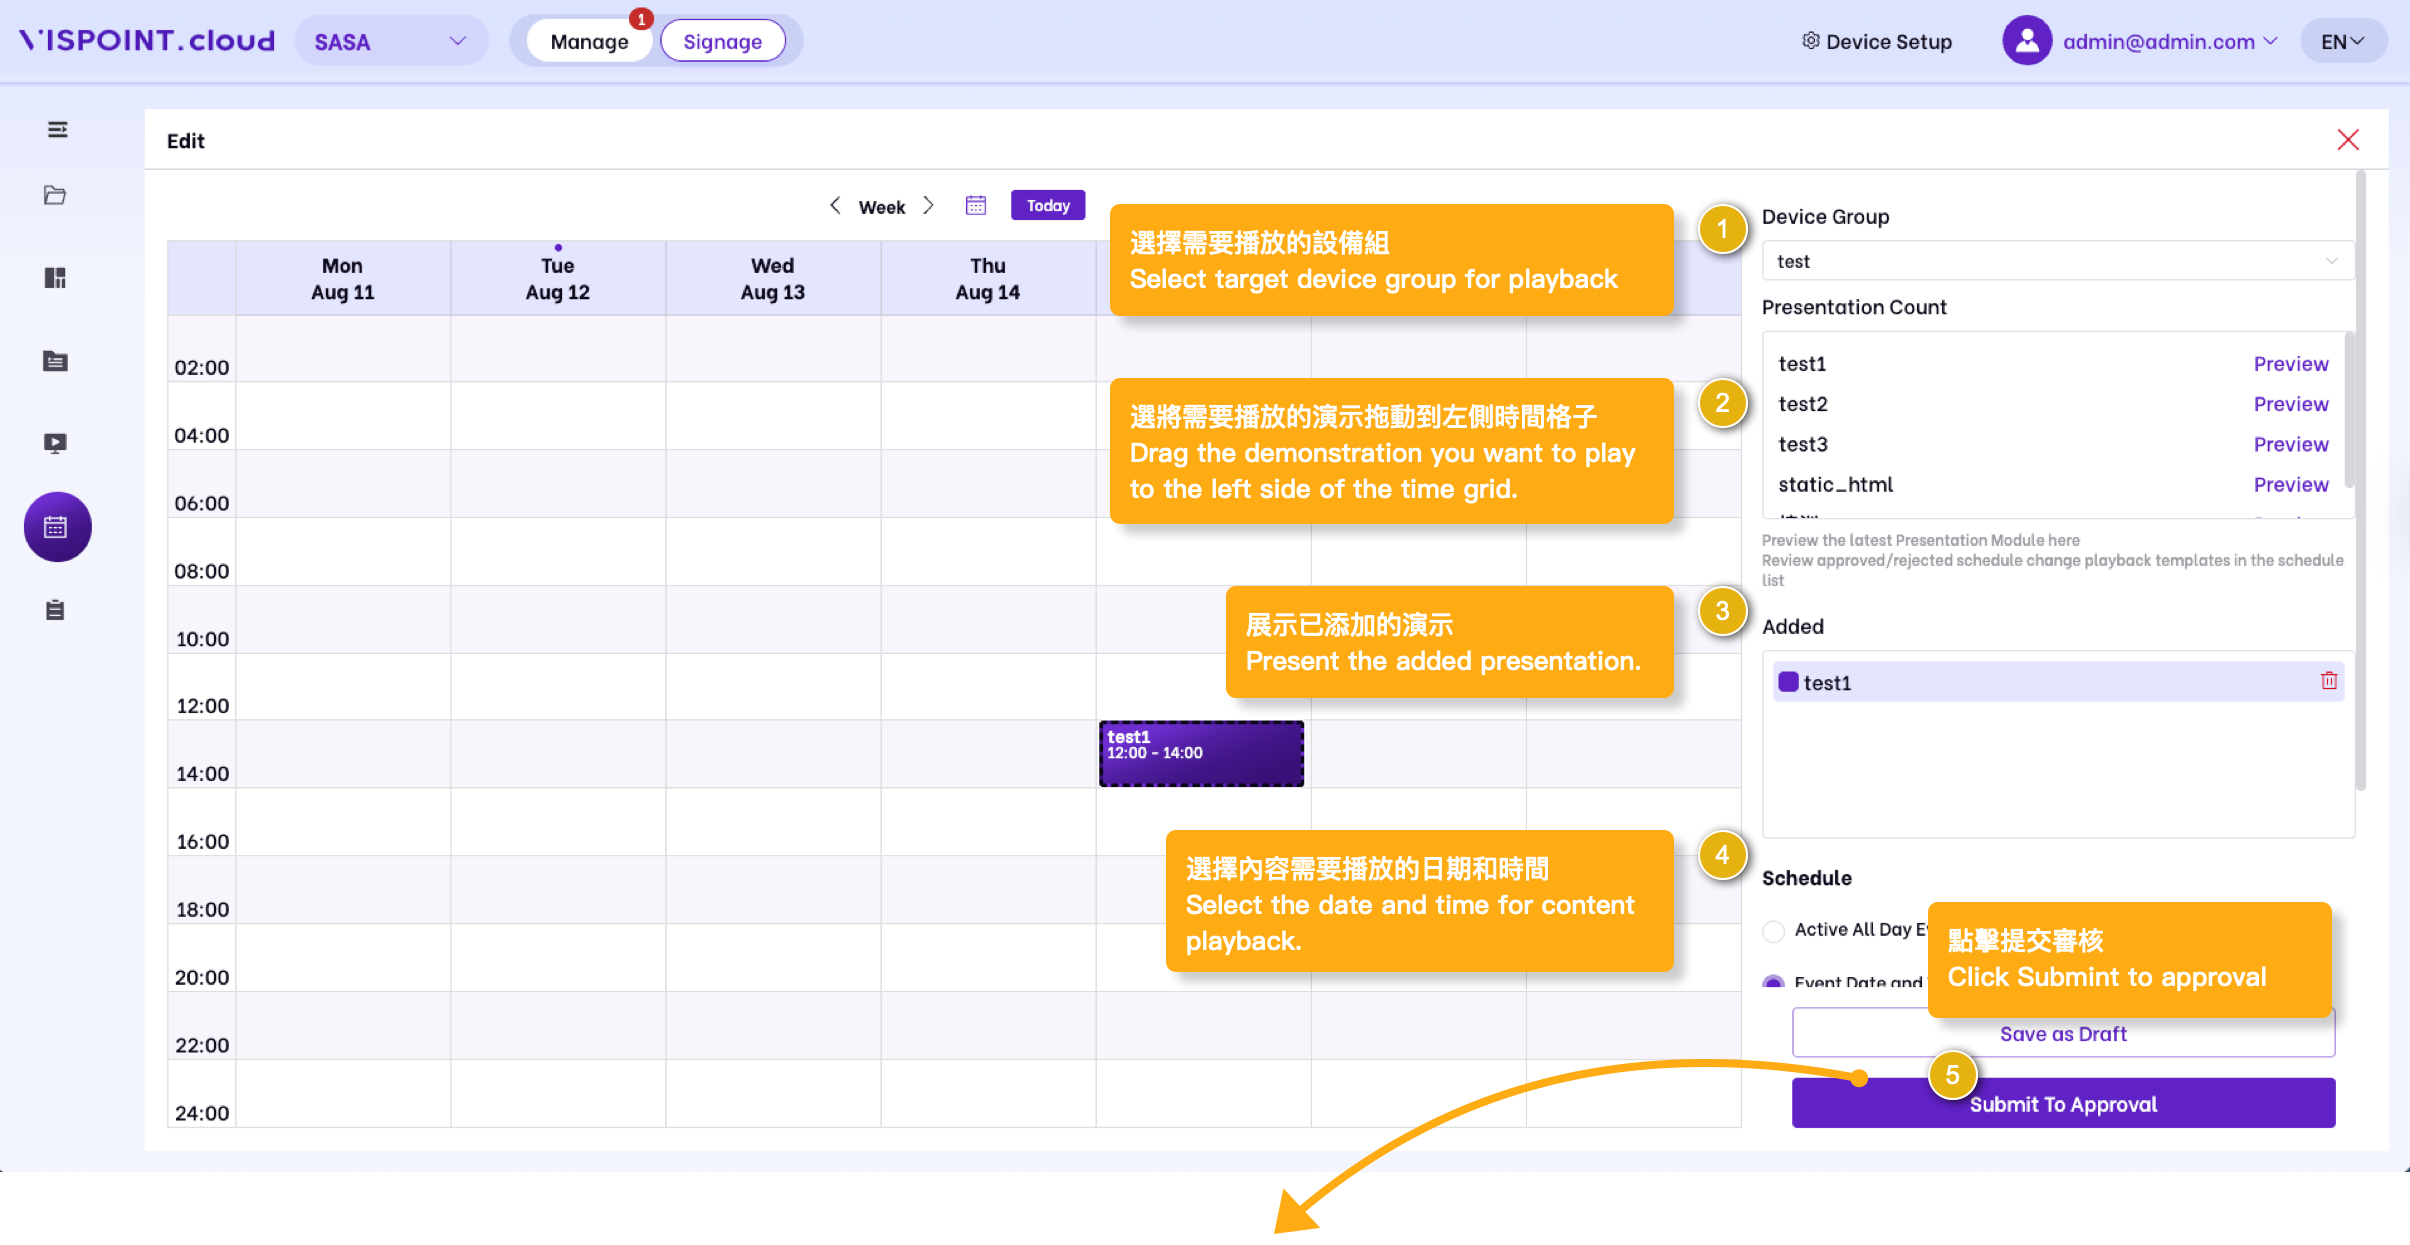
The Schedule lets you schedule presentations by date, time, and day of the week, then publish them to your players.

Add Schedule

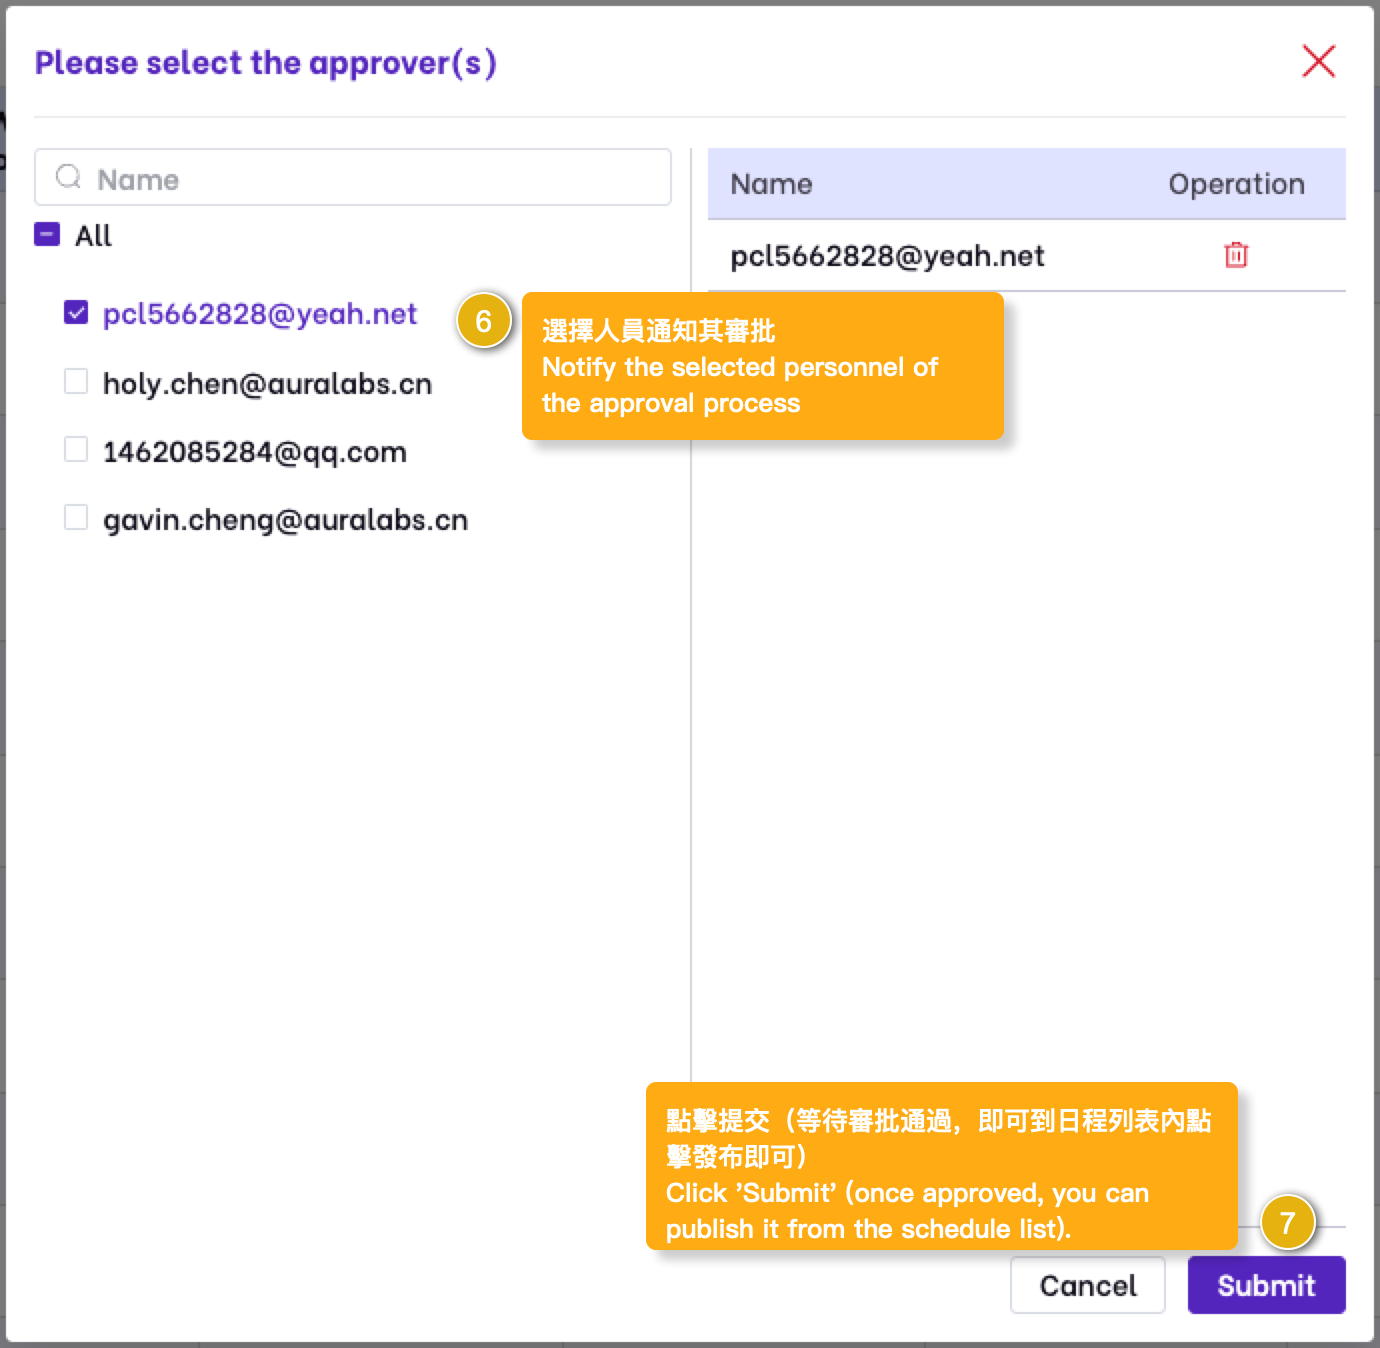
  • Whether the settings for adding new schedules and editing schedules support approval requirements.
  • The interface shown below requires approval. If no approval is necessary, you can publish it directly.

Current Schedule

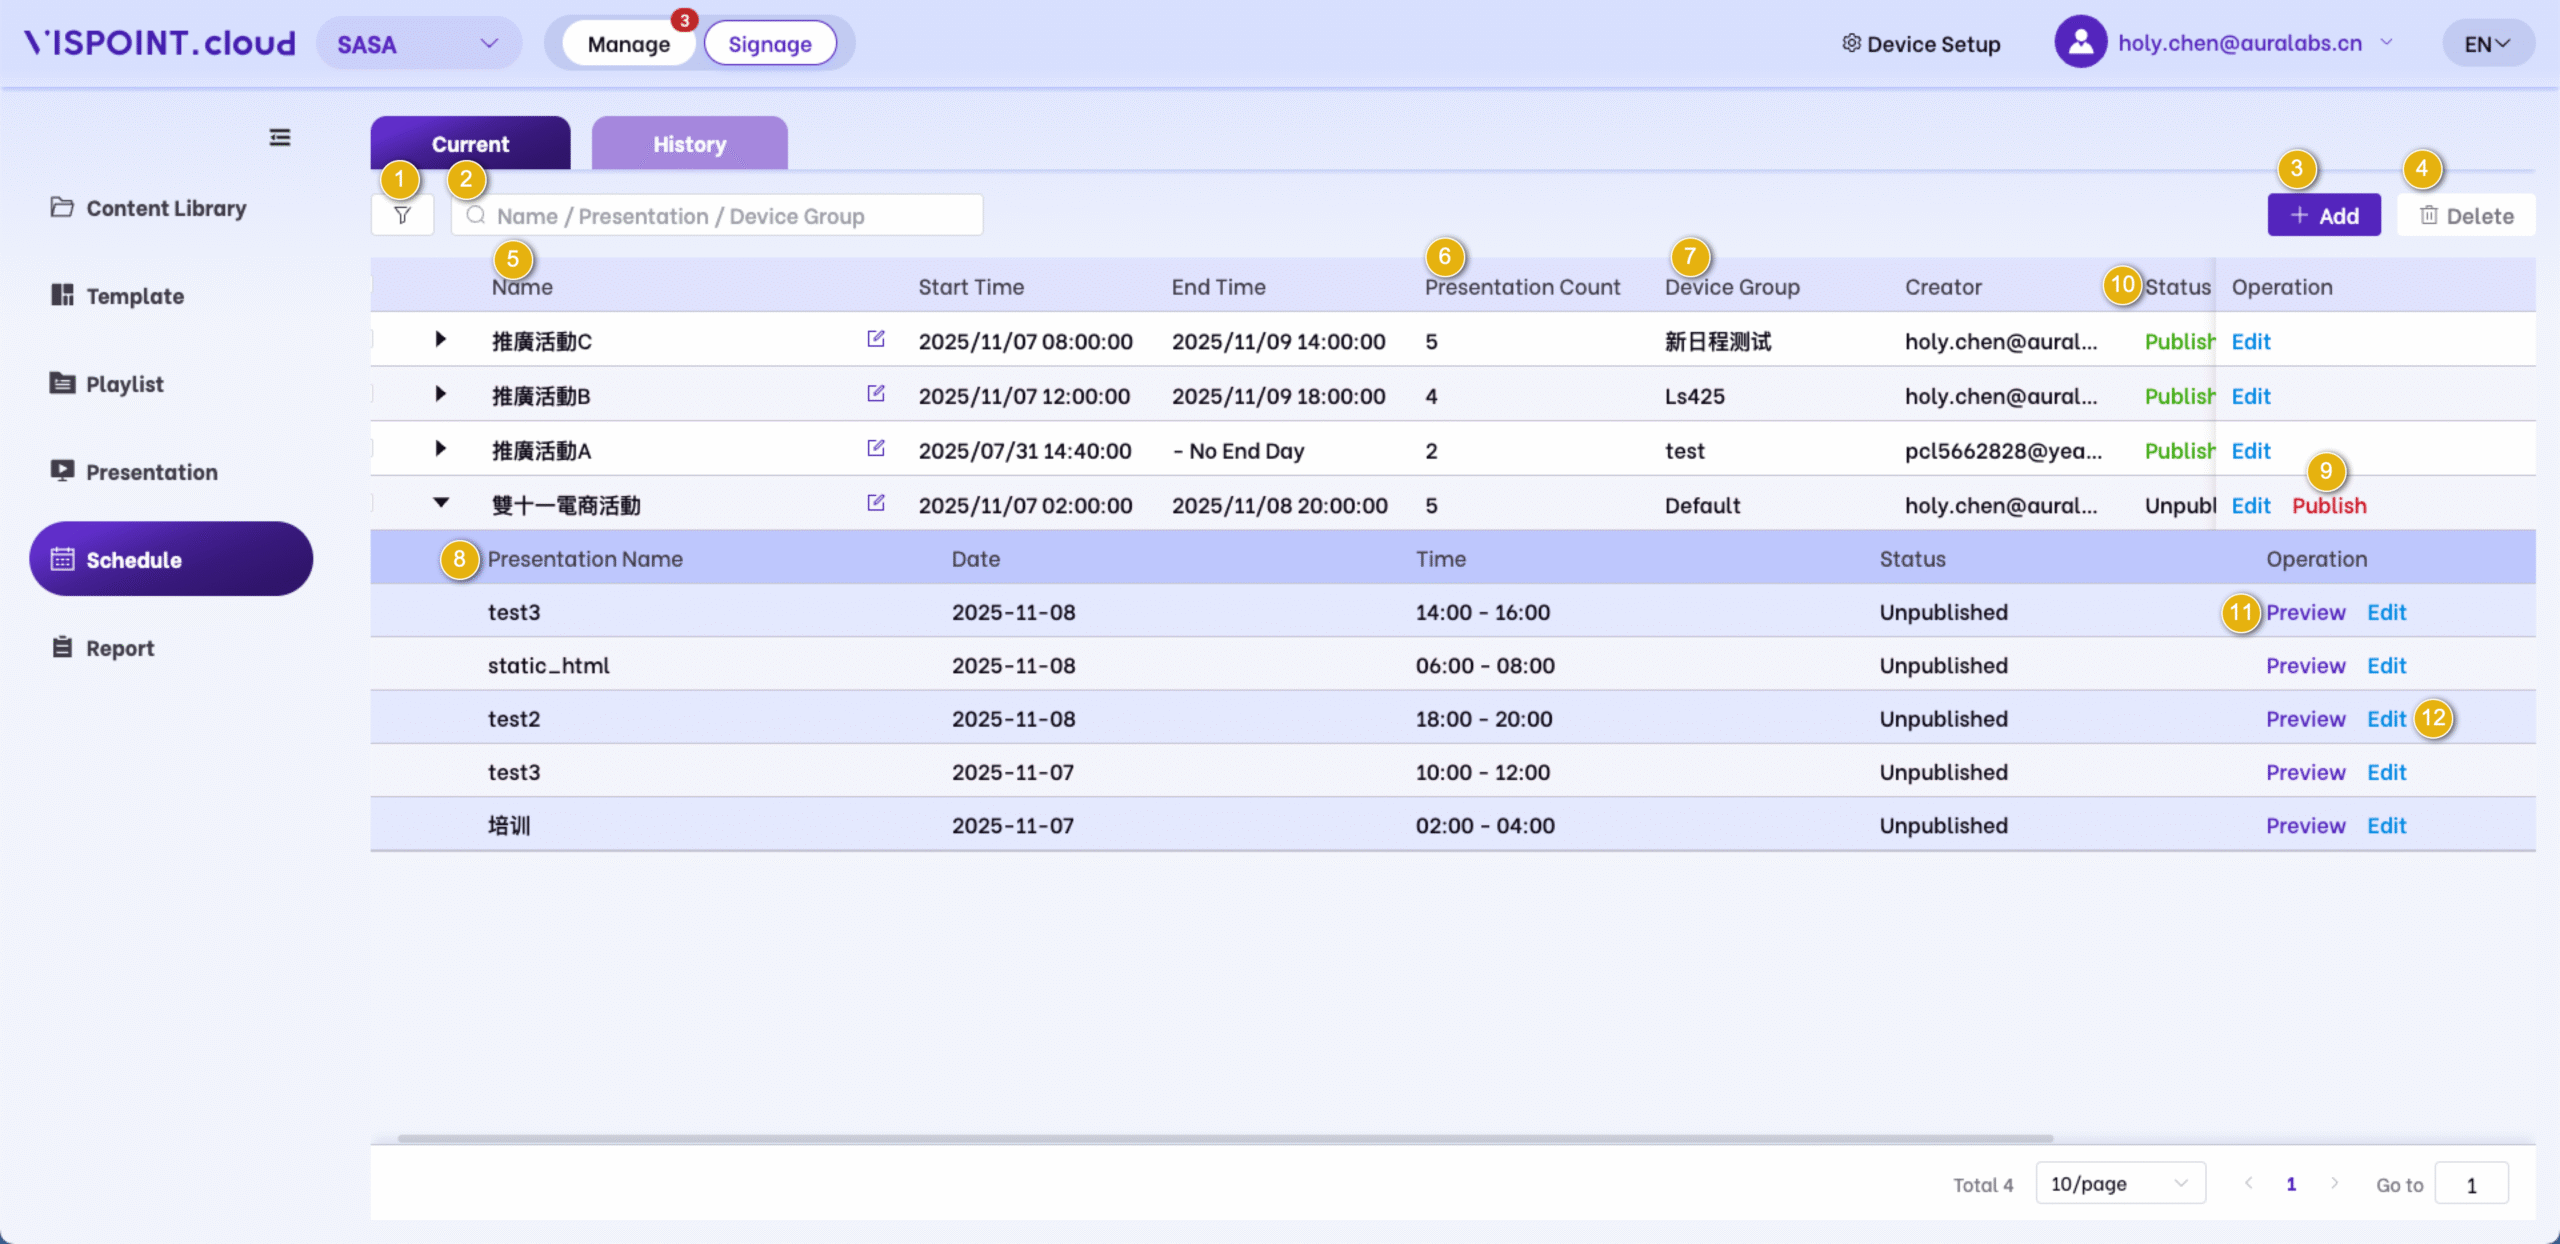
1.Filter: You can filter the schedule in the list by creation time, status, and more.

2.Search:Retrieve schedule data from the list using a fuzzy query based on demo name and device group name keywords.

3. Add: Click to add and enter the ‘Add Schedule’ page.

4. Delete: After selecting the list of devices, click “Delete”, and after confirming twice, the schedule can be deleted. (If deletion requires approval: For published schedules, deletion requires approval to be granted, and then the schedule needs to be manually clicked to be published again before it can be deleted successfully; For schedules in the “Pending for Release” state, deletion is automatically performed after approval; For schedules in the “Pending Approval or Draft” state, deletion is automatically successful after confirmation.)

5. Name: Display the name of the entire scheduling group and allow for modification.

6. Number of presentation schedules: Show the total number of presentation schedules within the presentation schedule group.

7. Device group: Display the device group selected when adding or editing a schedule.

8. Expand: Display all the presentation schedule information under the presentation schedule group, including the presentation schedule name, play date, play time, status, etc. You can click to edit and modify the schedule information.

9. Publish: When the schedule needs to be approved, after the approval is granted, you need to manually click “Release”. Once the release is successful, the scheduled content can be played normally.

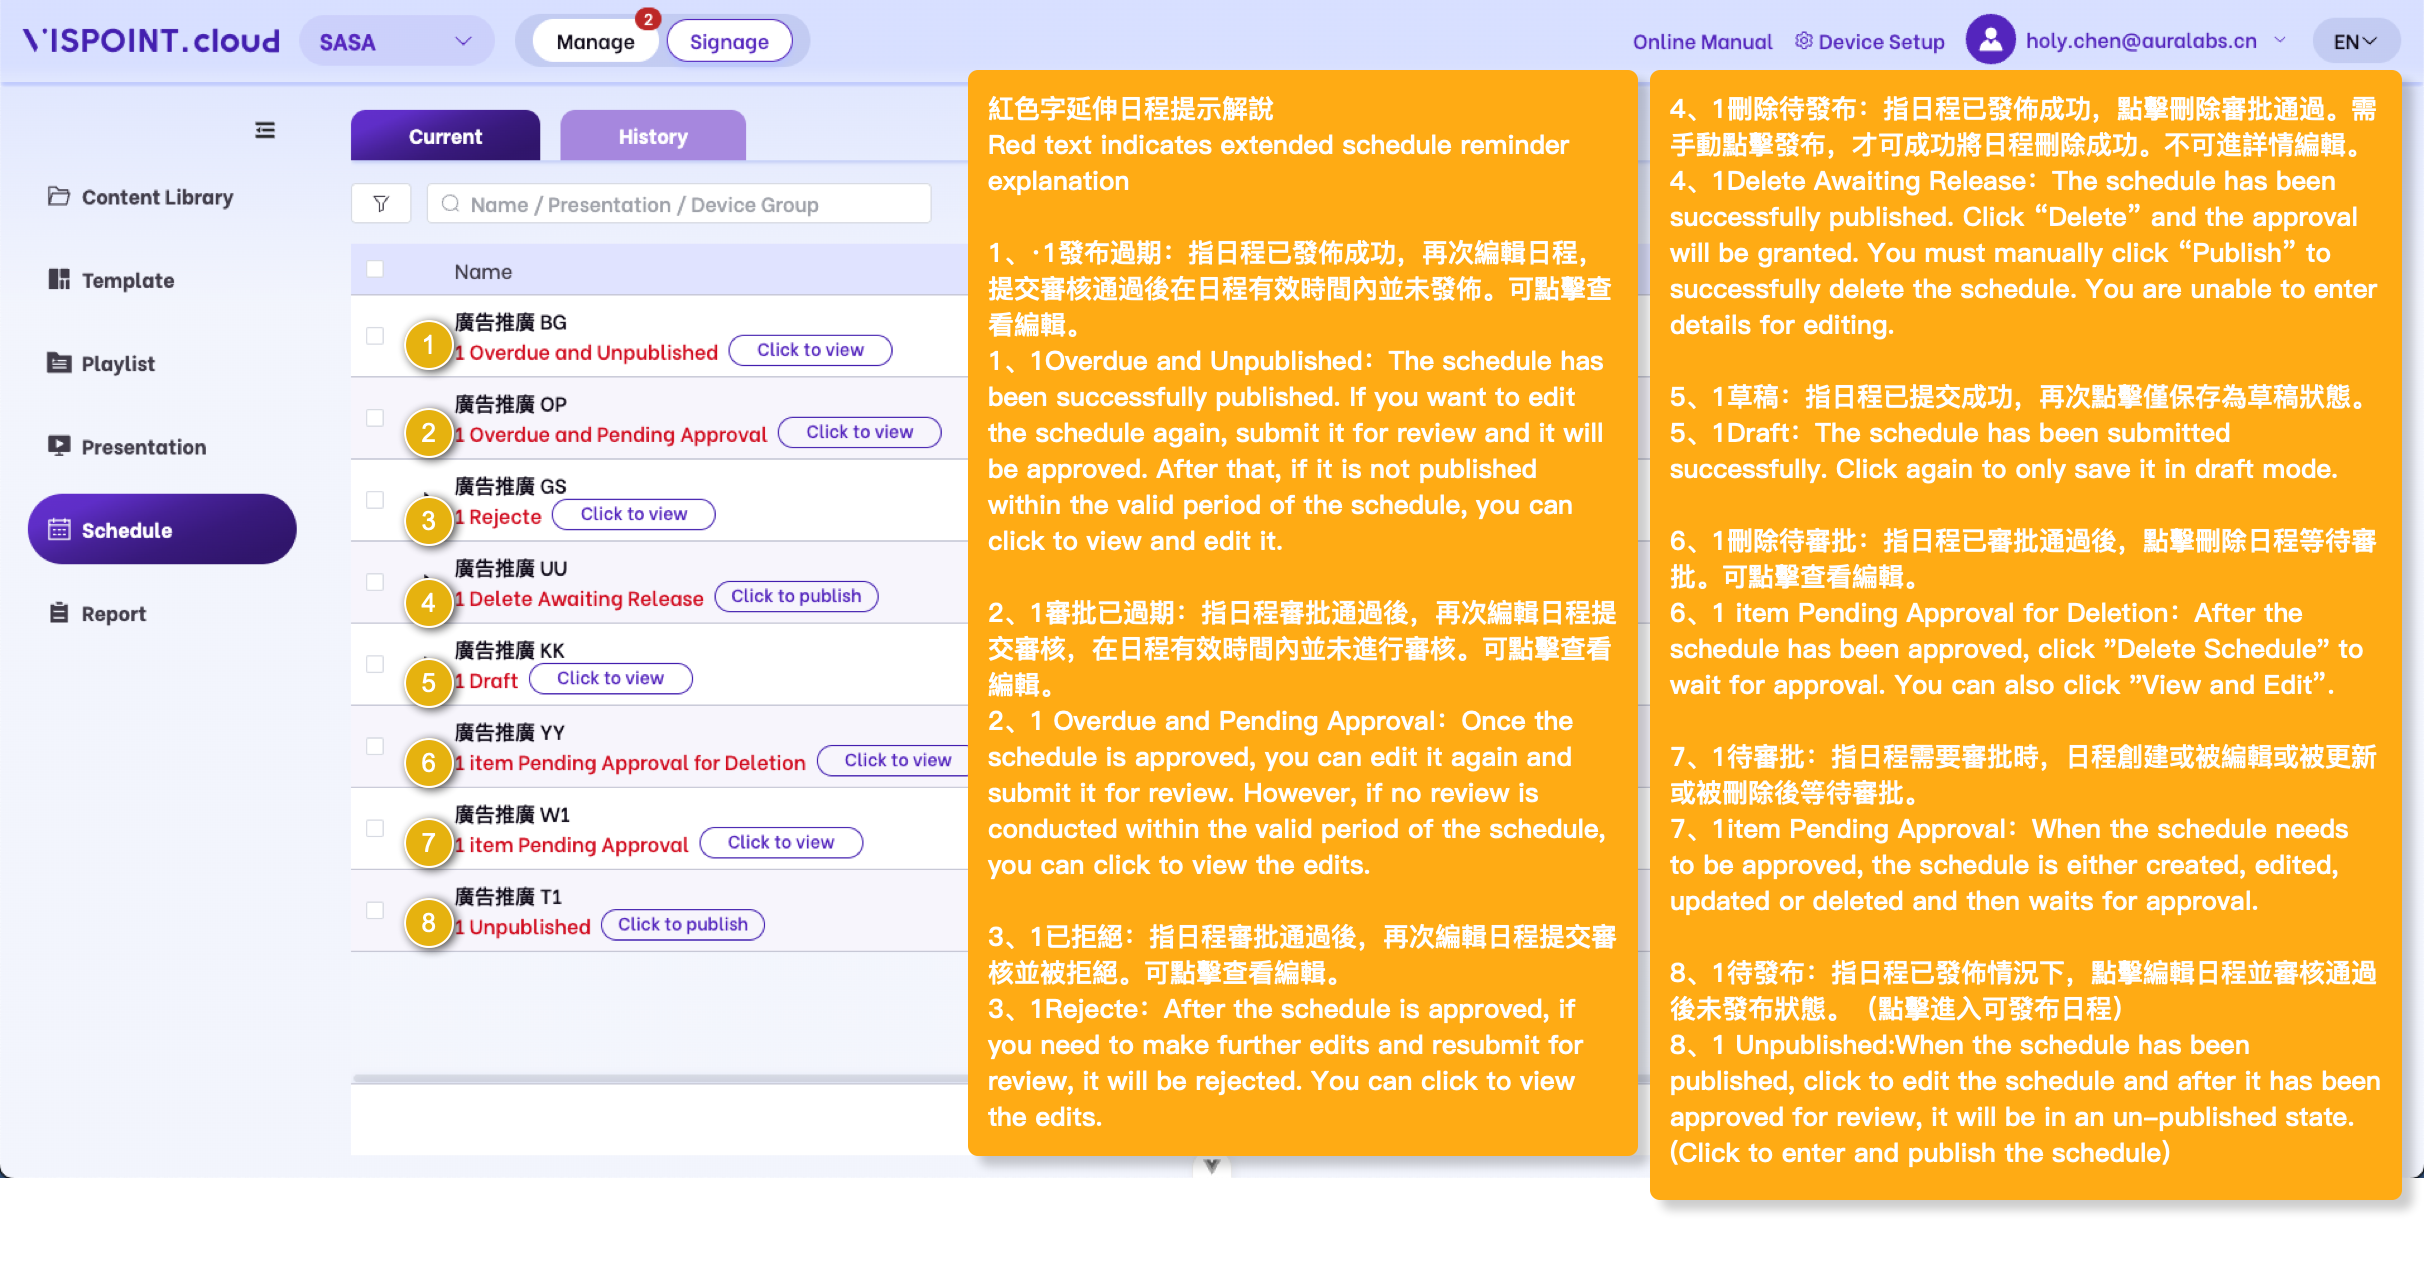
10. Status: Includes “Pending Release,” “Pending Approval,” “Not Started,” and “In Progress,” explained below:

·Draft: Schedule saved only in draft mode

·Pending Release: Refers to a schedule that has been submitted for approval and has been approved, requiring the user to manually click “Release” to successfully publish the schedule. Once published, the content will play successfully when the scheduled time arrives.

· Pending Approval: Refers to a schedule that has been submitted for approval and is awaiting approval from the approver (at this moment, the approver needs to review it in the approval center).

· Not Started: Refers to a schedule that has been approved and successfully published (the content will play successfully when the scheduled time arrives).

· In Progress: Refers to a schedule whose date has arrived and is currently being executed.

11. Preview: Click to preview the current schedule’s playback content (Ticker, HTML, and weather data cannot be previewed).

12. Edit: Click to edit, enter the editing page, and make changes.
Historical Schedules

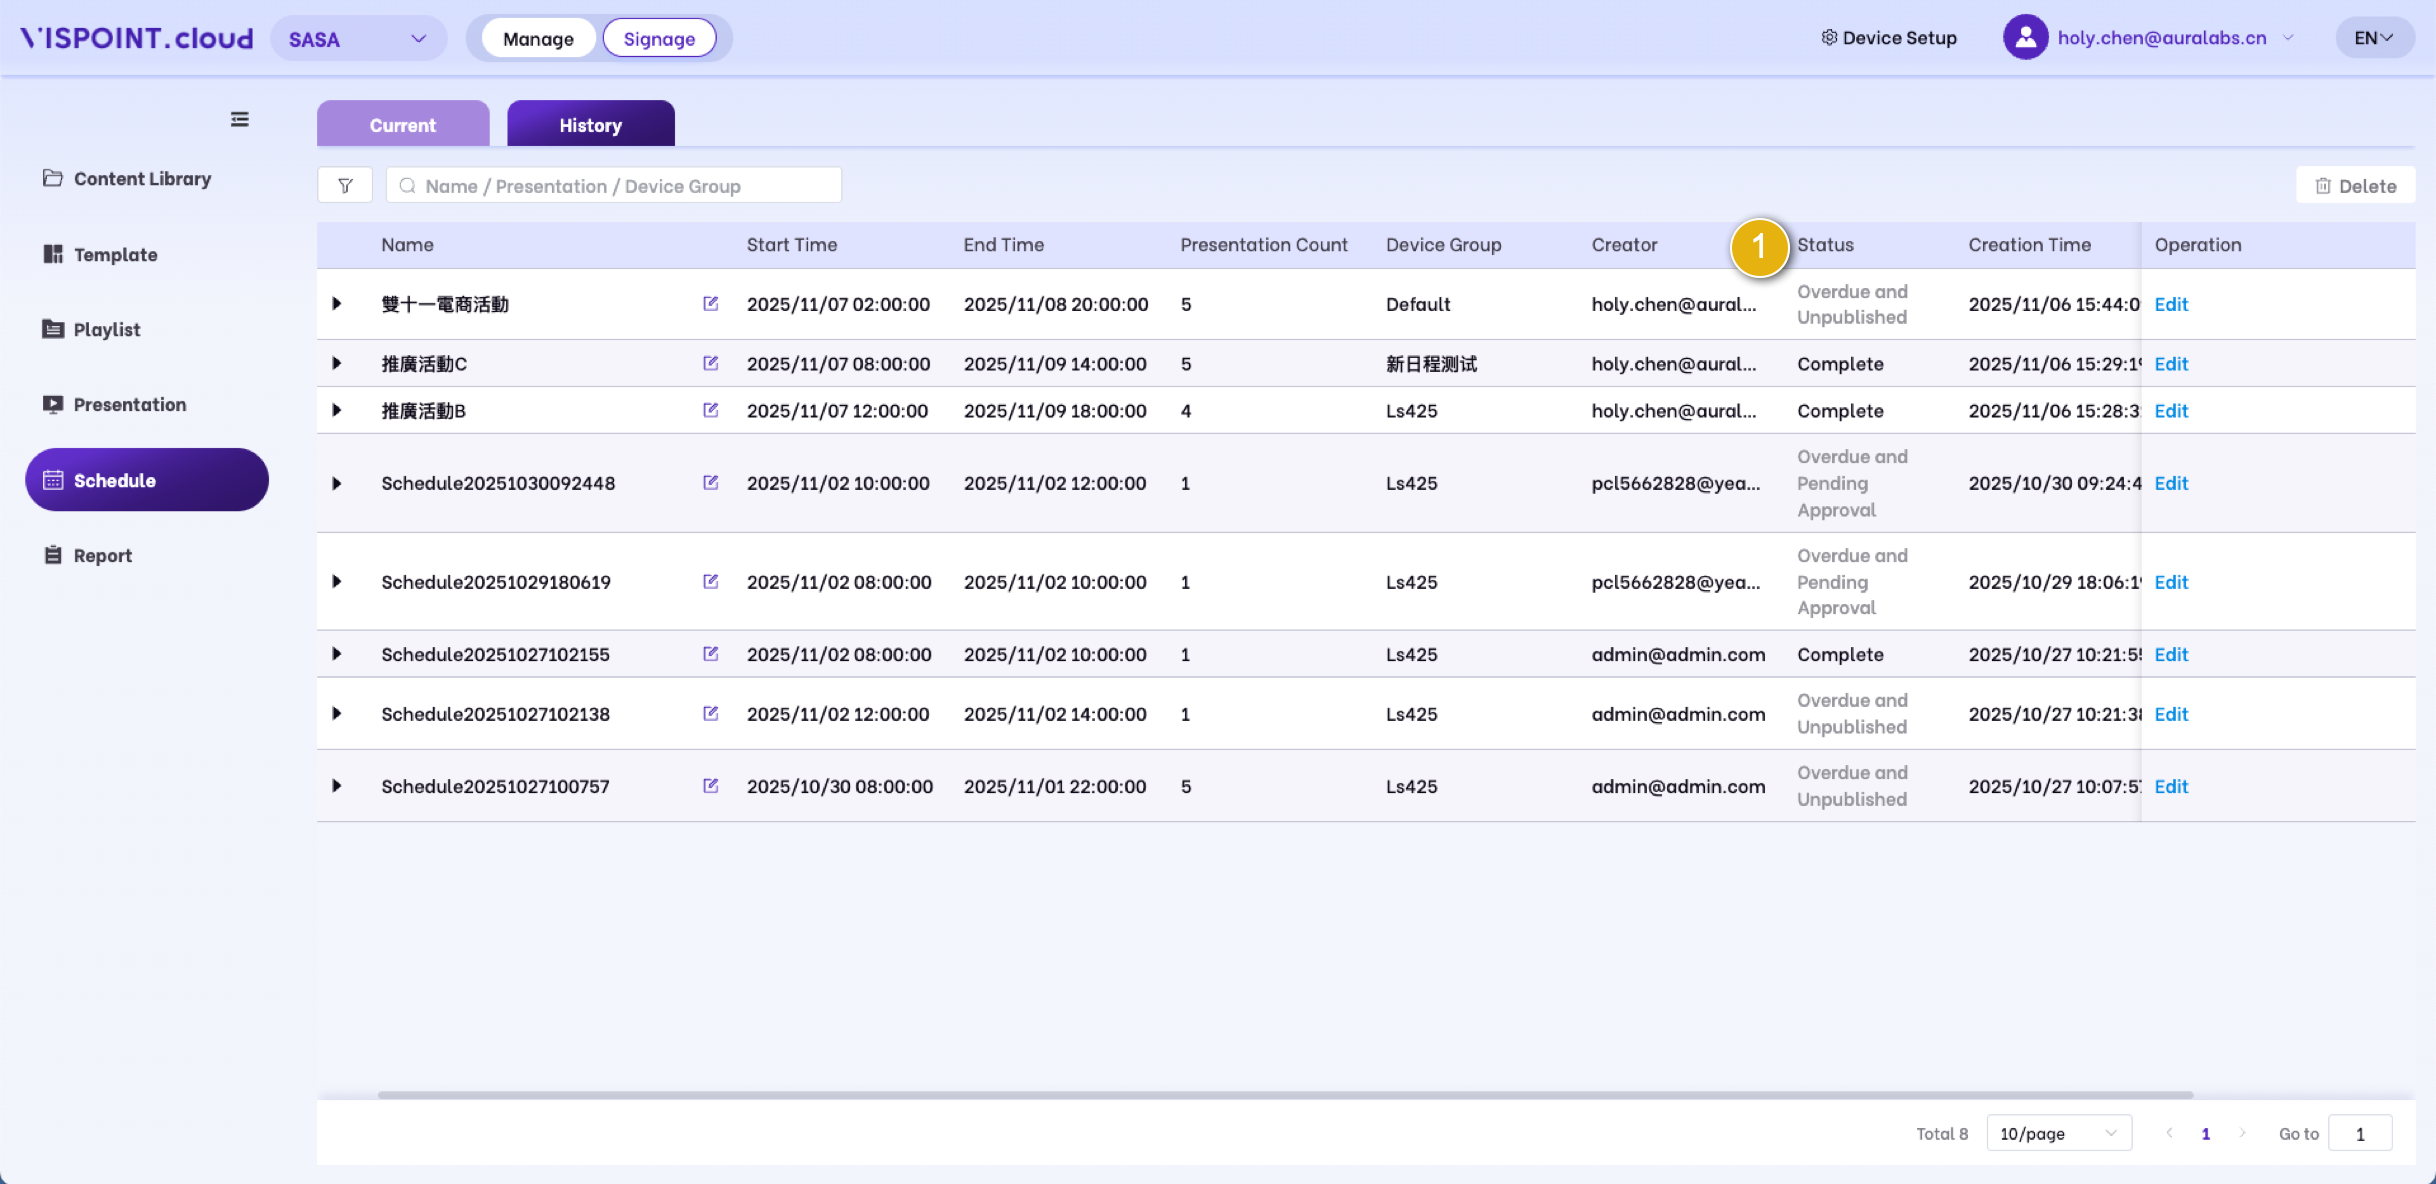
1. Status: It includes “Rejected”, “Expired but not published”, “Expired but not reviewed”, and “Completed”. The explanations are as follows:
· Rejected: Refers to the status where the schedule has been submitted for approval but the approval has not been granted.
· Overdue unpublished: Refers to the situation where the schedule has been approved but has not been published by the start date.
· Overdue unreviewed: Refers to the situation where the schedule has been released and is awaiting approval. After the start date, approval personnel have not yet initiated the approval process.
· Completed: Indicates that the schedule has been fully played.

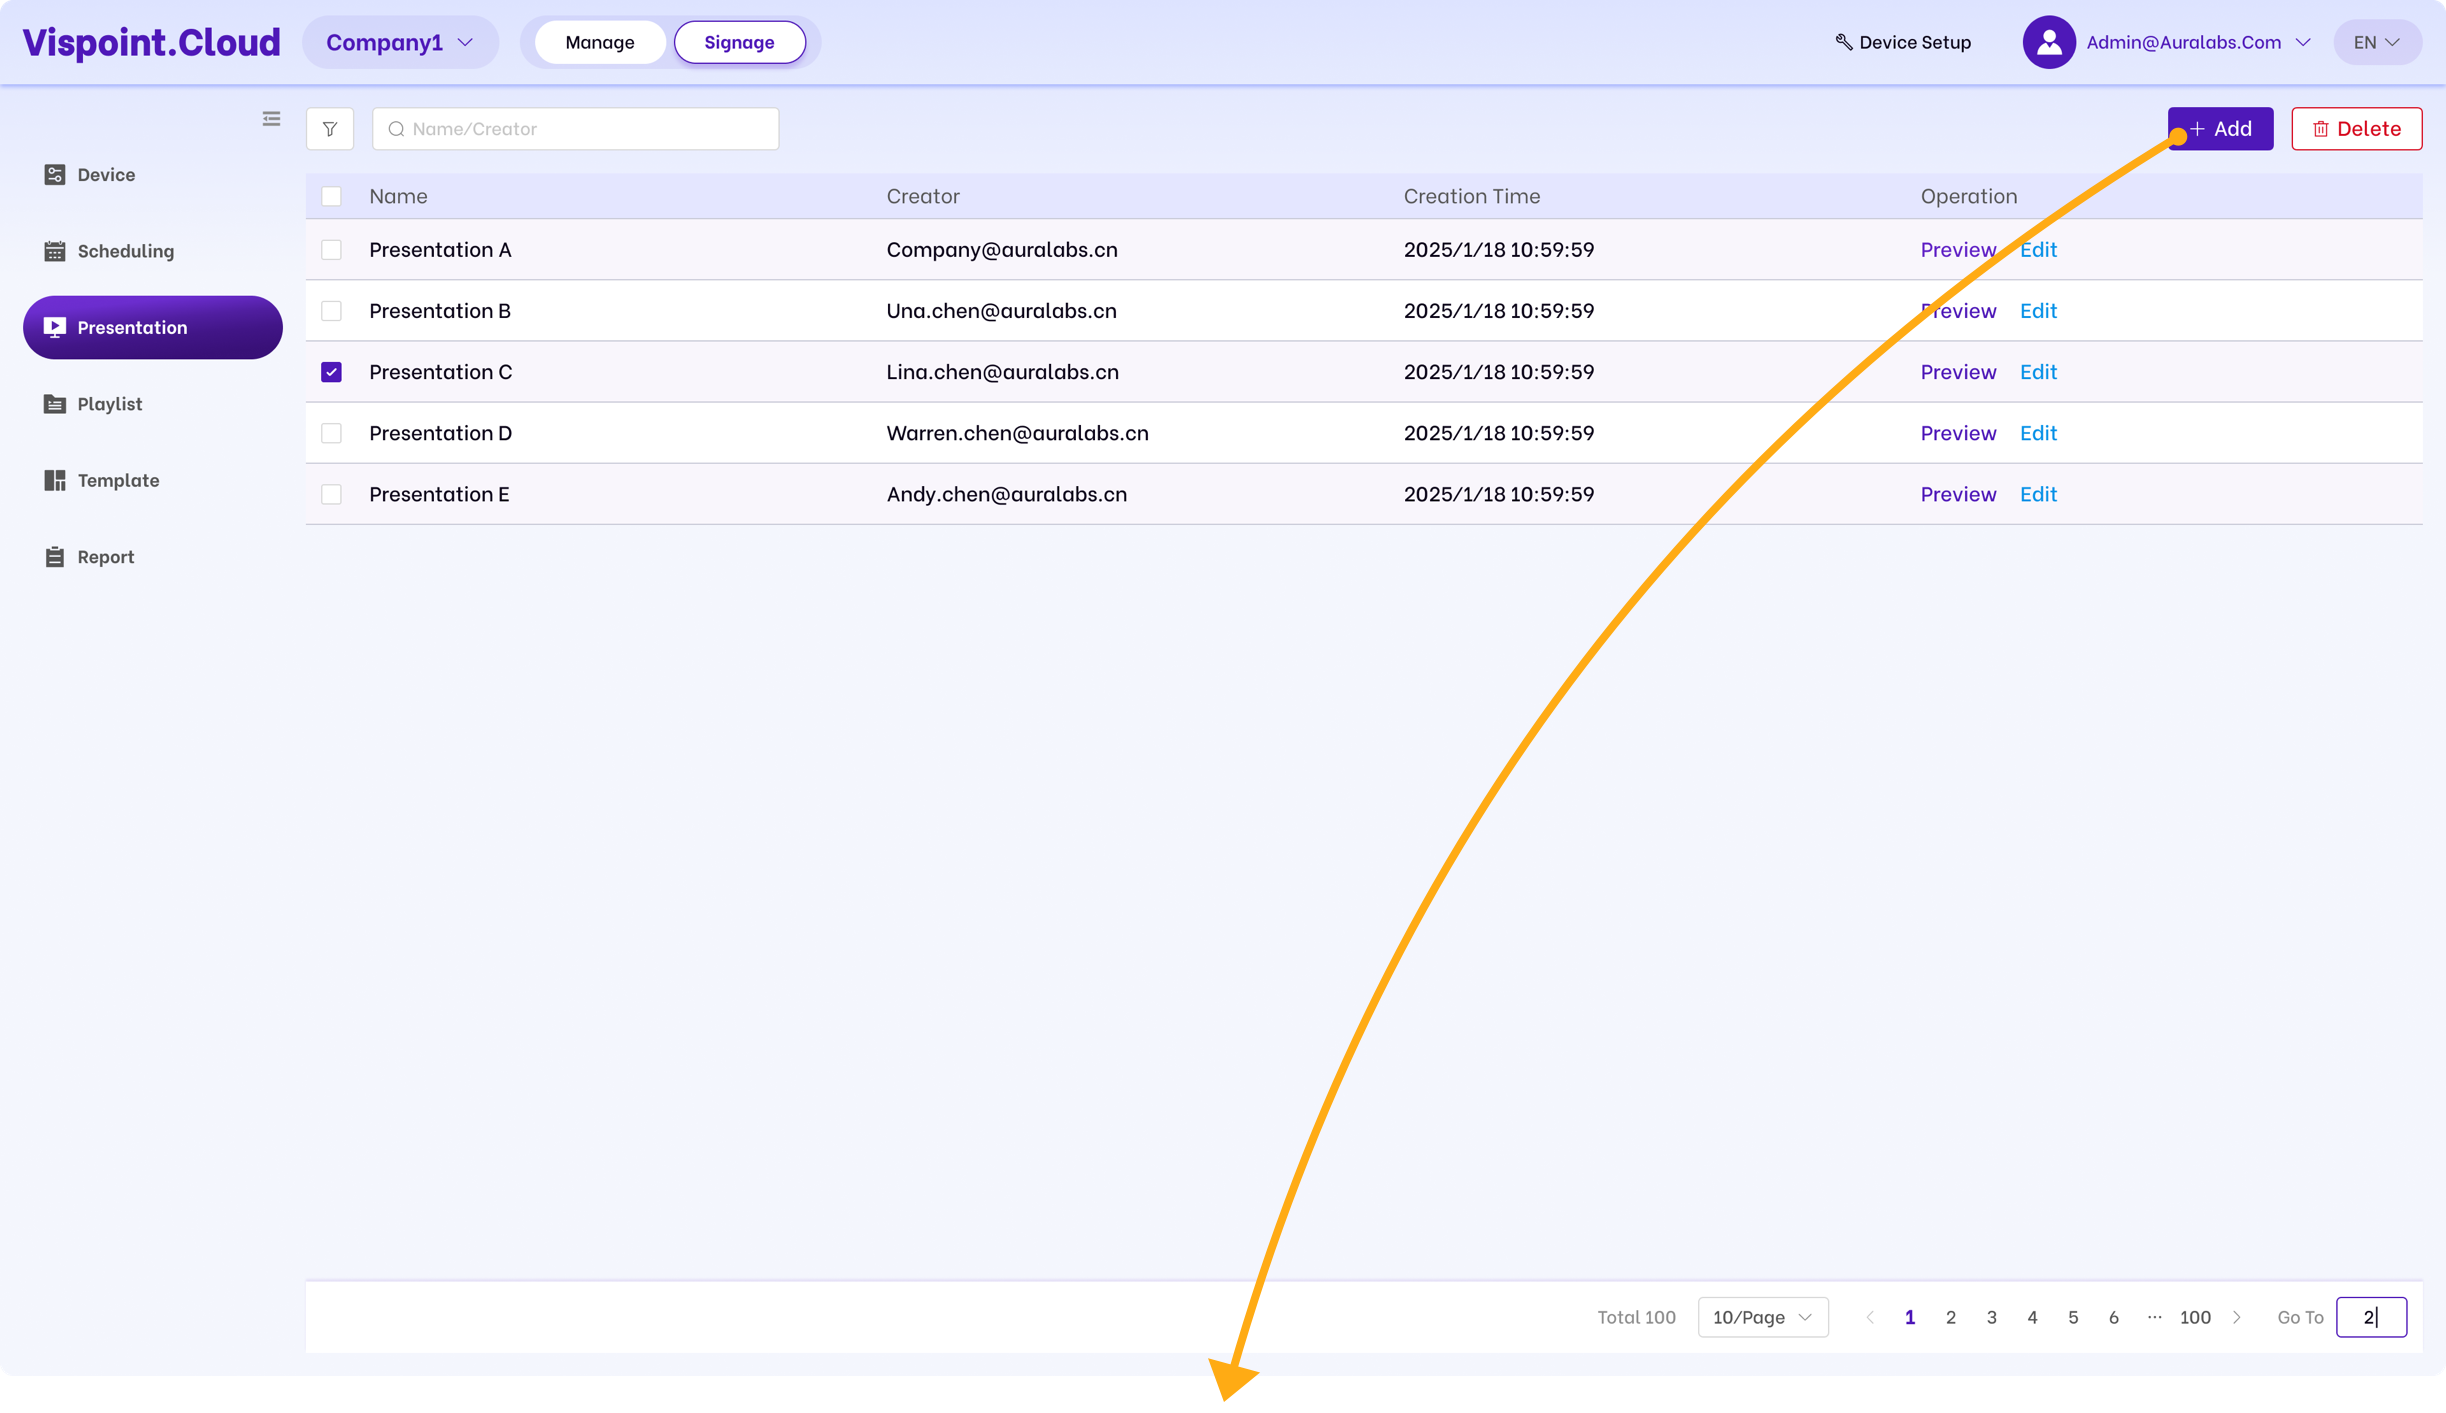
Presentation

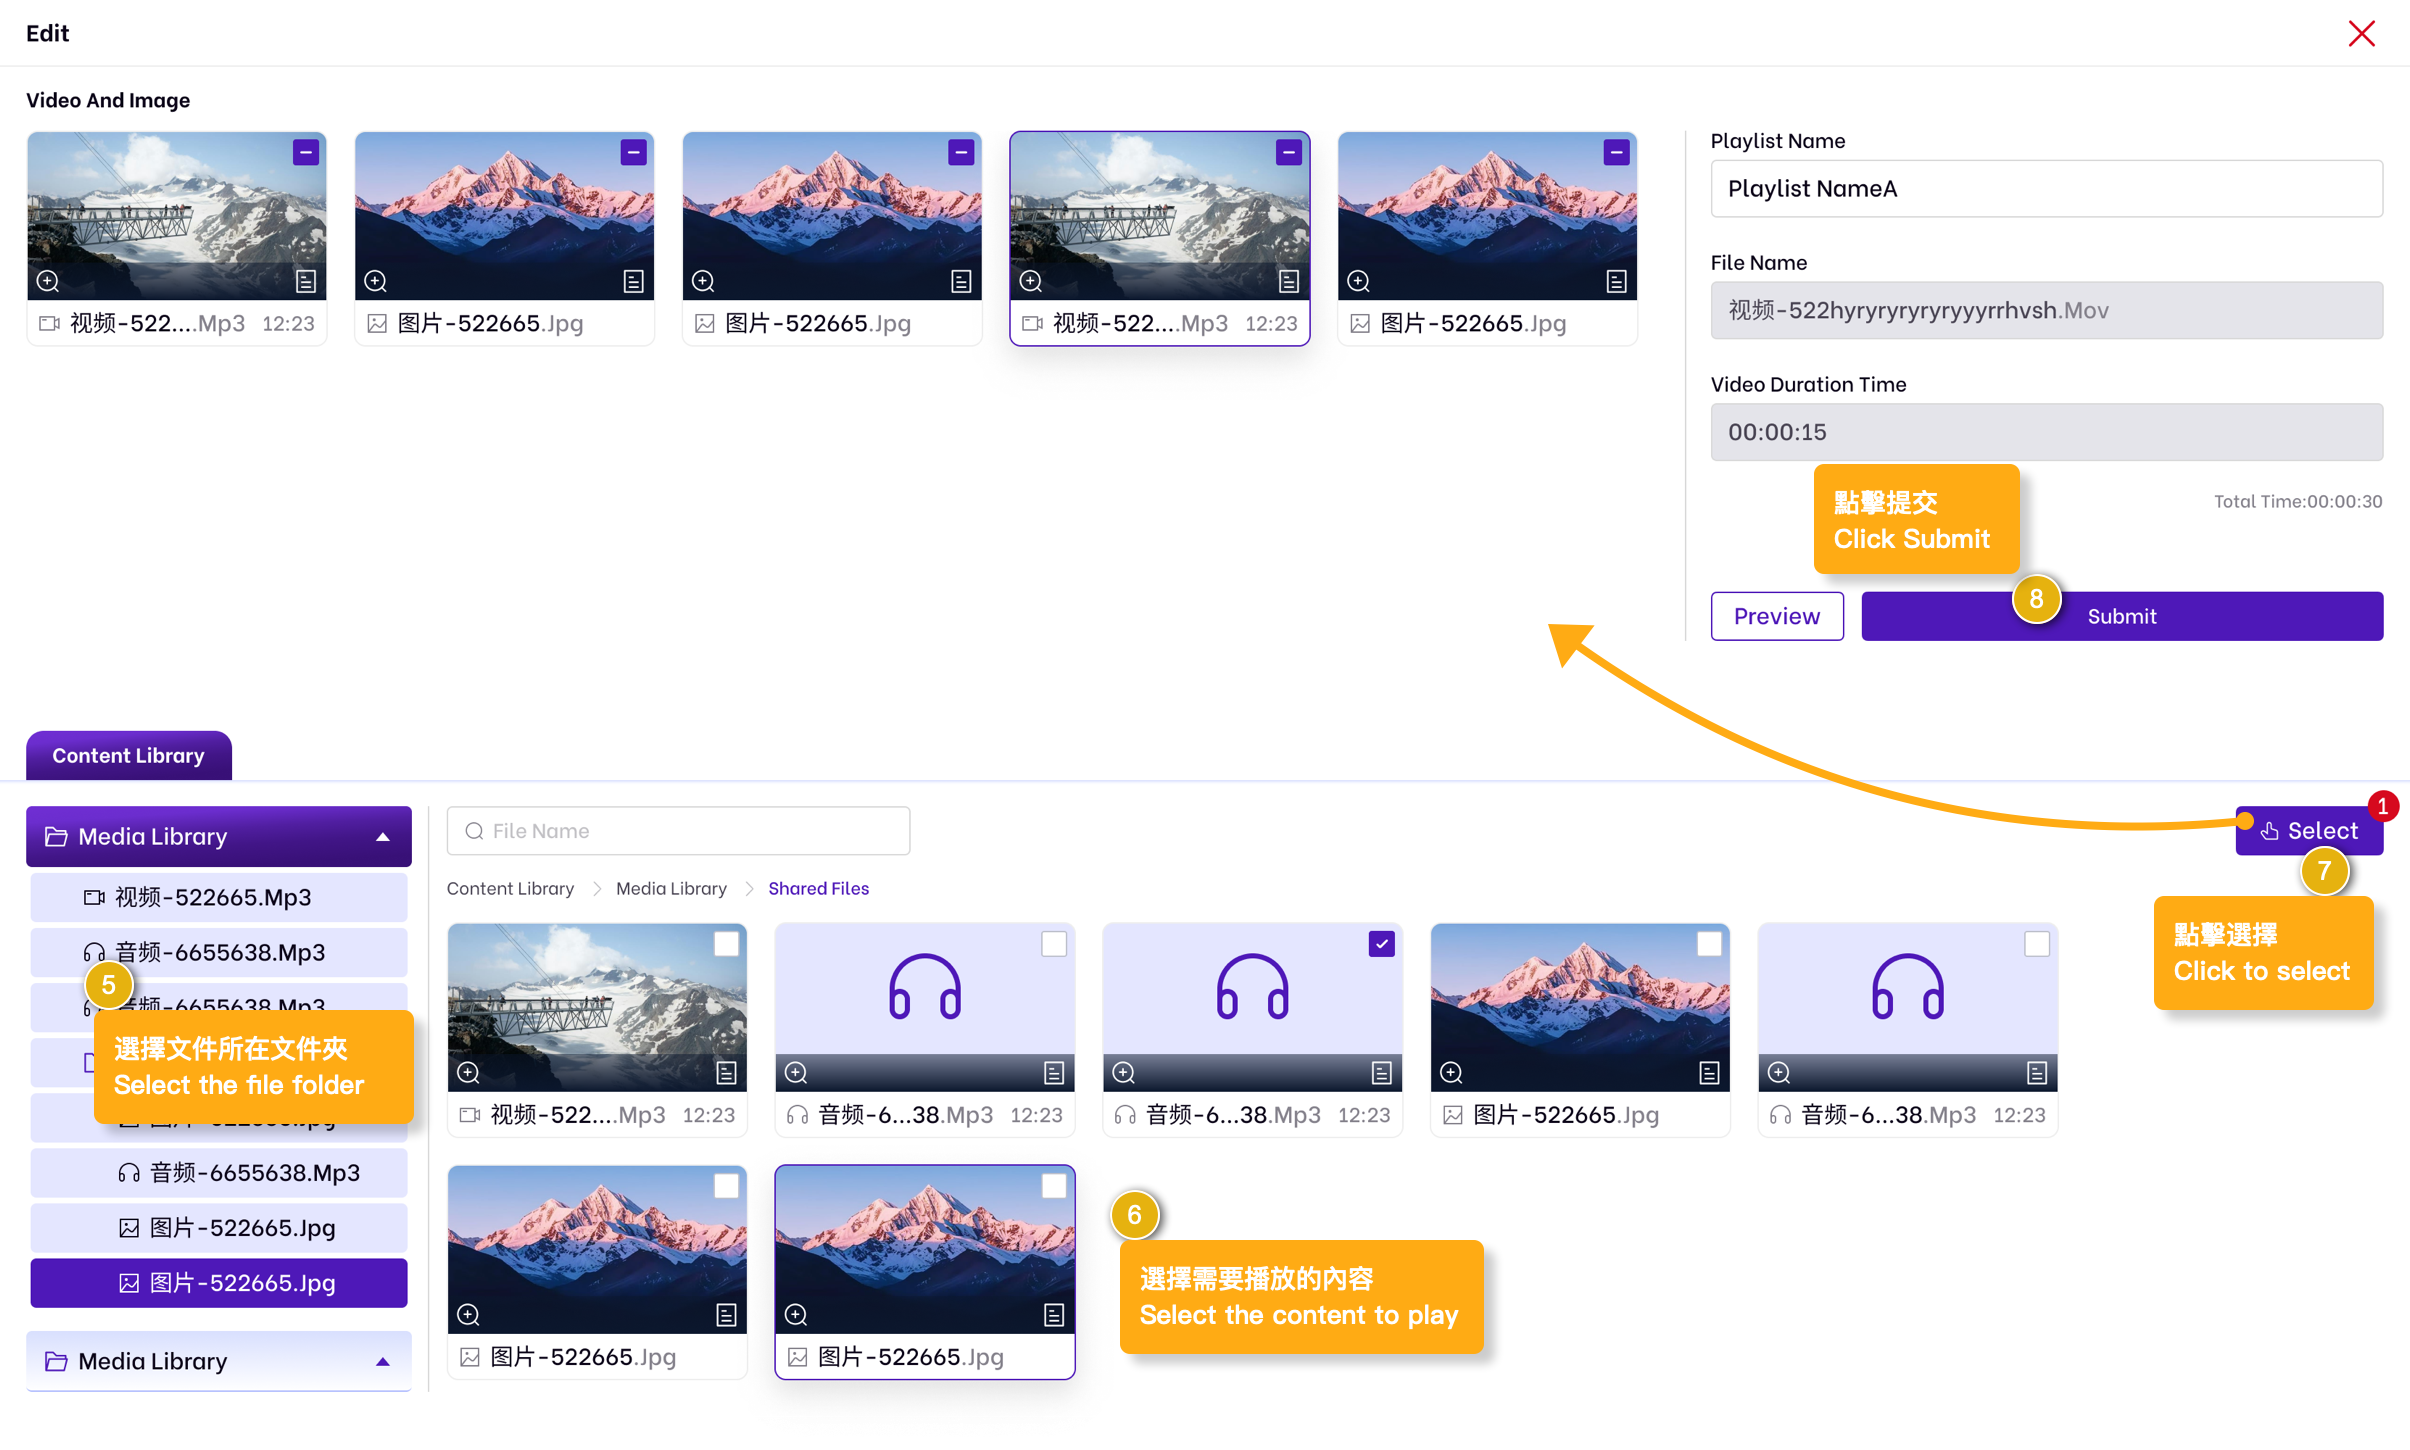
Users can add desired playback content in this module.

The demonstration playback template will be used in the “Schedule” section.

Adding/Editing/Deleting Demo Templates in the Vispoint.cloud Platform

·For Approved Schedules:After schedule approval, modifications to demo templates will not affect existing approved schedules.

·For Pending Schedules (Before Approval):For unapproved schedules, any changes to demo templates will trigger real-time data synchronization and updates.

·Prerequisite: Permission for this module is required.

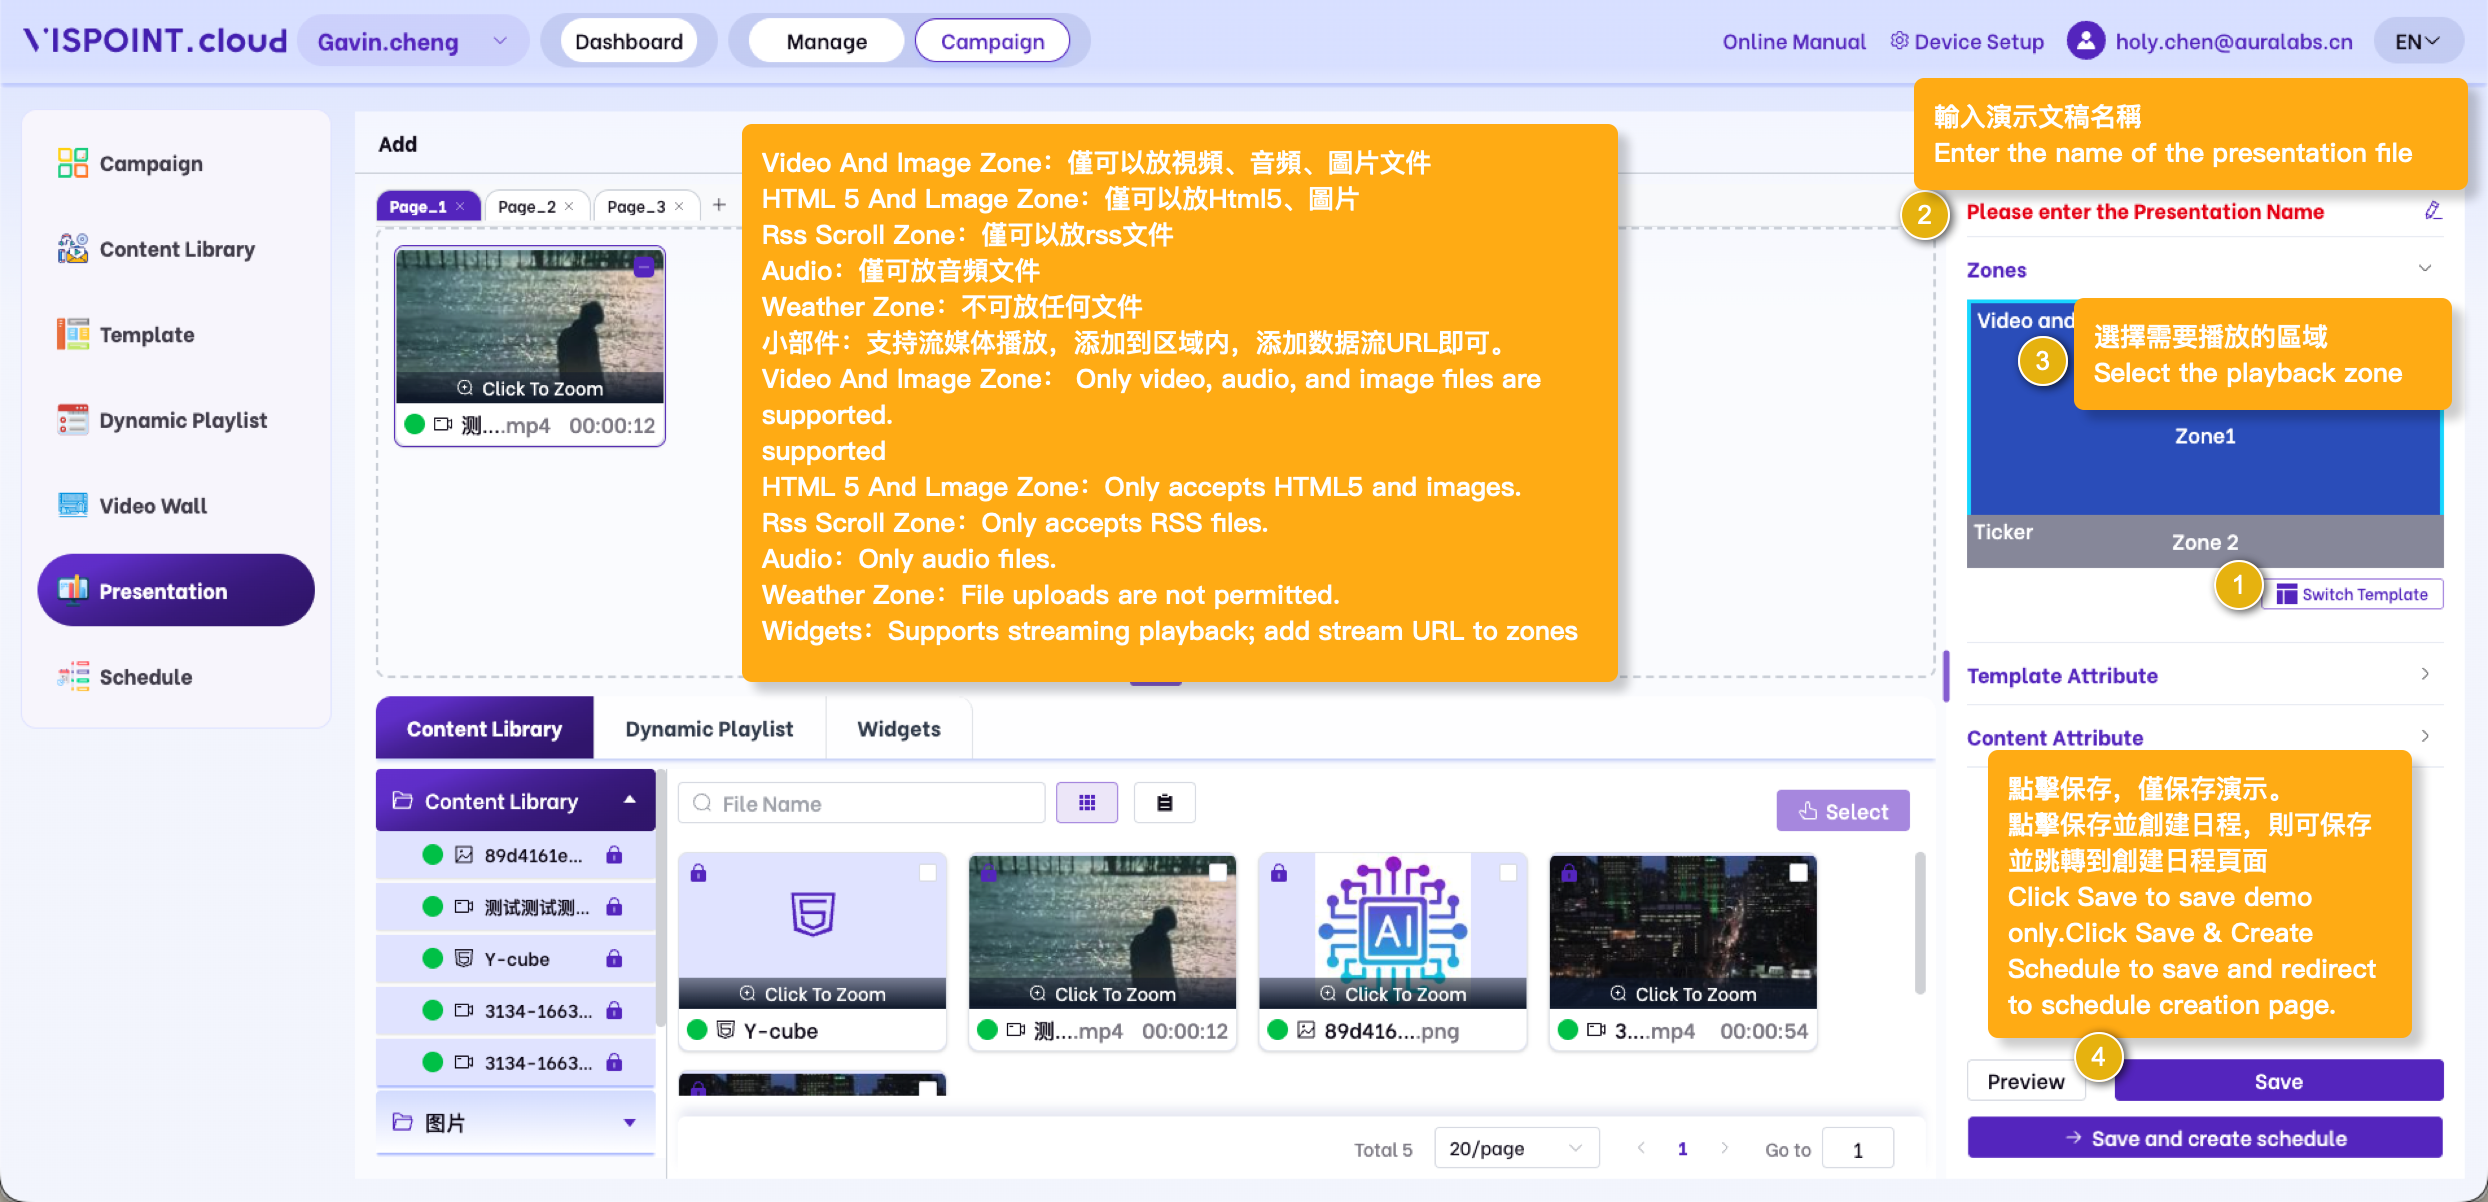
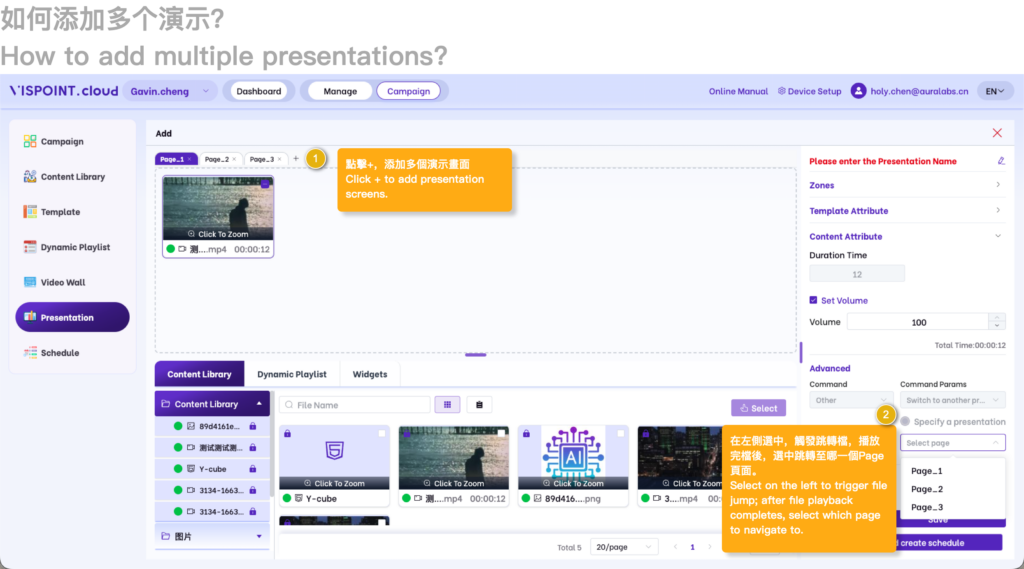
Add Presentation

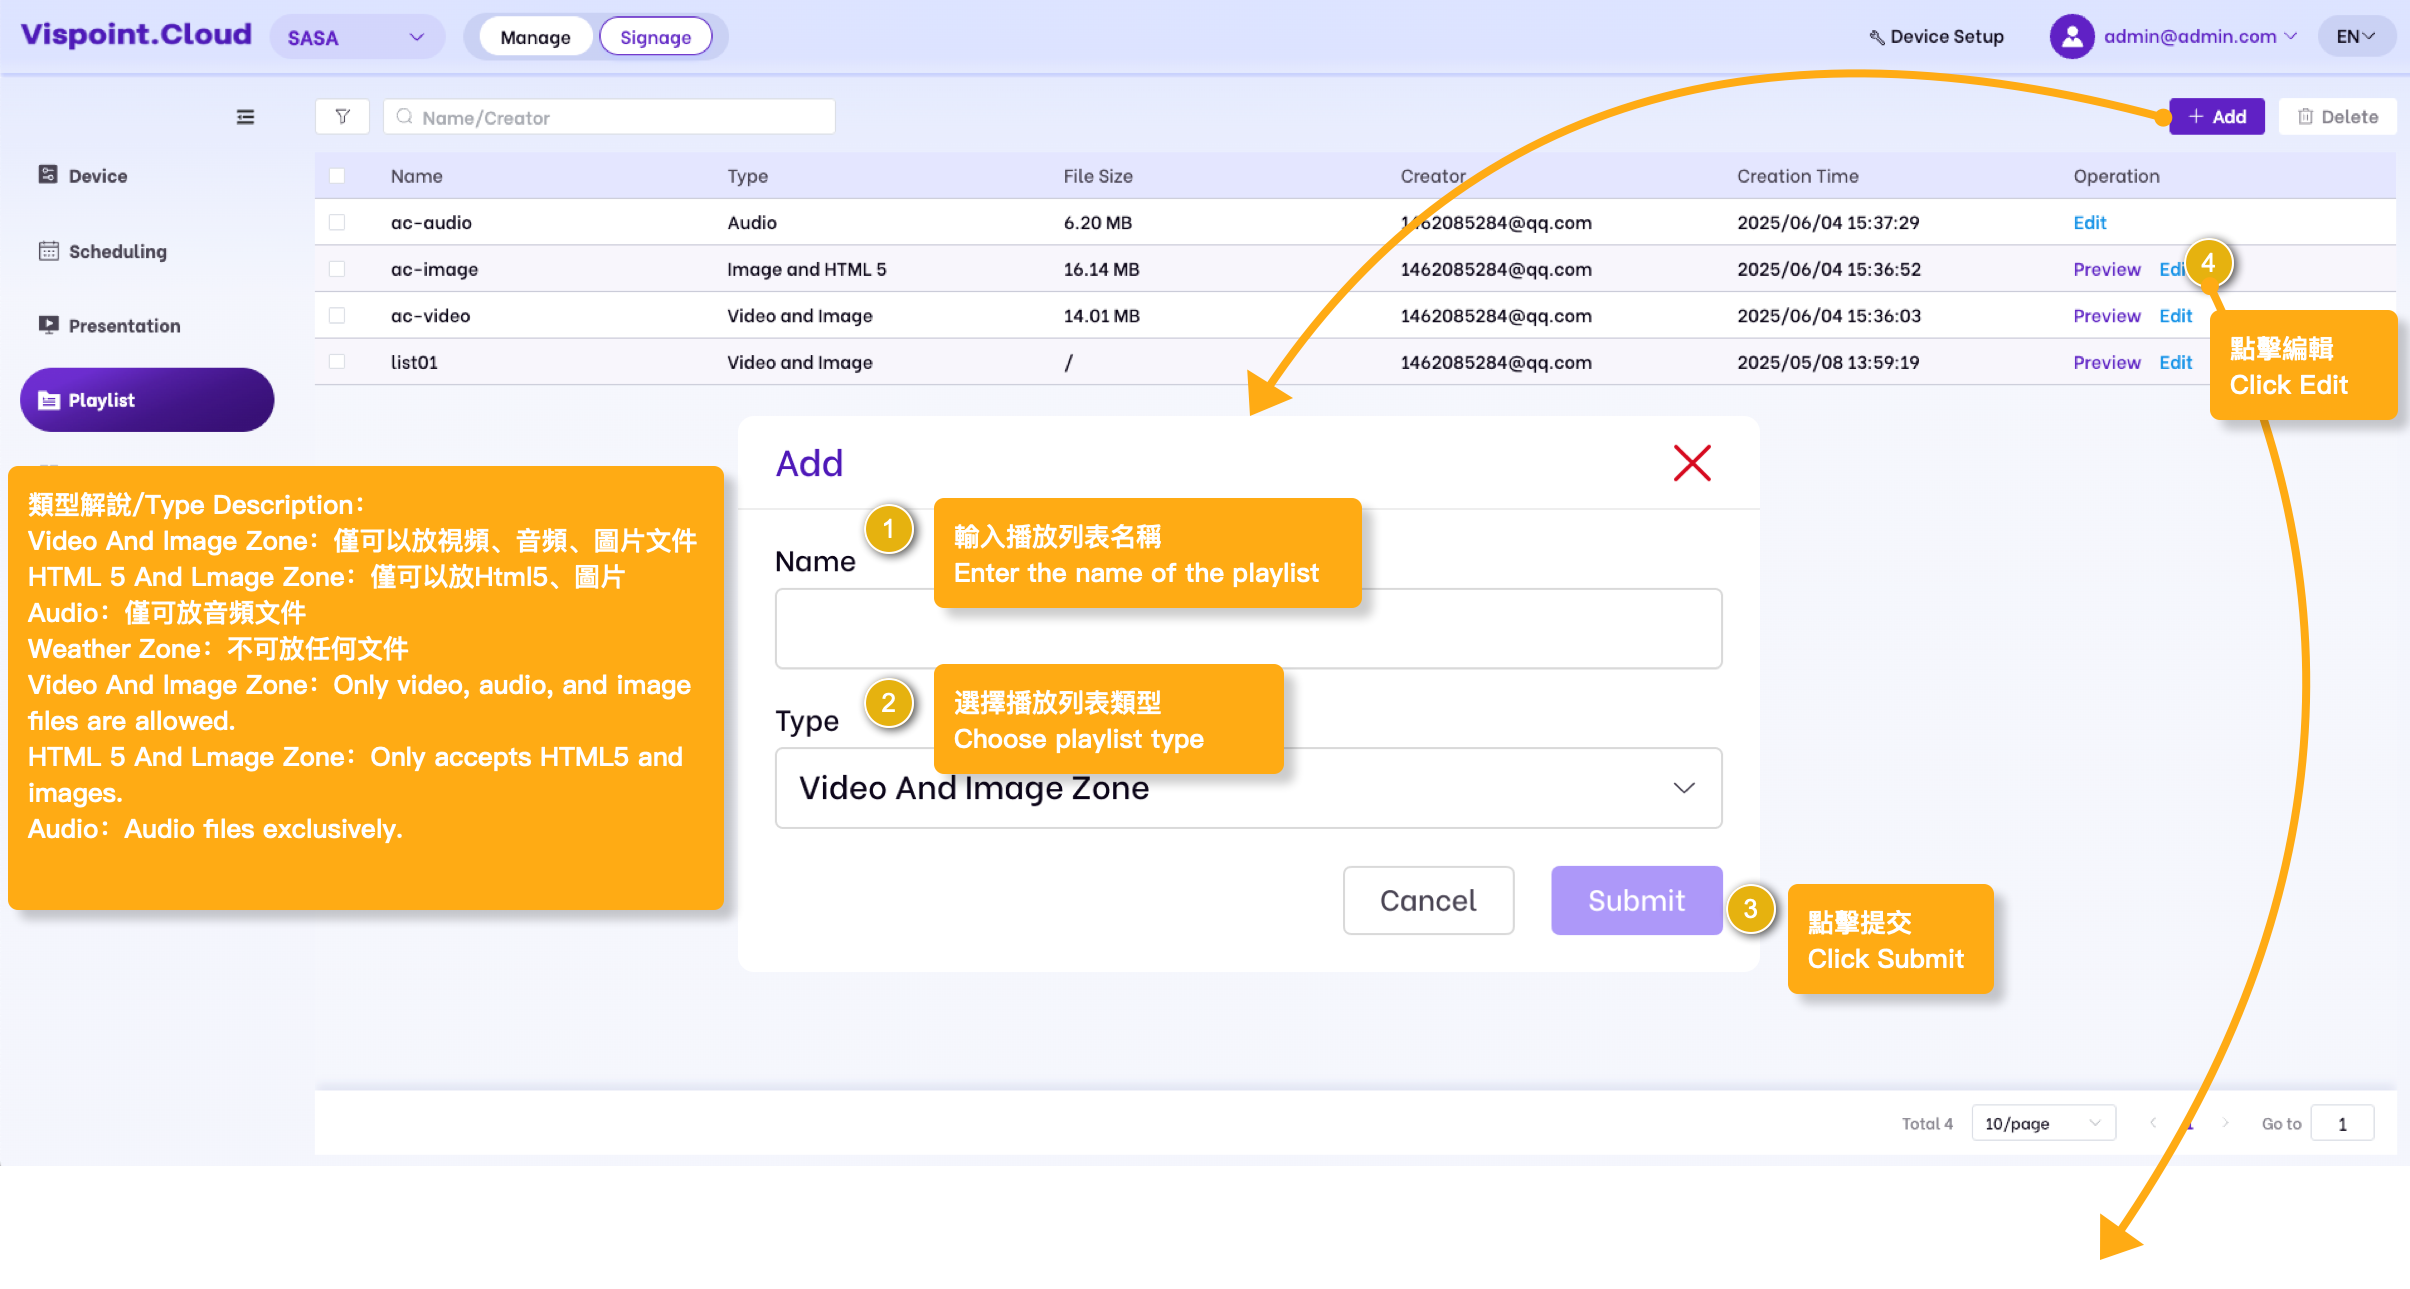
Dynamic Playlists

Add Playlist

Dynamic Playlists allow you to easily update content across multiple presentations within your network. When you modify the playlist inside a Dynamic Playlist, all presentations containing that Dynamic Playlist will receive the changes. This means a single update can be applied across multiple presentations simultaneously.

Adding / Editing / Deleting Dynamic Playlists within the Vispoint.Cloud Platform

  • After a schedule has been approved:Adding, editing, or deleting a playlist within a template schedule will not affect the approved schedule.
  • Before a schedule is approved:Adding, editing, or deleting a playlist within a template schedule will push updates via real-time data synchronization.
  • Prerequisite:You must have the required module permissions to perform these actions.

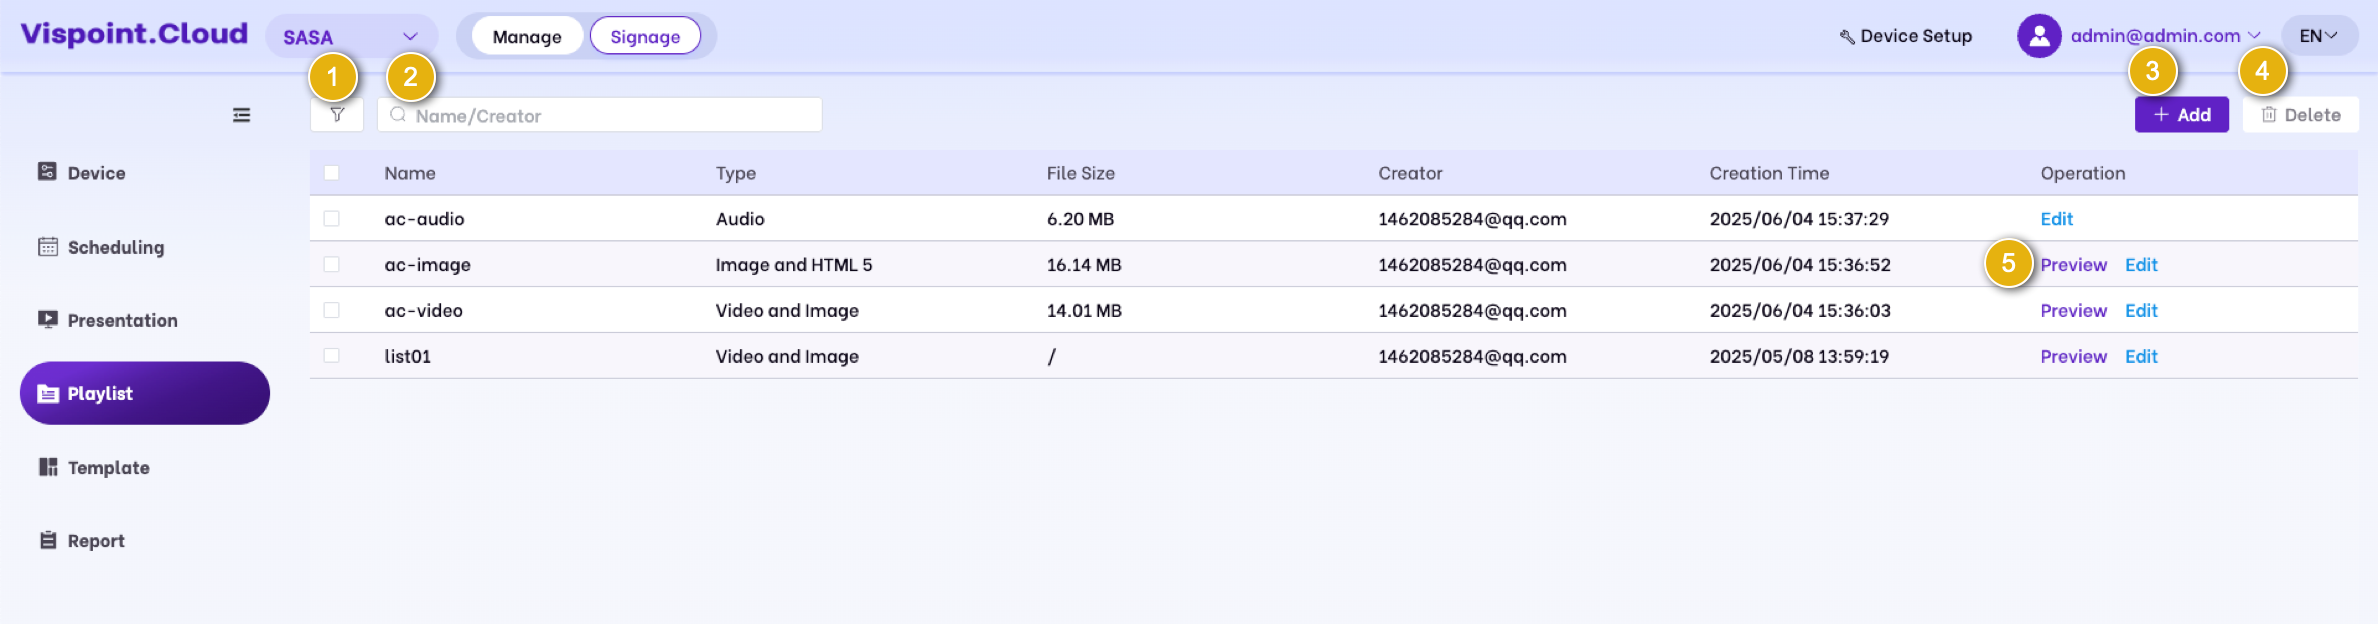
1. Filtering: You can filter the list display based on the creation time.

2. Search: Perform a fuzzy query on the demonstration playlist name and creator keywords to retrieve demonstration data within the list.

3. Add: Click to add, and enter the ‘Add Presentation’ page.

4. Delete: After selecting the devices from the list, click ‘Delete’ and confirm a second time to remove the presentation.

5. Name: The presentation name filled in when adding or editing a demonstration.

6. Preview: Click edit to enter the editing page, where you can make changes.

Template

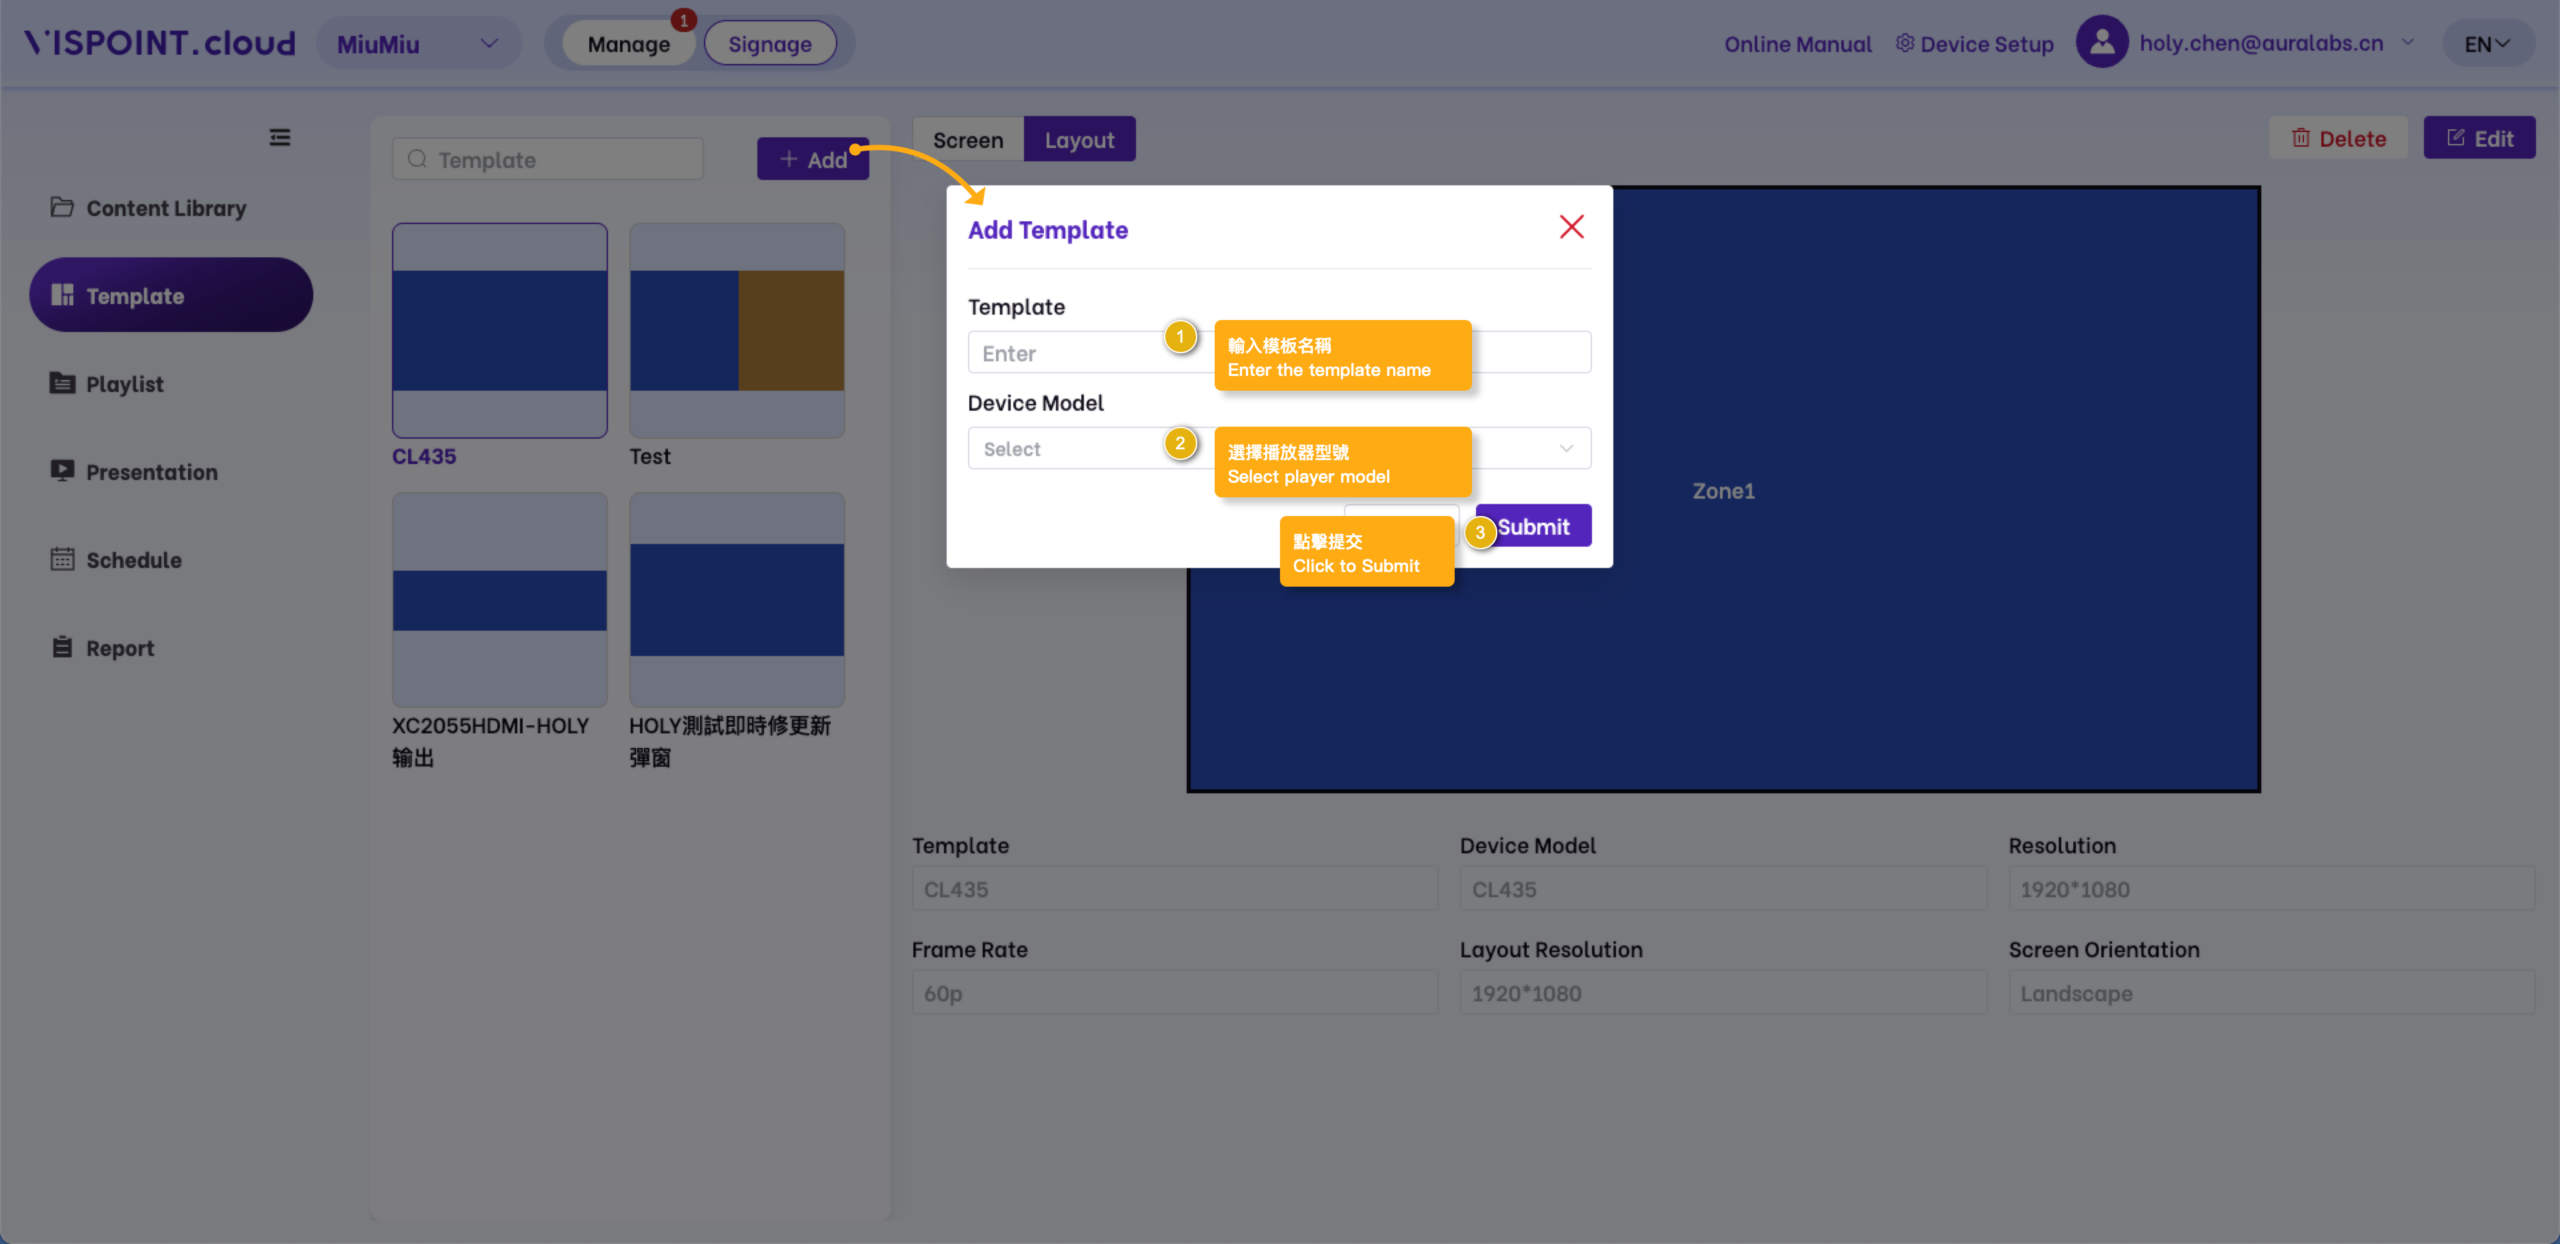
Templates will be used in the “presentation“. 
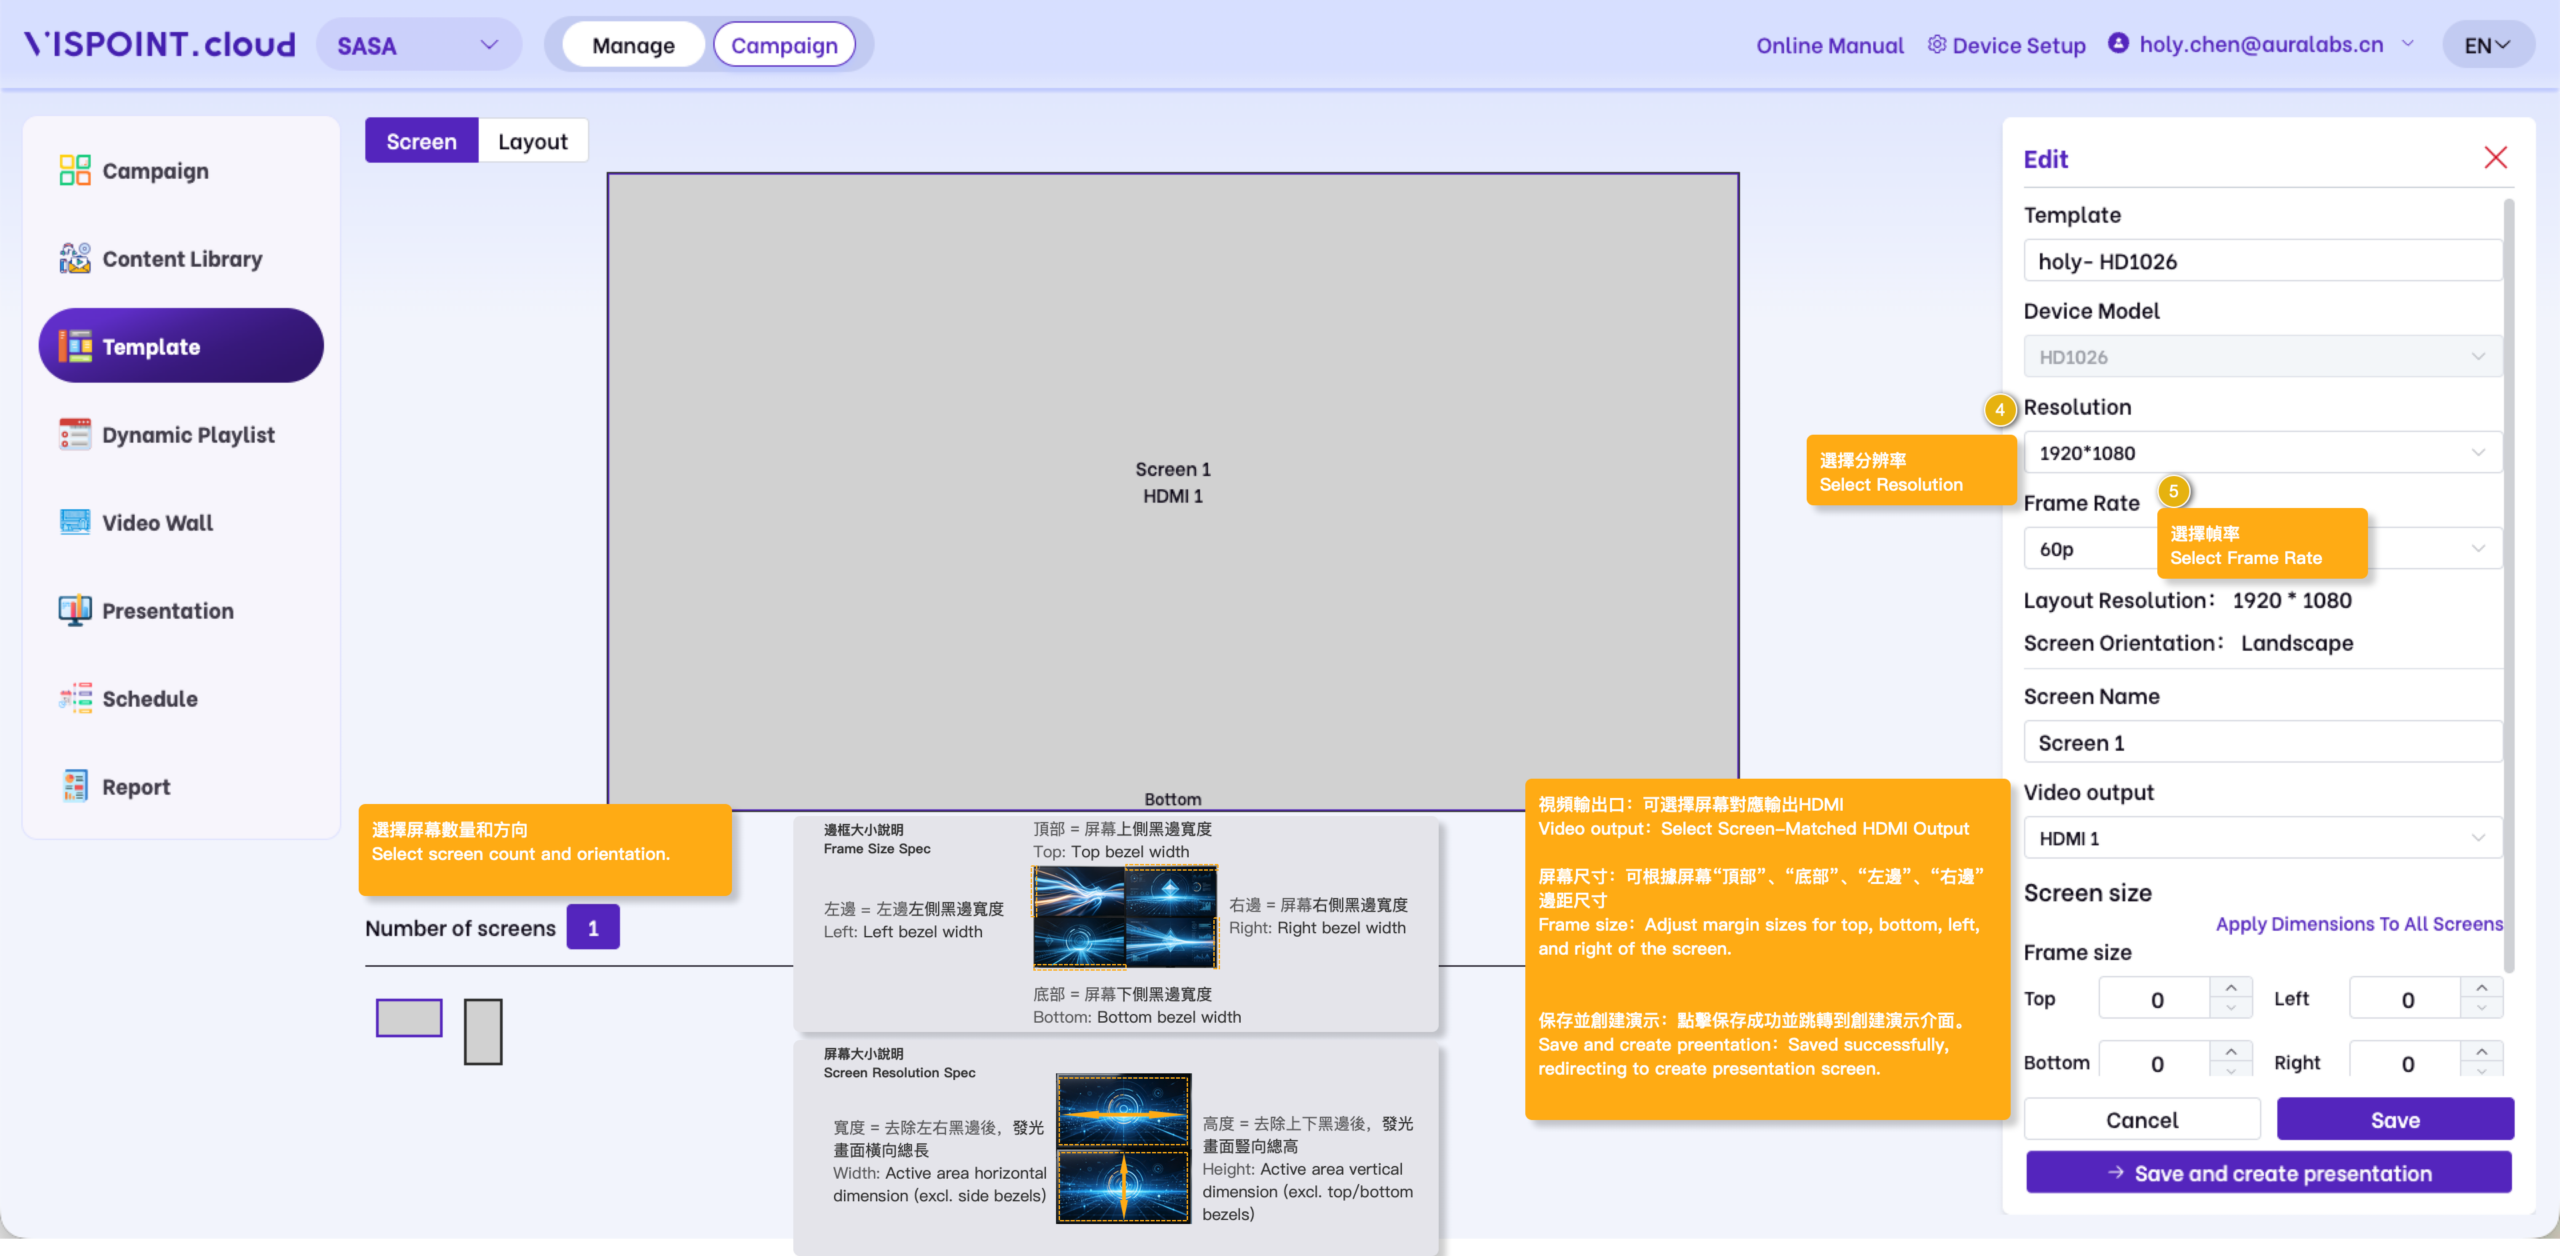
Add/Edit/Delete templates within the Vispoint.cloud platform. 

·Prerequisite: Have permission for this module.

Add Template

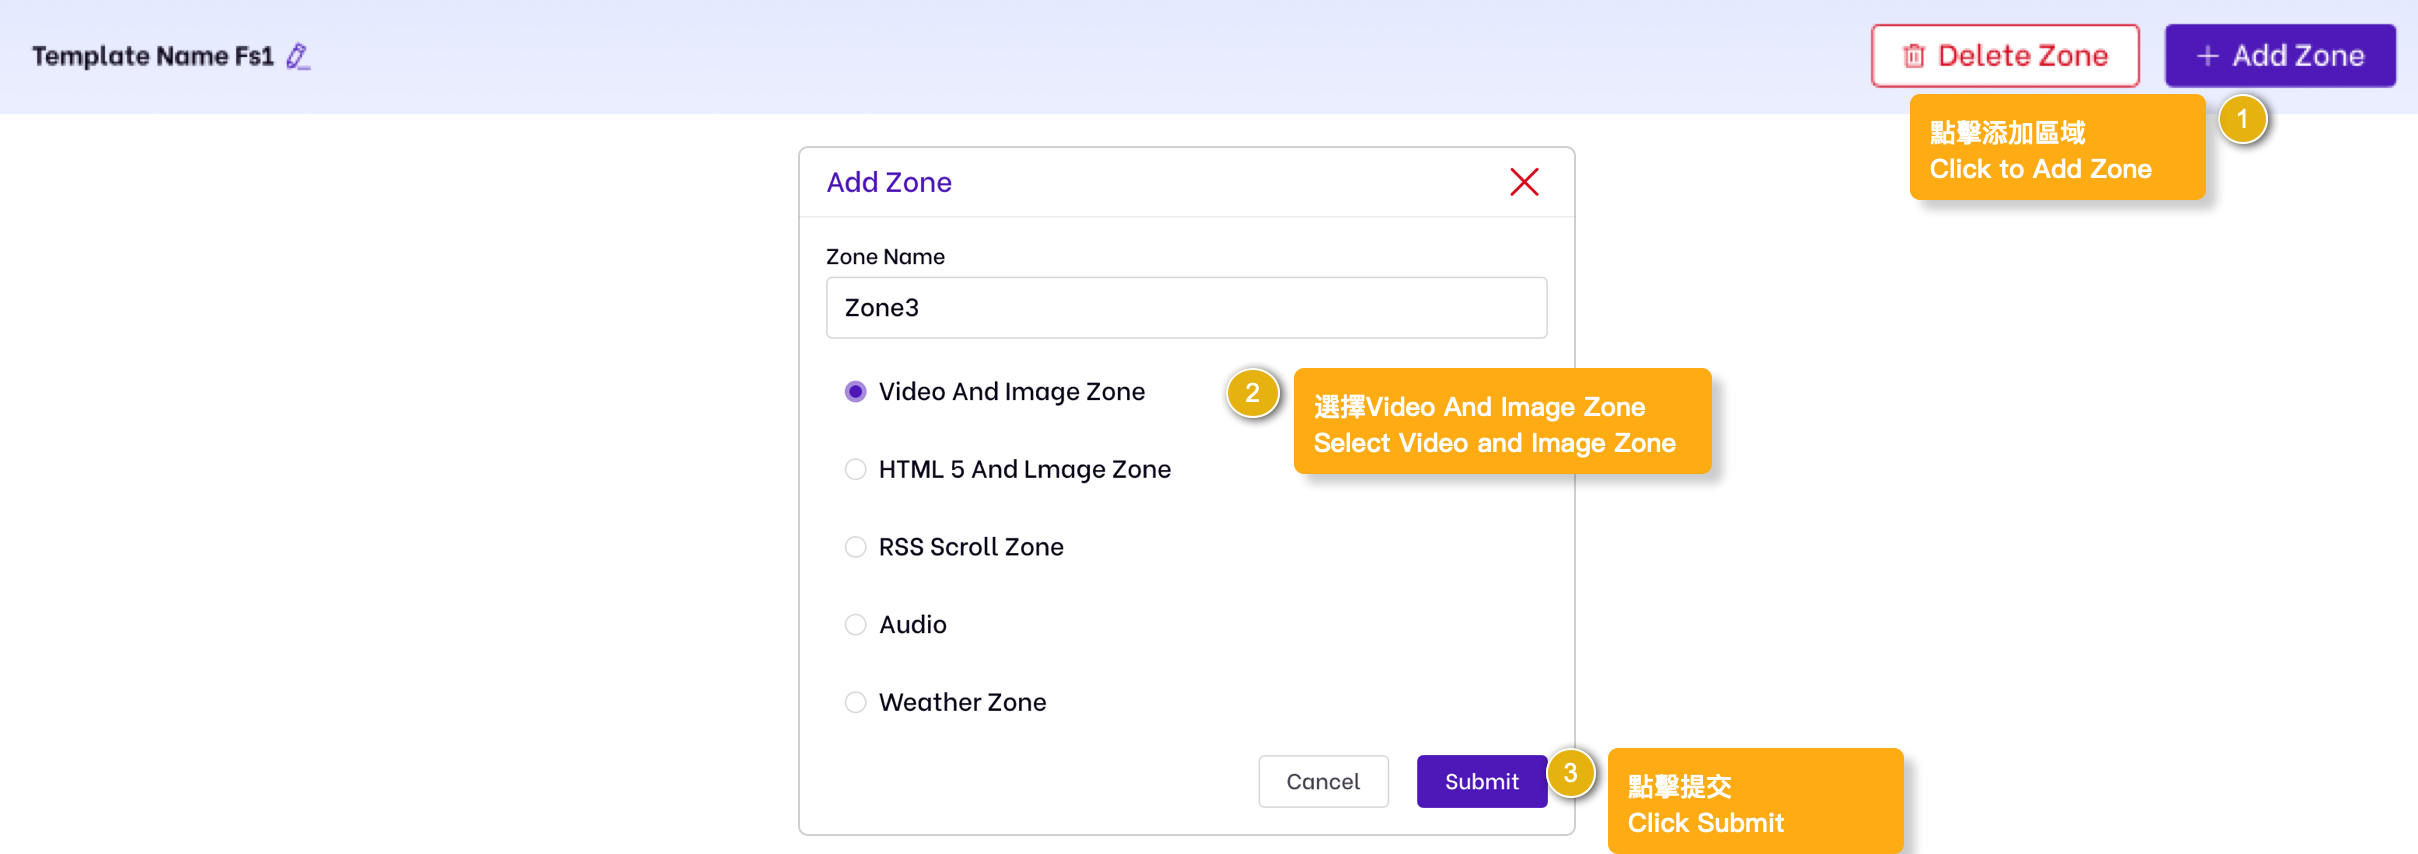
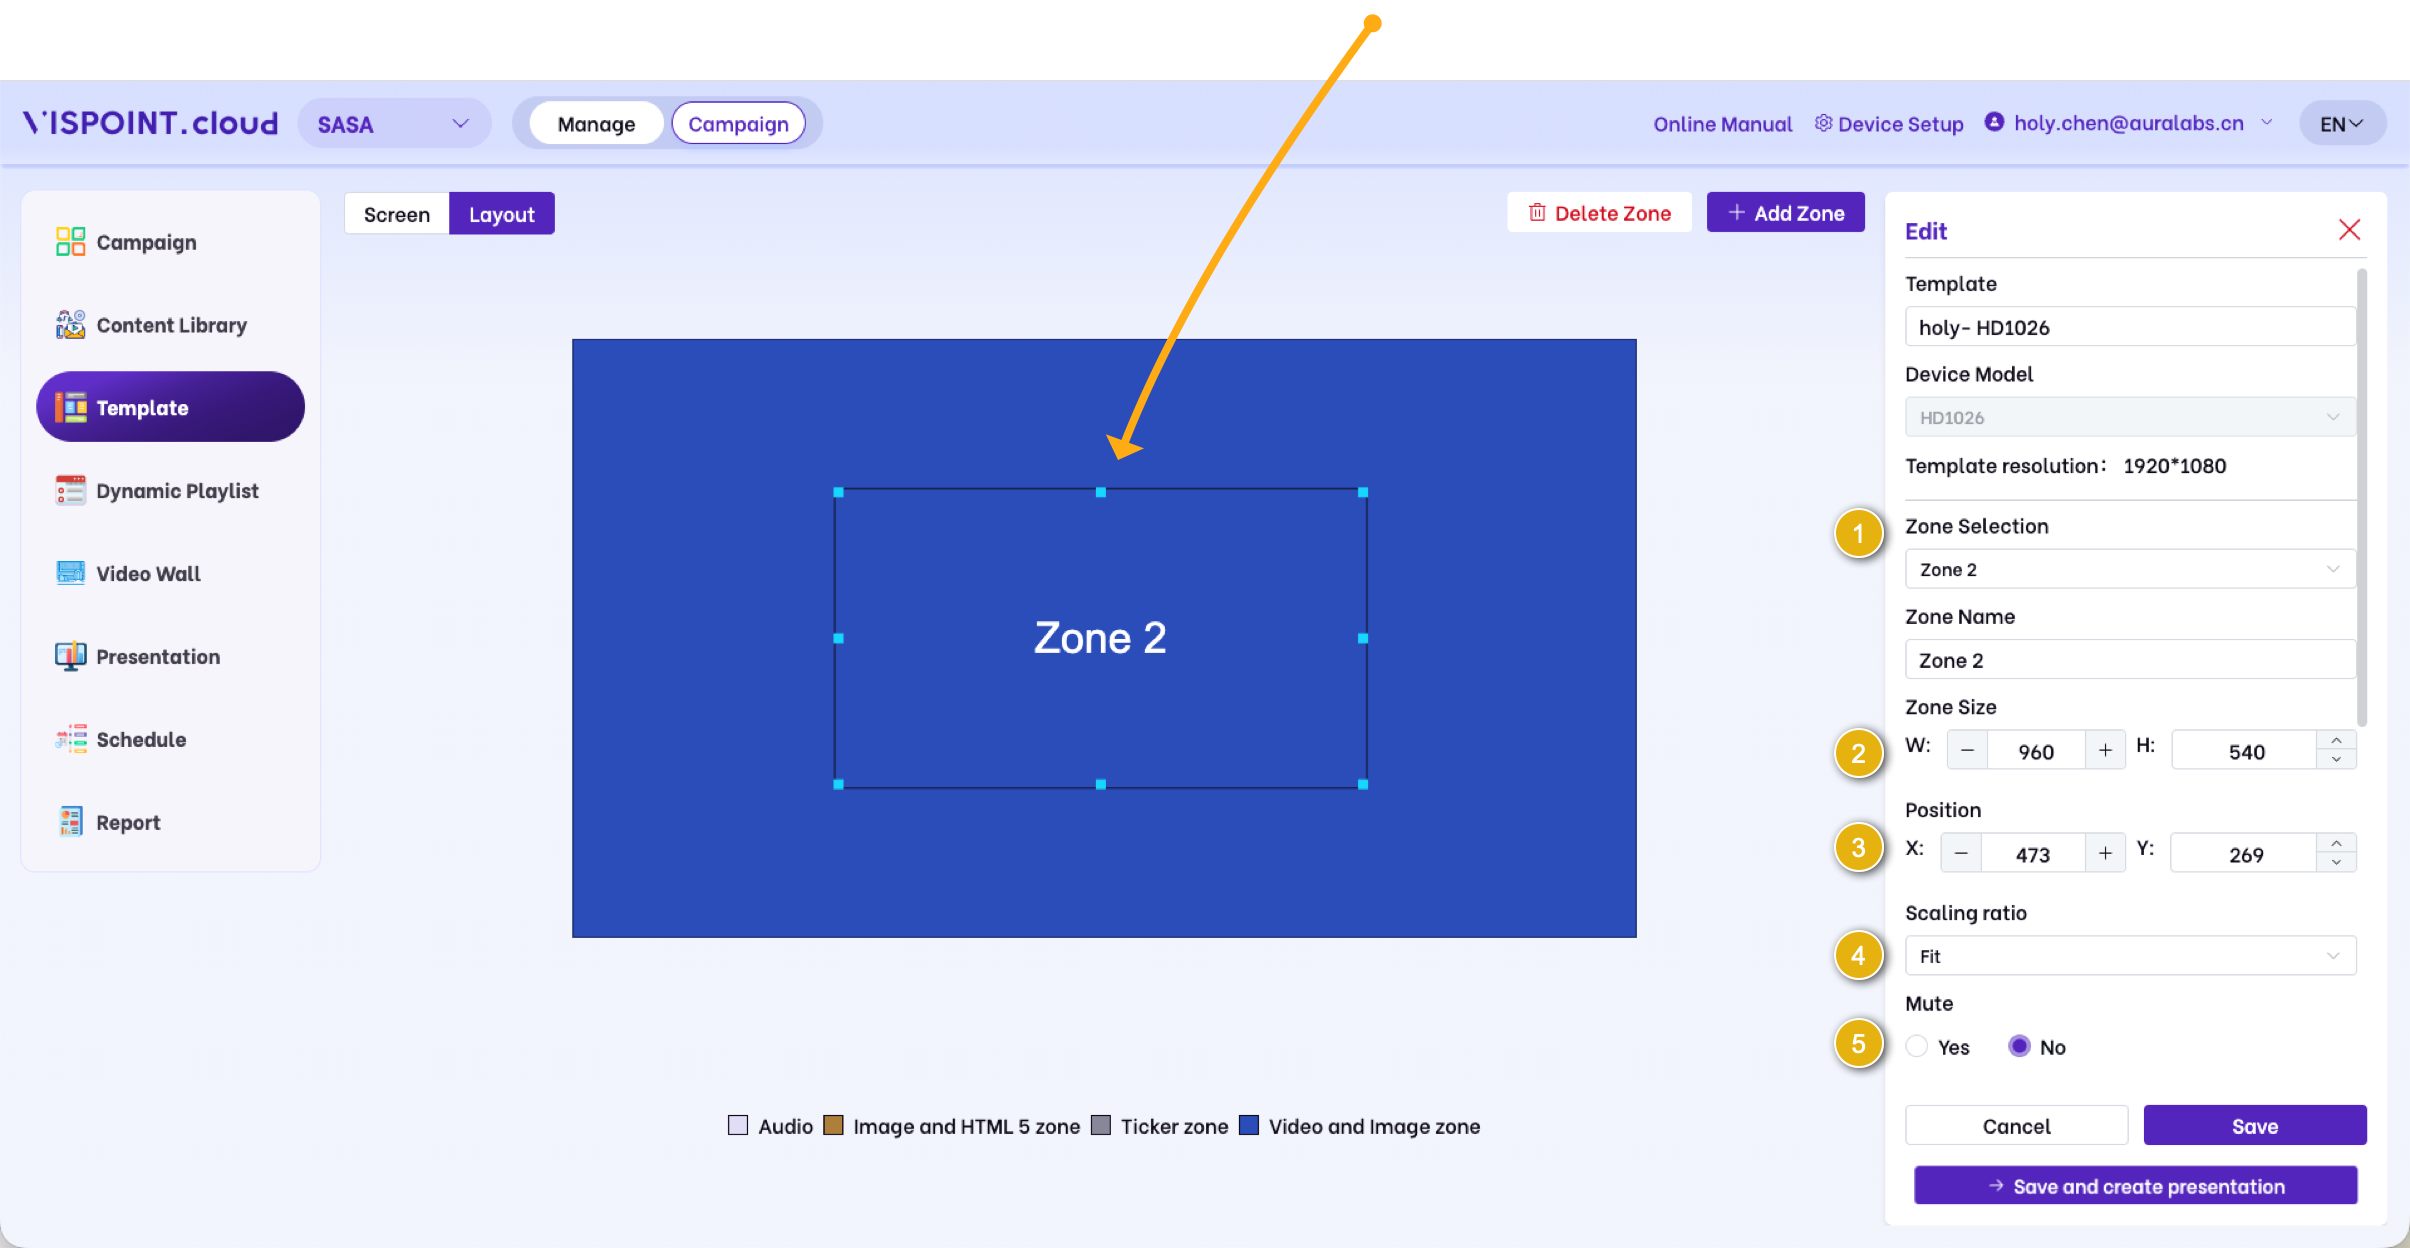
Add Video and lmage Zone

1. Zone Selection: Select the area on the left template, and you can modify the zone name on the right.

2. Zone Width: The selected zone on the left template can have its width and height modified.

3. XY Axis: The selected area on the left template can modify the XY axis position of the zone.

4. Zoom Scale: The default area content is scaled proportionally. You can select from options for fit, fill, crop, and fill.

5. Is it muted: Default is No, can be modified.When set to No, volume and audio playback channel for the audio/video area can be configured.

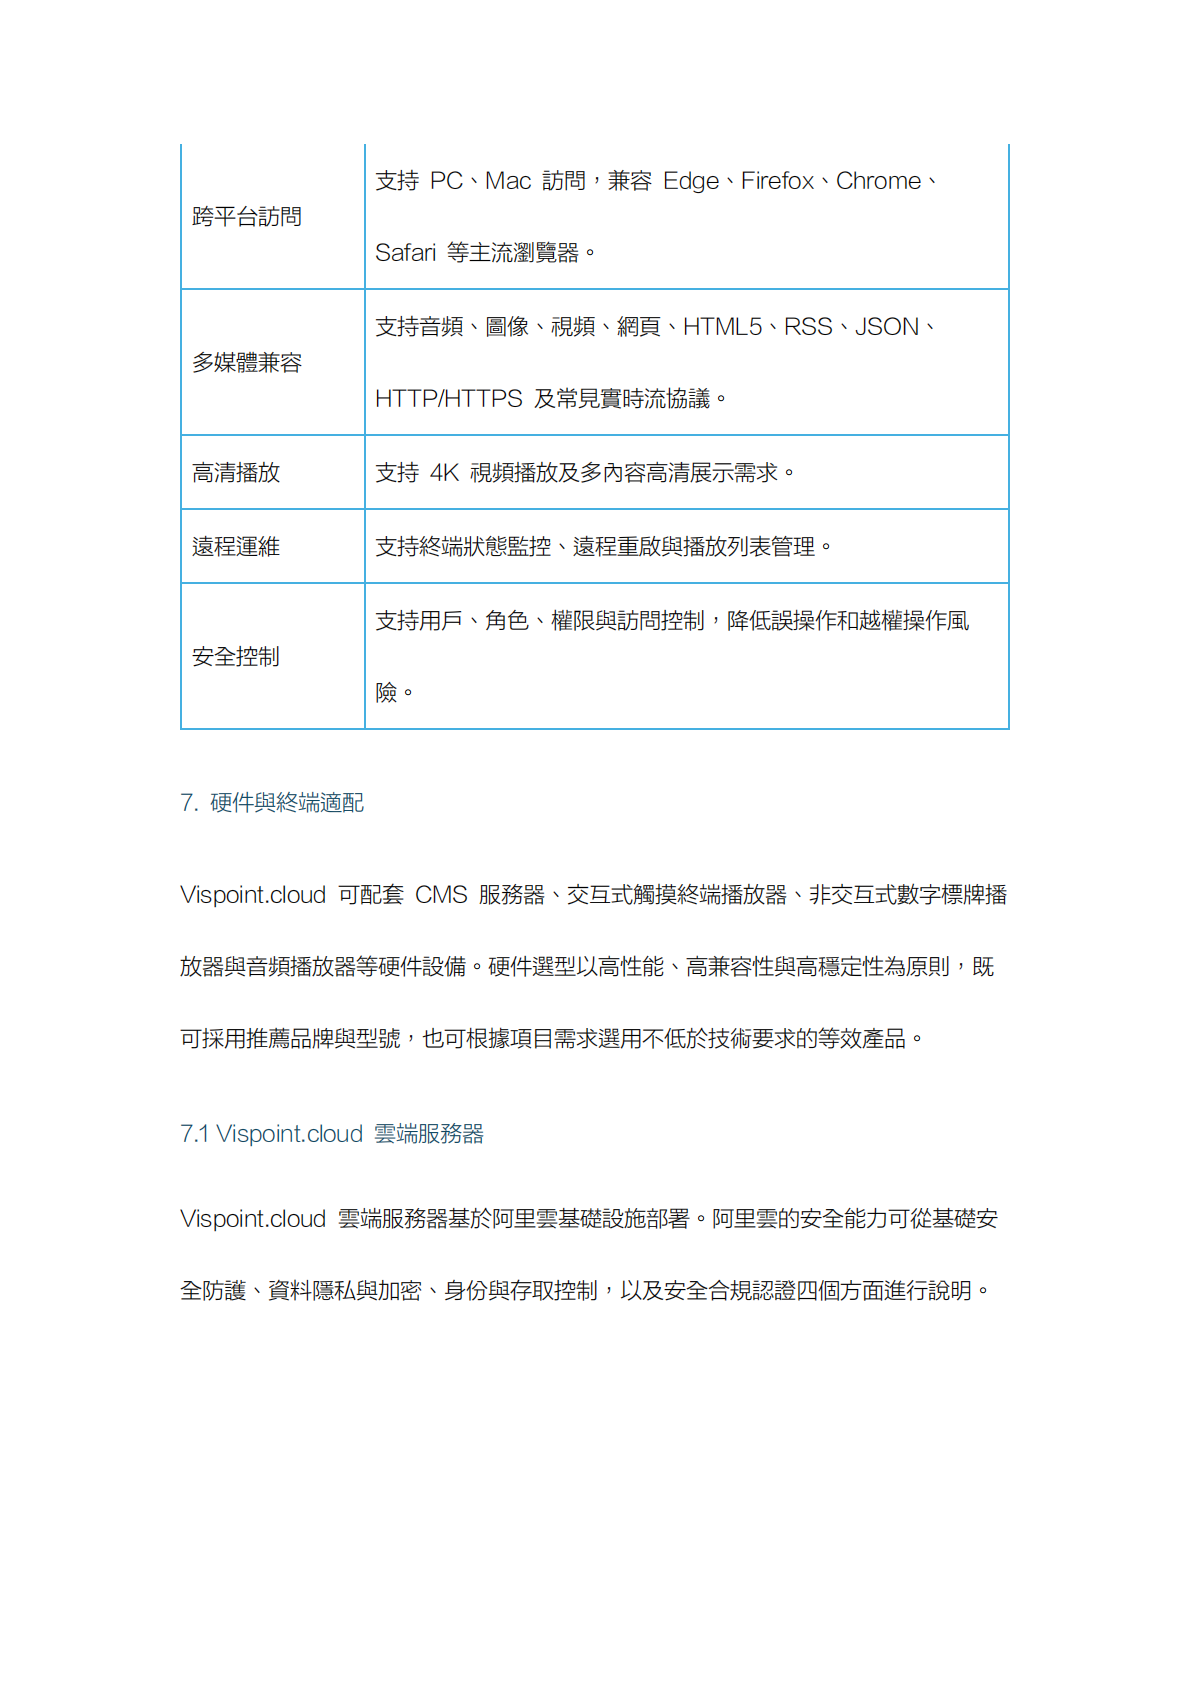
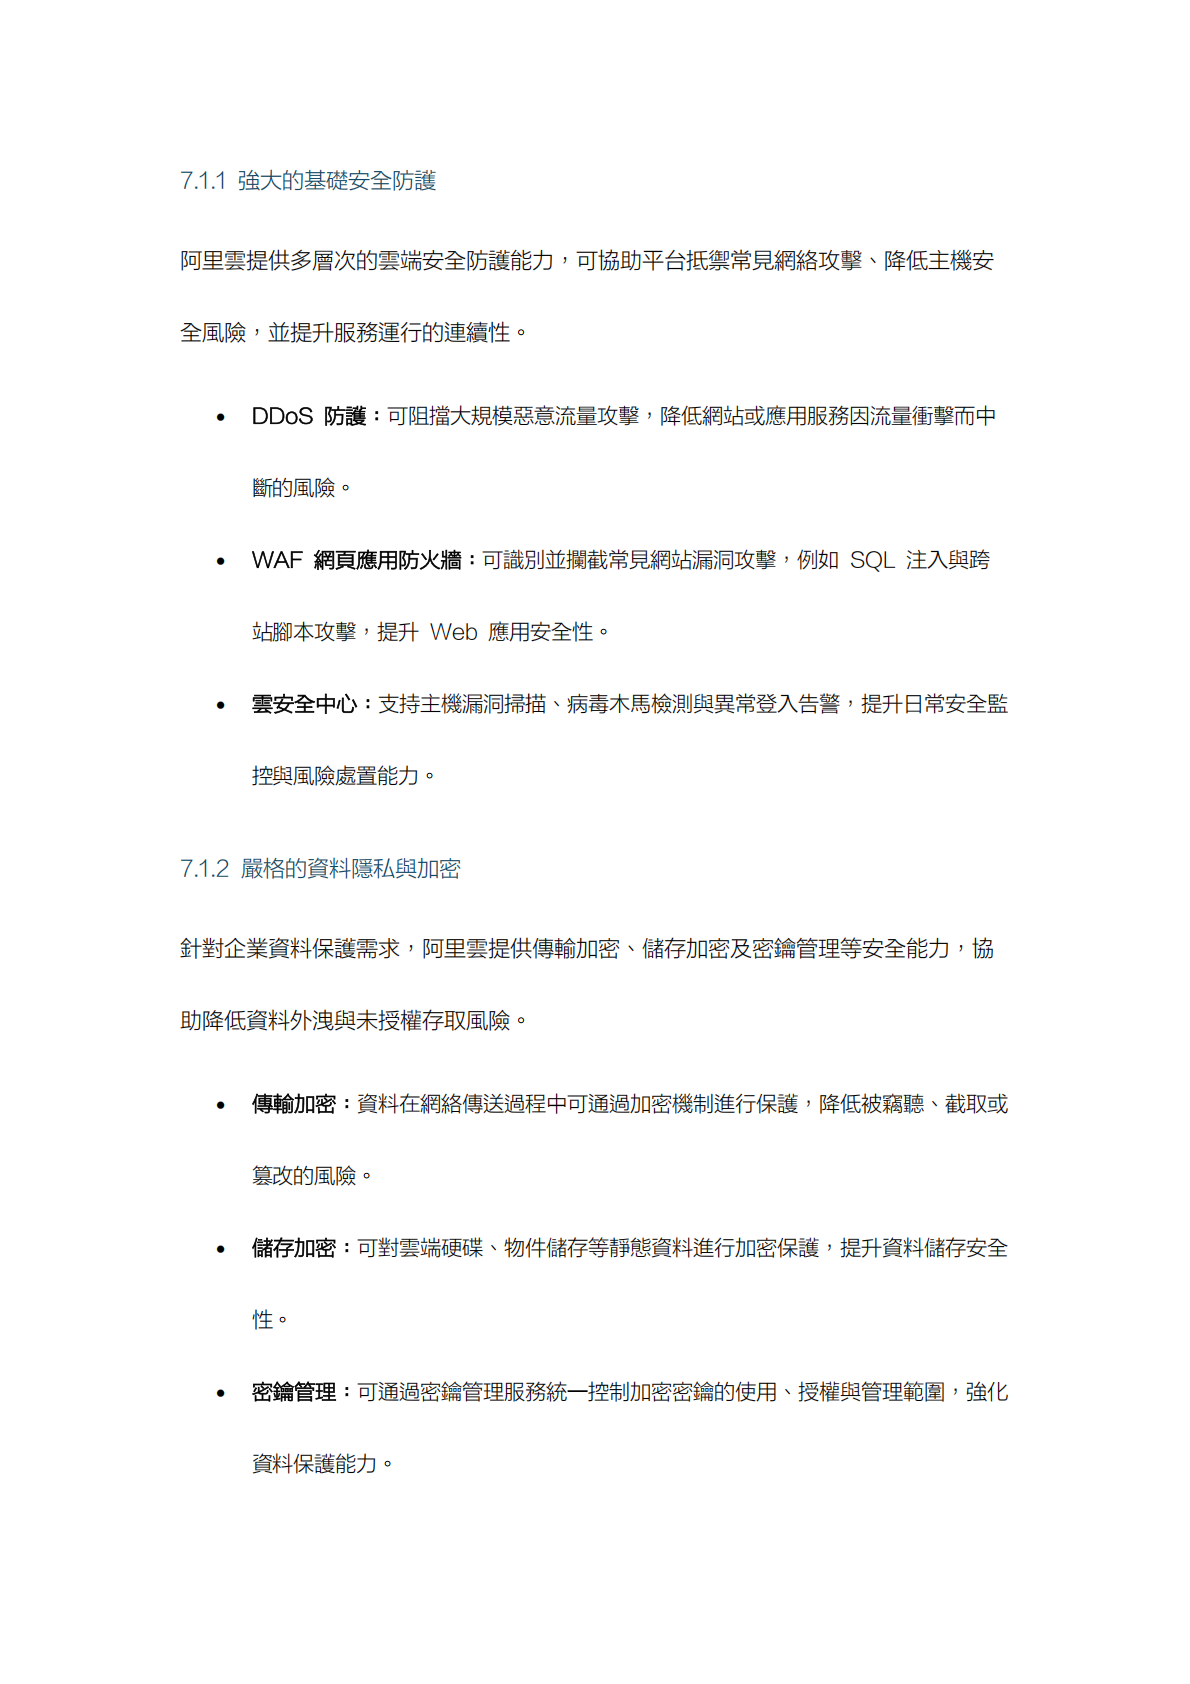
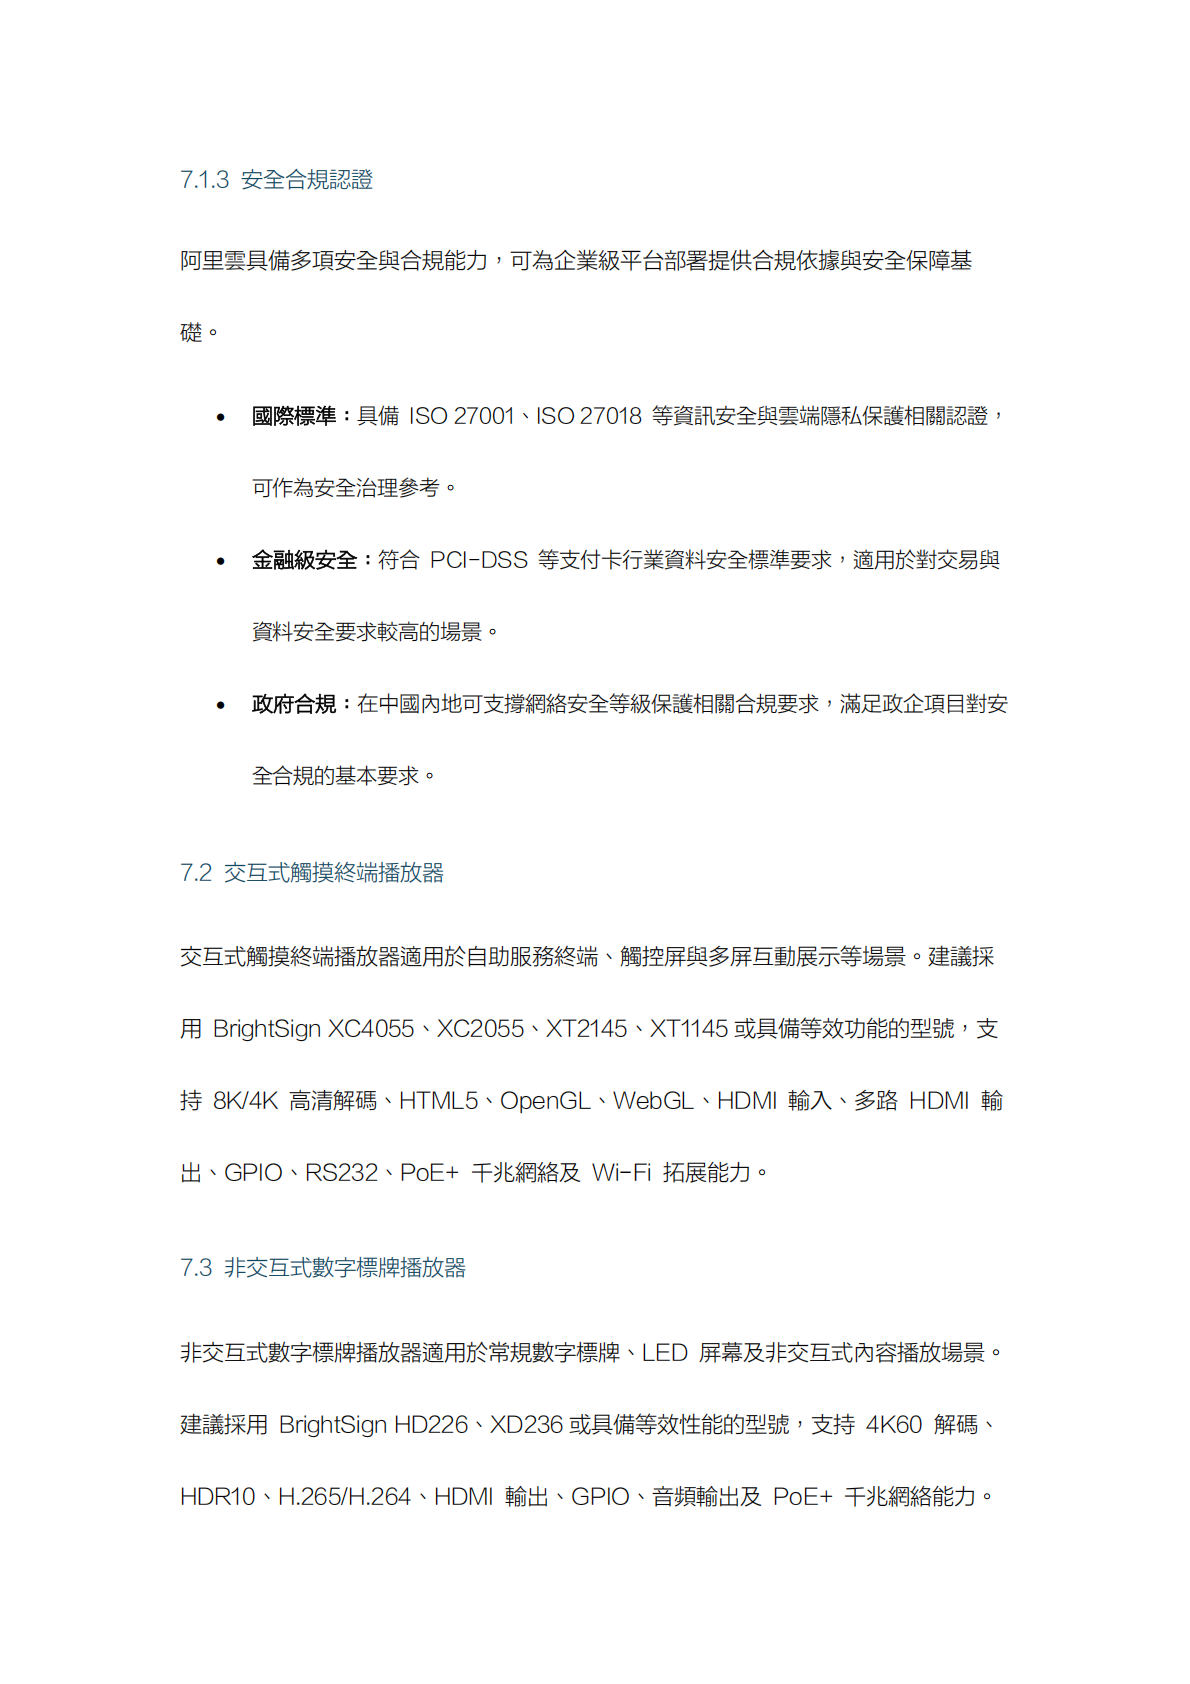
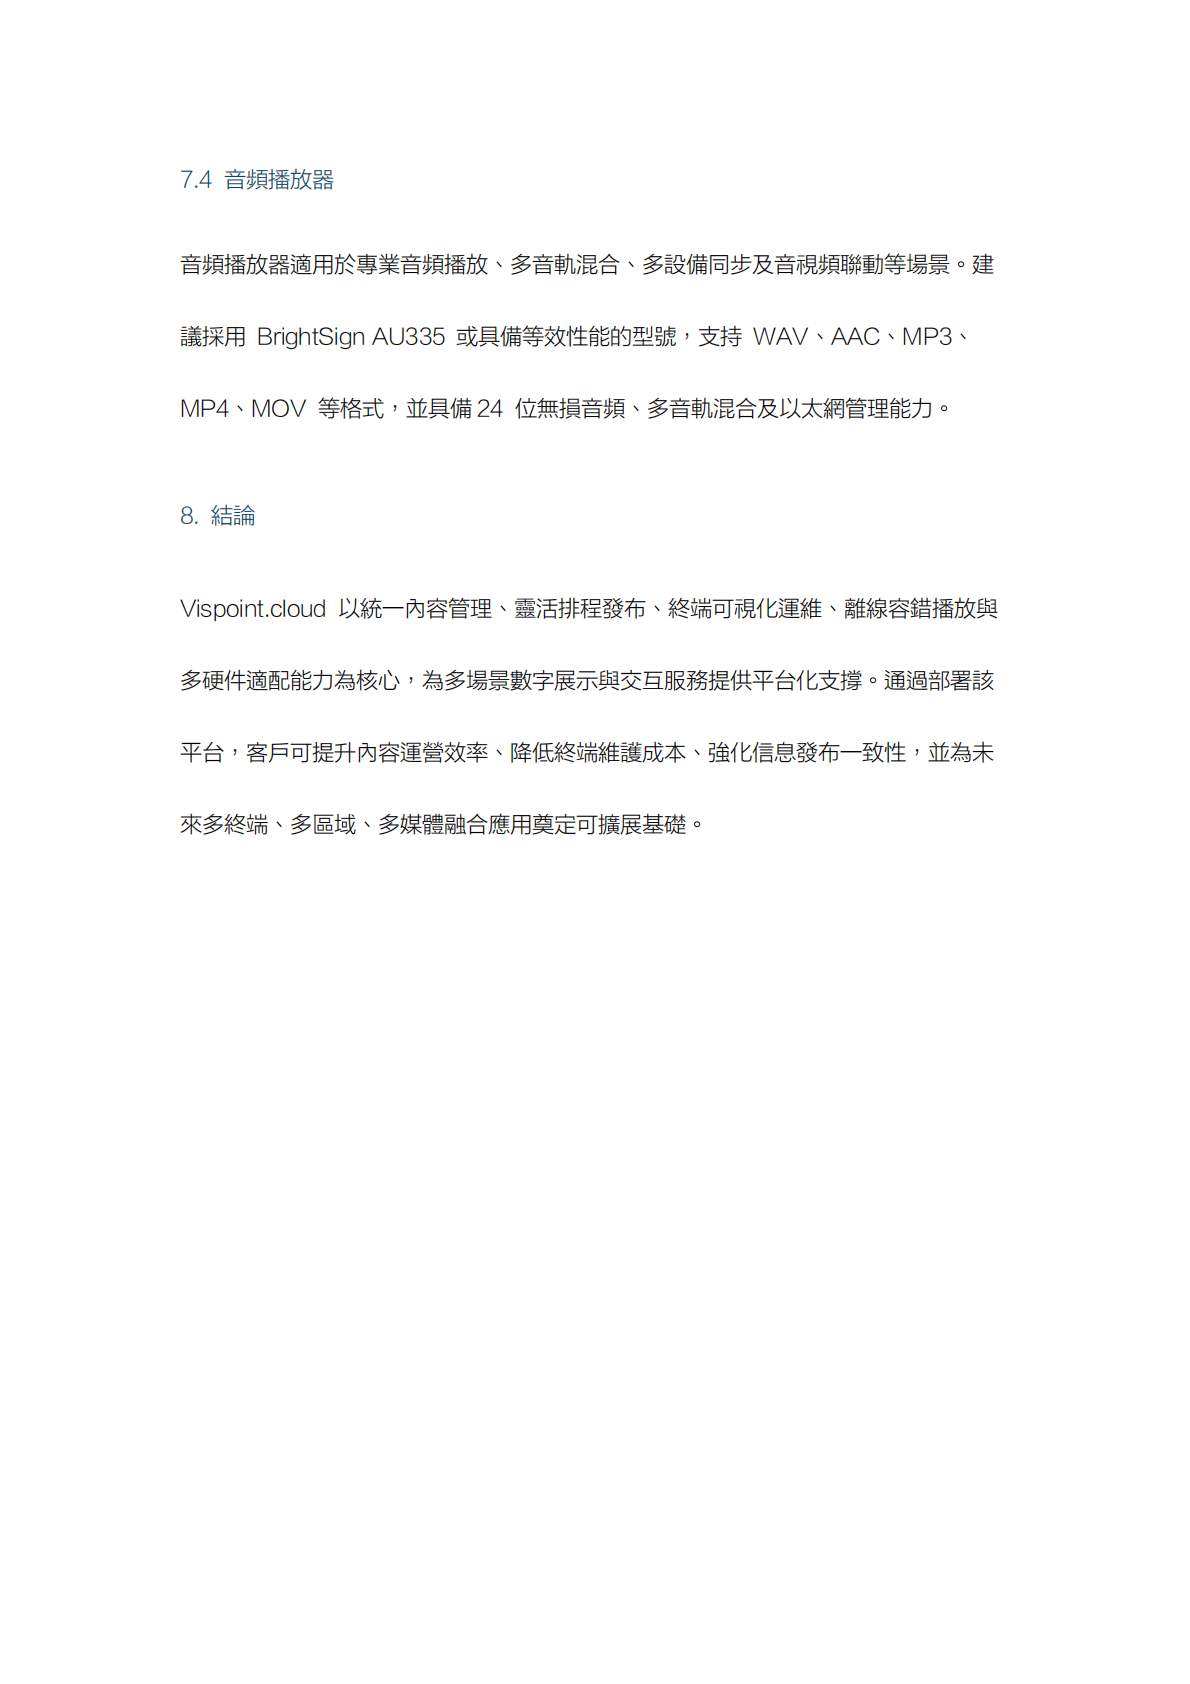
Technical Topics

Technical Specifications

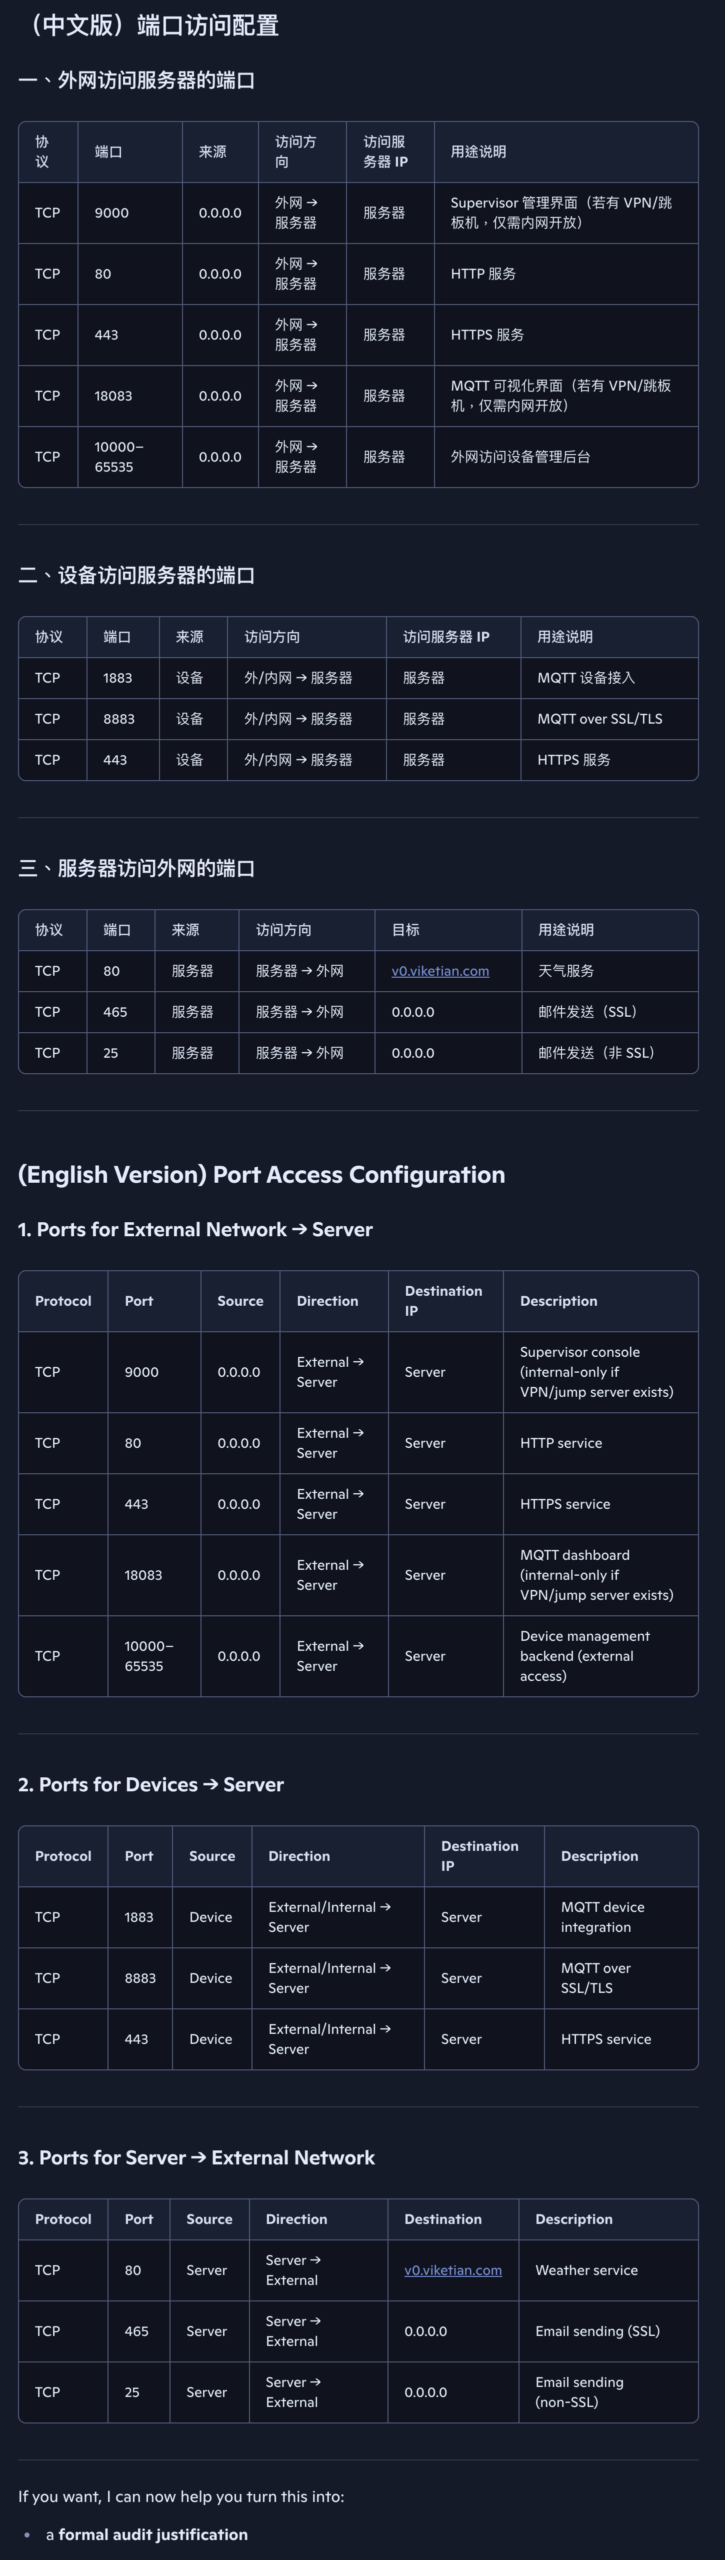
Access Port